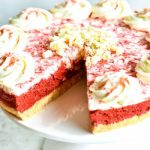
Gluten-Free Red Velvet No Bake Cheesecake
Gluten-Free Red Velvet No-Bake Cheesecake is a lusciously layered dessert. It has the decadent flavor of traditional cheesecake, without all of the fuss.
Servings: 16 slices
Ingredients
Crust:
- 3 cups of crushed Schär Gluten-Free Butter Cookies 3 packages
- 8 tablespoons butter melted
Cheesecake Filling
- 16 oz cream cheese 2-8oz packages, room temperature
- 1 cup powdered sugar
- 1/2 cup sour cream
- 1 envelope Knox gelatine
- 1/4 cup boiling water water
- 1 tablespoon pure vanilla extract
- 1/2 cup heavy whipping cream
- 1 cup gluten-free chocolate chips melted
- 3 tablespoons cocoa powder
- 3 tablespoons gluten-free red food coloring
Instructions
Crust:
- Crush Schär Gluten-Free Butter Cookies in a food processor or by hand, until you have 3 cups of fine cookie crumbs.
- Pour the cookie crumbs into a medium-sized bowl.
- Pour the melted butter into the cookie crumbs and mix until fully combined.
- Line a round 9-inch spring-form pan with parchment paper.
- Press cookie crumb mixture evenly into the bottom of the lined spring-form pan. You can use the back of a measuring cup to help press the cookies crumbs down firmly.
- Cover and refrigerate while making the cheesecake filling.
- Pour the gelatine into a small bowl and add boiling water. Keep stirring until the gelatine is completely dissolved.
- In a large mixing bowl beat the cream cheese and powdered sugar together until smooth.
- Add the sour cream and pure vanilla extract and mix until fully combined.
- Pour the gelatine into the cream cheese mixture and mix until fully combined.
- Add the heavy whipping cream and mix until fully combined and mixture thickens.
- Pour half of the cheesecake filling into a medium sized bowl for the top layer and set aside. (This will be the white top layer.)
- In a medium-sized bowl, melt the chocolate chips in the microwave at 15-second increments, stirring after every 15 seconds until fully combined. Chocolate chips can also be melted in a small saucepan on the stove.
- Pour the melted chocolate chips into the cheesecake filling in the original large bowl. Mix until fully combined. (This will be the red velvet bottom layer.)
- Add the cocoa powder and mix until fully combined.
- Add the red food coloring to the chocolate cheesecake mixture until fully combined. The cheesecake filling will turn really red.
- Put two tablespoons of the red velvet cheesecake filling into a small bowl. Add 1/4 teaspoon of red food coloring to the red velvet cheesecake filling and stir until fully combined. This is for the swirl decoration for the top. (optional)
- Remove the crust from the refrigerator and spoon in the red velvet cheesecake filling to create the bottom layer. Smooth the top with a spatula or the back of a large spoon.
- Spoon the white cream cheese filling over the top of the red velvet cheesecake filling. Smooth the top with a spatula or the back of a large spoon.
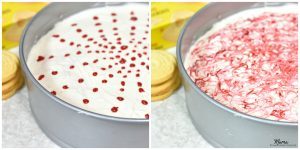
- To create the swirl design, use a toothpick to drop little dots of the red velvet cheesecake filling (with the additional red food coloring mixed in) in a circular pattern. Start by making the drops from the outside of the cake and work your way to the center of the cake. Using a toothpick create a swirl pattern by dragging the toothpick through the red dots. See the example below.
- Cover cheesecake with plastic wrap and refrigerate until firm (about 3 hours). You can put it in the freezer to speed up.
- Once the cheesecake is set, run a knife under hot water, and then along the edge of the springform pan to create a small gap between the pan and the filling before carefully unmolding the cake.
- Top with whipped cream before serving. I also added white chocolate curls.
- Store in an air-tight container in the refrigerator.
- Enjoy!
Notes
Mama says, "Check all of your labels!"
Disclosure: This recipe is sponsored by Schär. The opinions are my own.
Nutrition
Serving: 1slice | Calories: 367kcal | Carbohydrates: 29g | Protein: 3g | Fat: 26g | Saturated Fat: 16g | Cholesterol: 75mg | Sodium: 213mg | Potassium: 69mg | Fiber: 1g | Sugar: 20g | Vitamin A: 735IU | Vitamin C: 0.2mg | Calcium: 56mg | Iron: 0.4mg