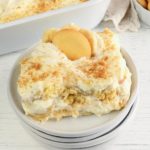
Gluten-Free Banana Pudding
An easy recipe for gluten-free banana pudding. This classic dessert has layers of gluten-free vanilla wafer cookies, sliced bananas, and a creamy vanilla pudding. It’s an easy no-bake gluten-free dessert!
Servings: 16 servings
Ingredients
- 1 5-oz box gluten-free instant vanilla pudding mix
- 2 cups whole milk See notes for a dairy-free option.
- 1 8-oz cream cheese, softened See notes for a dairy-free option.
- 1 14-oz can sweetened condensed milk See notes for a dairy-free option.
- 2 1/2 cups heavy whipping cream You can use a 12-oz container of Cool Whip in place of the homemade whipped cream. See notes for a dairy-free option.
- 1 teaspoon pure vanilla extract
- 1/2 cup powdered sugar
- 6-8 medium bananas, sliced 1/4-inch thick Use just barely ripe bananas. If the bananas are ripe or have spots, they will be too mushy by the time the putting sets up. You can toss the sliced bananas in lemon juice to slow down their browning.
- 2 6-oz boxes gluten-free vanilla wafers I like Kinnikinnick Vanilla Wafers. I buy them from Walmart.
Instructions
- Use an electric or stand-up mixer when making the pudding, cream cheese mixture, and homemade whipped cream. You don’t have to wash the beaters between steps because they will all be mixed together.
Pudding Step:
- In a medium-sized bowl, combine the whole milk and pudding mix and blend well using an electric mixer until smooth. Set aside to thicken.
Cream Cheese Step:
- In a different large bowl, combine the cream cheese and sweetened condensed milk together with an electric mixer and mix until smooth.
Whipped Cream Step:
- In a medium-sized bowl, whip together the heavy whipping cream, pure vanilla extract, and powdered sugar with an electric mixer until smooth and firm.
Pudding Mixture Step:
- Add the vanilla pudding to the cream cheese mixture and stir until well blended.
- Fold the whipped cream into the pudding and cream cheese mixture.
Layering Step:
- Line the bottom of a 9 × 13-inch dish with the gluten-free vanilla wafers
- Add a layer of the sliced bananas on top of the gluten-free vanilla wafers.
- Pour half of the pudding mixture over the first layer of gluten-free vanilla wafers and sliced bananas. Use a spatula to smooth the top of the pudding mixture.
- Cover the pudding mixture with the remaining gluten-free vanilla wafers and sliced bananas.
- Pour the remaining pudding mixture over the second layer of gluten-free vanilla wafers and sliced bananas. Use a spatula to smooth the top of the pudding mixture.
- Cover with plastic wrap and place in the refrigerator to chill for at least 4 hours.
- When ready to serve, garnish with more whipped cream, gluten-free vanilla wafers, banana slices, or wafer crumbs.
- Store leftovers covered in the refrigerator.
Video
Notes
Dairy-Free Option: The pudding will not be thick or firm like the traditional recipe made with dairy. The pudding texture is very soft, but it tastes amazing.
- For the dairy-free pudding, you will need to use the Jell-O Cook & Serve vanilla pudding. Dairy-free milk will not work with instant pudding.
- You will also use only 1 ½ cups of dairy-free milk to make the pudding. I recommend unsweetened almond milk. Soy milk is not recommended for Jell-O pudding mix.
- I buy dairy-free sweetened condensed coconut milk (11.6-ounce) from Walmart.
- I like Kite Hill dairy-free cream cheese.
- I use the 9-ounce So Delicious Cocowhip in place of the homemade whipped cream/Cool Whip.
- Kinnikinnick gluten-free vanilla wafers are also dairy-free.
Nutrition
Serving: 1serving | Calories: 201kcal | Carbohydrates: 17g | Protein: 3g | Fat: 15g | Saturated Fat: 9g | Polyunsaturated Fat: 1g | Monounsaturated Fat: 4g | Cholesterol: 46mg | Sodium: 23mg | Potassium: 240mg | Fiber: 1g | Sugar: 12g | Vitamin A: 625IU | Vitamin C: 4mg | Calcium: 65mg | Iron: 1mg