Gluten-Free Cherry Pie
Published
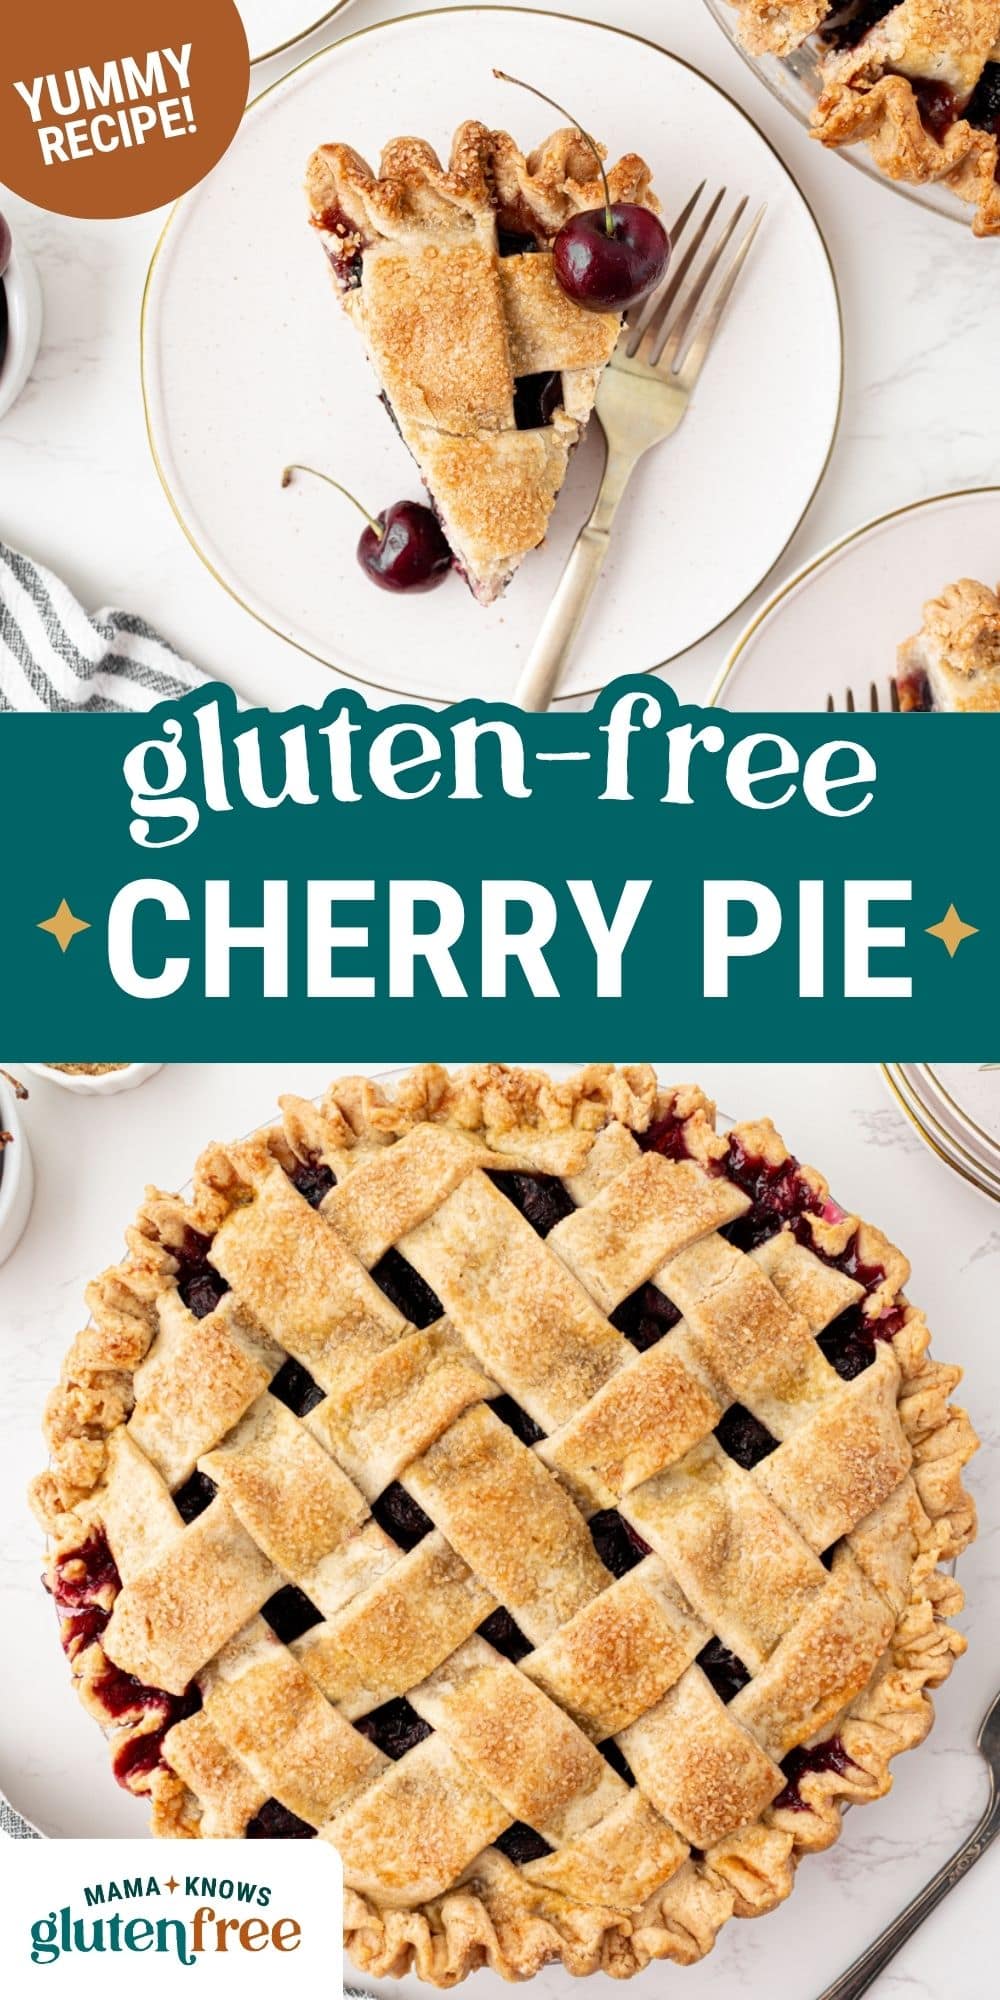
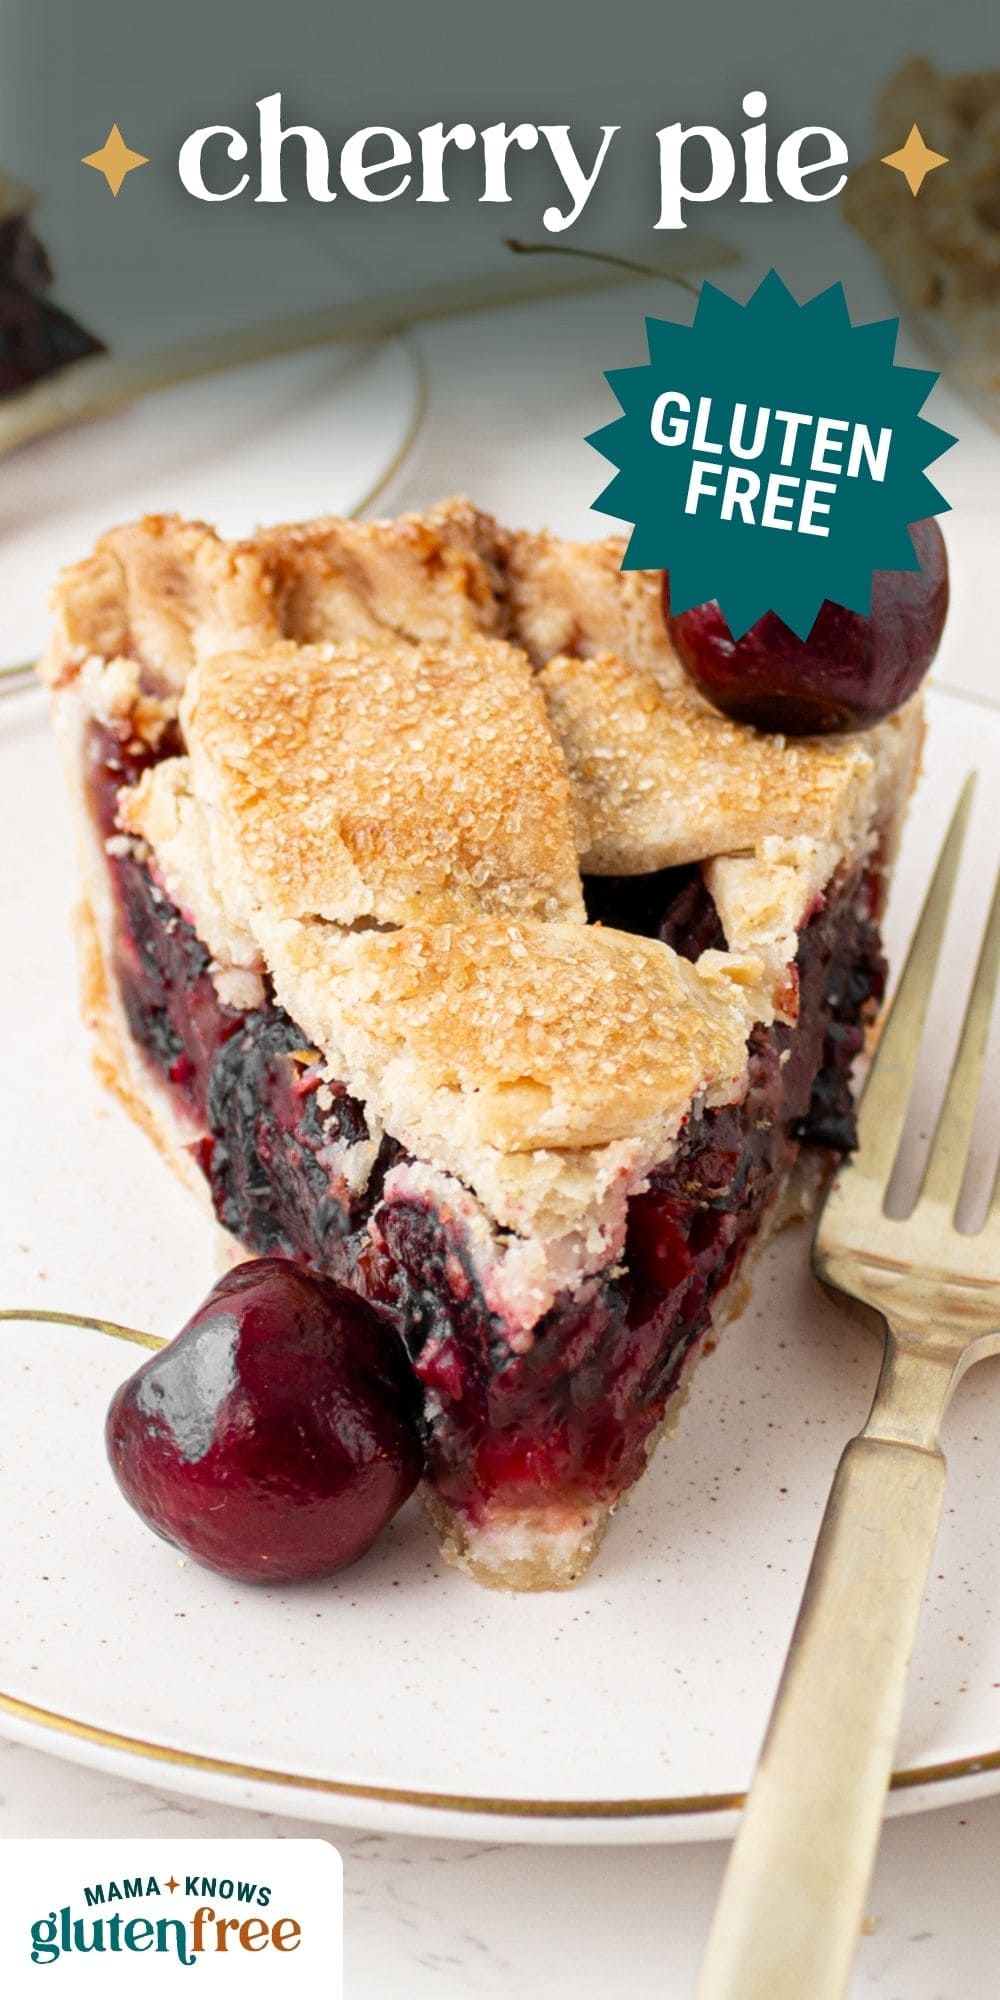
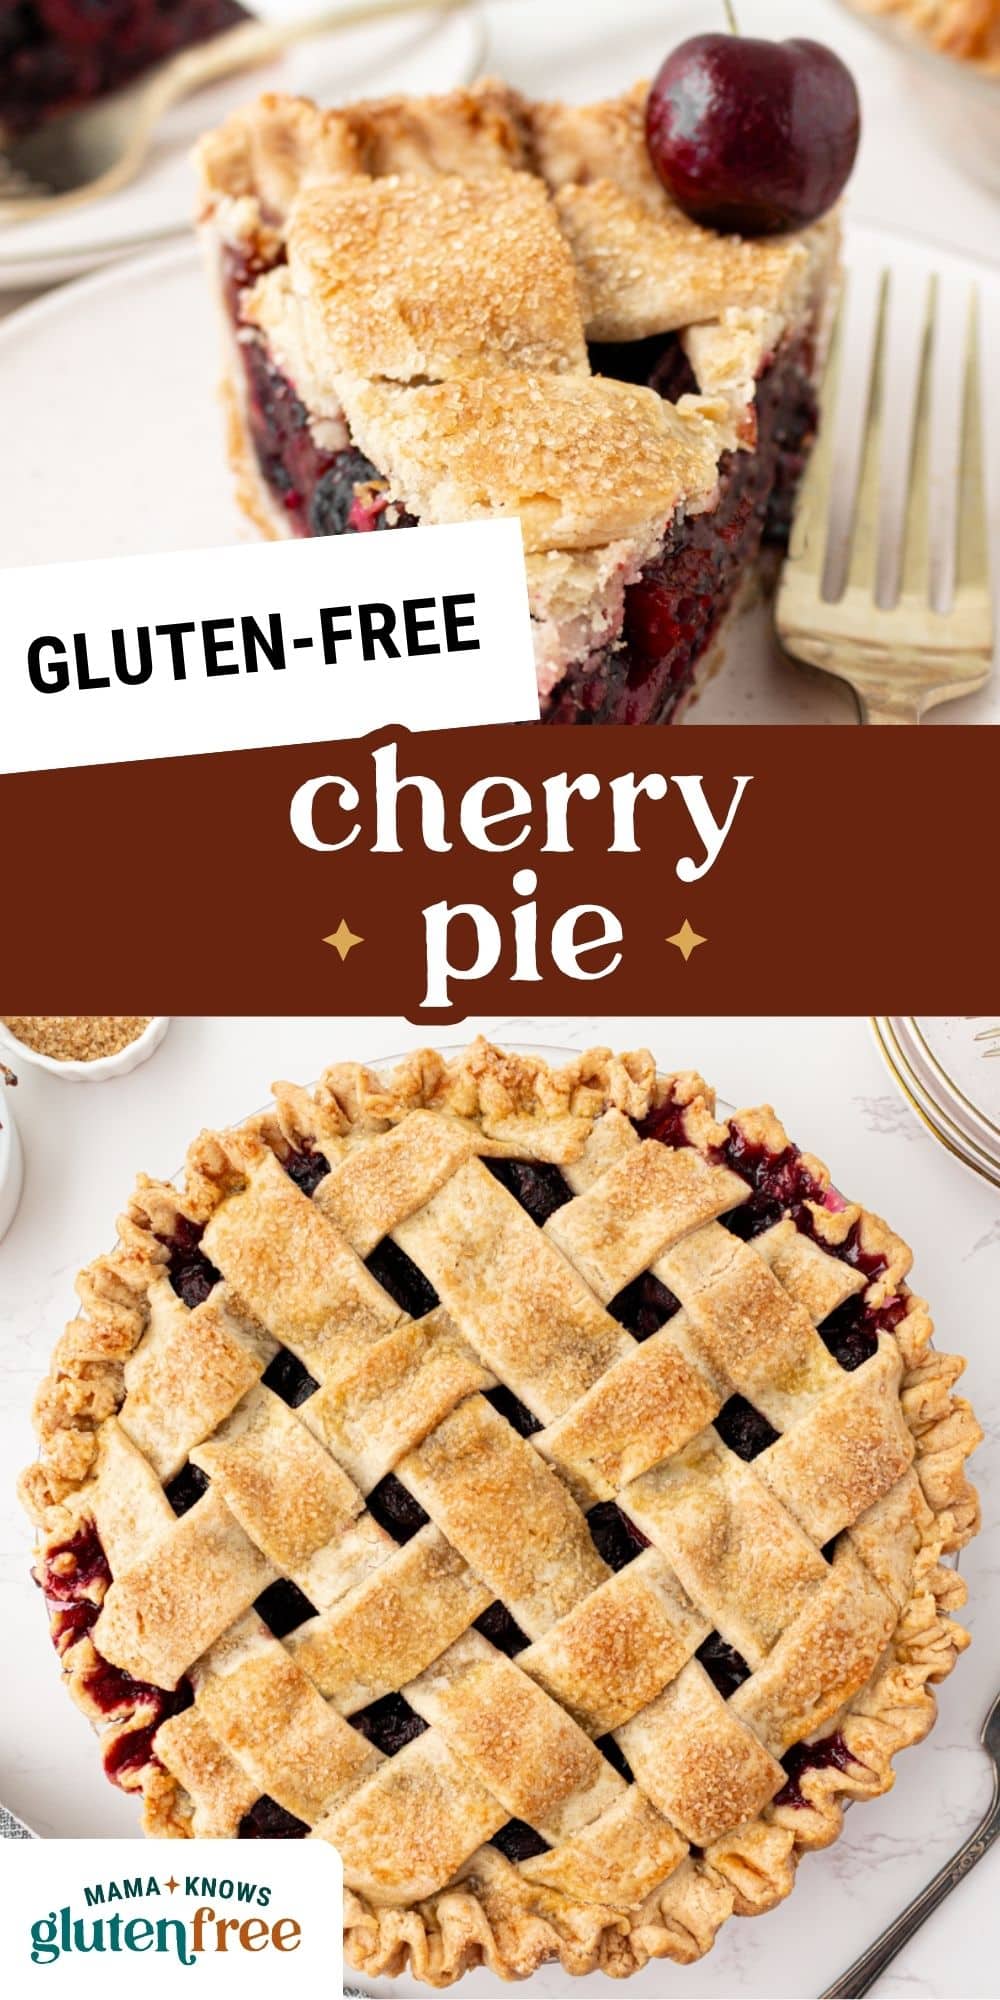
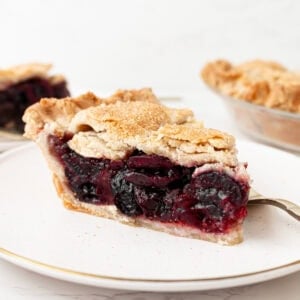
This gluten-free cherry pie is the recipe you’ve been looking for. Made with a from-scratch gluten-free pie crust and a fresh cherry filling, it bakes up in about an hour with a flaky, golden lattice top and a glossy, jammy filling that sets perfectly every time. It’s the kind of pie that feels special enough for a summer holiday table but straightforward enough to make any time fresh cherries are in season.
I first made this pie on a whim one summer afternoon when I had a bowl of fresh cherries sitting on the counter that needed to be used up. Already a regular maker of gluten-free pie crust, something about pairing it with a fresh cherry filling that day felt like a whole new discovery. The combination that works best is cold butter and cold shortening together in the crust. The butter brings the flavor, the shortening brings the tenderness, and keeping both ice cold is what creates those distinct flaky layers. A little apple cider vinegar and cold eggs help the dough stay workable without falling apart, which is the biggest challenge with gluten-free pastry.
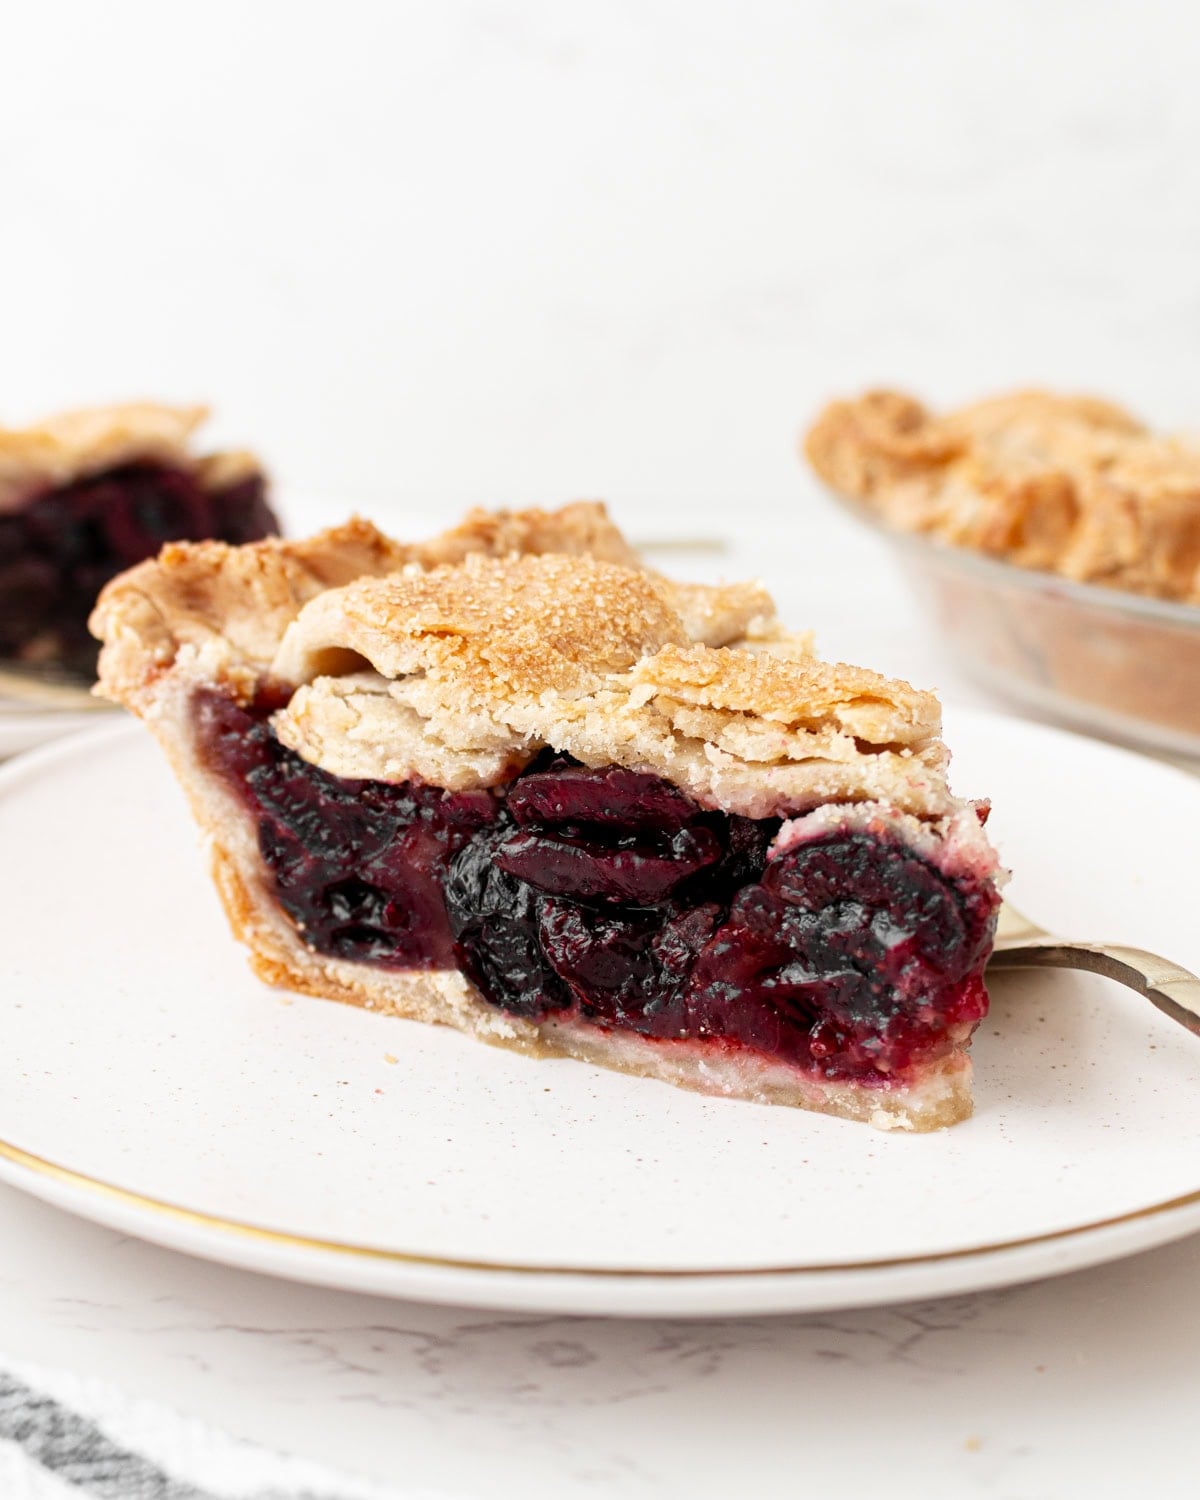
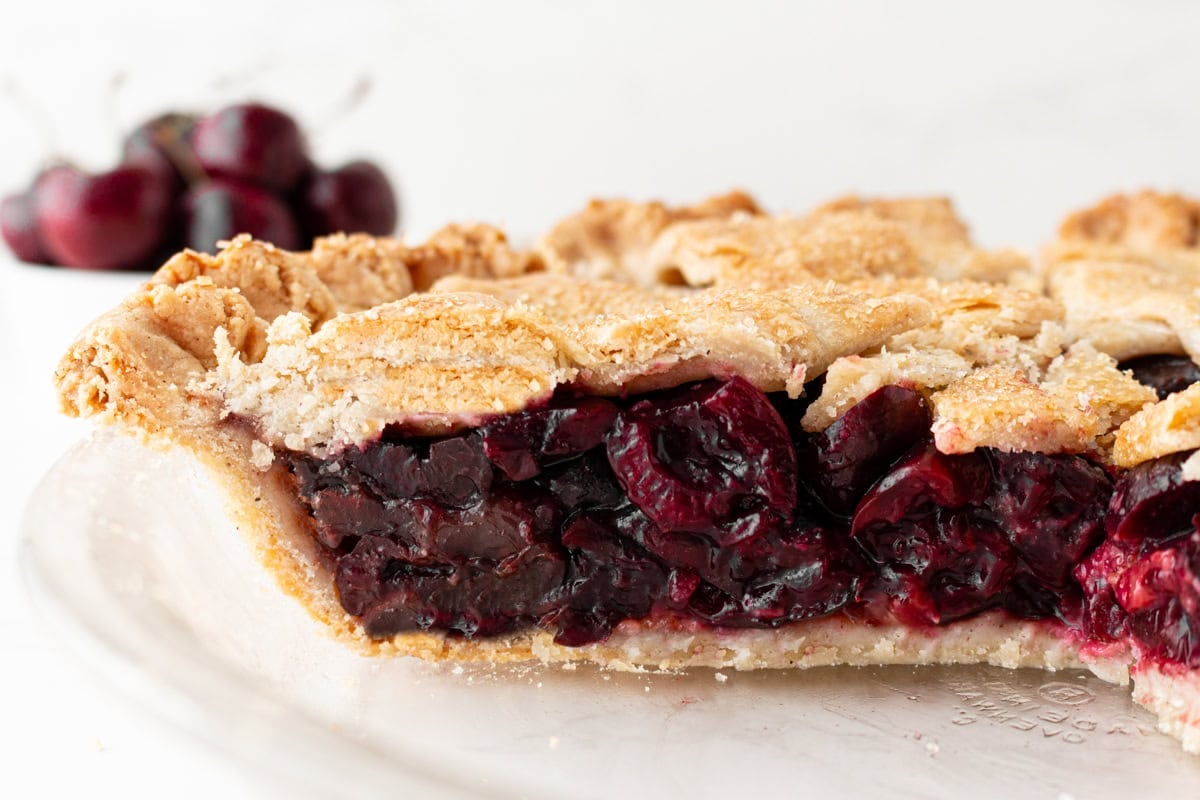
The cherry filling is thickened with cornstarch so it slices cleanly after cooling, and a small amount of almond extract alongside the vanilla is what makes the cherry flavor taste full and deep rather than flat. You will know the pie is done when the filling is bubbling steadily in the center and not just at the edges, which means the cornstarch has fully activated and the filling will set properly as it cools. Every year when cherries come into season, this is the first thing I make. It has become my signal that summer is here. If you make this pie, I would love to hear how it turned out. Leave a comment below and let me know!
What I Learned While Testing
- Temperature controls everything. Cold butter and cold shortening are what create distinct, flaky layers in the pie crust. When they stay cold all the way into the oven, they release steam as they bake, and that steam is what puffs the dough into layers. When they warm up before baking, they just melt into the flour, and you end up with a dense, greasy crust instead. Keep your butter, shortening, eggs, and water cold, and if at any point the dough starts to feel soft or tacky, stop and refrigerate it for 15–20 minutes before continuing. It is the difference between a crust that is flaky and one that is not.
- The one-hour chill after mixing is not optional. The first time I tested this, I was impatient and tried to roll the dough after only 30 minutes. It cracked, it stuck, and it fell apart when I tried to transfer it. The chill is what allows the fat to firm back up and gives the dough the structure it needs to be handled without falling apart.
- Roll the dough between two sheets of parchment paper. GF dough doesn’t have gluten strands holding it together, so it’s more fragile than traditional pie dough and needs to be handled differently. The parchment method means you never have to directly lift the raw dough with your hands until it’s already draped over the pie plate, which dramatically reduces cracking and tearing.
- Keep the dough cold at every stage of assembly. After fitting the bottom crust into the pie plate, I put it straight back in the fridge while I cut the lattice strips, then refrigerated the strips while I made the filling.
- Bake on a preheated baking sheet. I tested this both ways, and the difference was noticeable. The version baked on a preheated sheet had a much better-cooked bottom crust. Gluten-free crusts can bake up underdone on the bottom because the filling weighs them down and insulates them from the oven heat. The hot baking sheet solves that by delivering direct, immediate heat from the moment the pie goes in.
- Watch the crust edges closely. Gluten-free crusts brown faster than traditional ones. Check the edges at the 30-minute mark and cover them loosely with foil or a pie crust shield the moment they start getting ahead of the rest of the pie.
- Let the pie cool fully before cutting. I tested an early slice once just to see what would happen, and the filling ran completely. The cornstarch needs time to fully set as the pie cools, and there is no shortcut. Wait patiently.
Gluten-Free Cherry Pie
Ingredients
Gluten-Free Pie Crust
- 2½ cups all-purpose gluten-free flour, with xanthan gum
- ¼ cup granulated sugar
- ½ cup butter, cold and cubed
- ½ cup vegetable shortening, cold and cubed
- 1 tsp apple cider vinegar
- 2 large eggs, cold
- 6 tbsp ice water
Cherry Pie Filling
- 5 cups fresh cherries, pitted, halved
- ⅔ cup sugar
- 3½ tbsp cornstarch
- ½ tsp cinnamon, optional
- 1 tbsp lemon juice
- 1 tsp vanilla extract
- ½ tsp almond extract
- 1 tbsp butter, cut into small cubes
- 1 large egg
- Turbinado or Demerara sugar
Instructions
- In the bowl of a stand mixer fitted with the paddle attachment, combine the flour, sugar, butter, shortening, apple cider vinegar, eggs, and ice water. Mix on low speed until well combined and forms a dough.
- Divide the dough in half and wrap each in cling film. Flatten the dough into disc shapes and refrigerate for at least one hour.
- Place a large baking sheet inside the oven and preheat to 400°F (205°C).
- Between two pieces of parchment paper, roll one of the dough discs out to a 12” round.
- Remove the top piece of parchment paper. Pick up the parchment paper with the dough and lay over a pie plate. Carefully roll back the parchment paper from the dough. Work the dough into the pan and cut off any excess, leaving about 1” of overhang for the crust.
- Refrigerate while preparing the lattice and filling.
- Between two pieces of parchment, roll out the second disc to a 12” circle. With a pizza or pastry cutter, cut the dough into 10 – 1” strips. Refrigerate while preparing the filling.
- In a large bowl, stir together the cherries, sugar, cornstarch, cinnamon, lemon juice, vanilla, and almond extract until well combined.
- Pour the cherry filling into the pie plate. Dot with butter pieces.
- Lay 5 strips of lattice dough evenly over the pie. Weave the remaining 5 strips over and under, pulling back strips as necessary to create a weave pattern.
- Trim off any excess dough, leaving about a ¾” overhang. Gently press the strip edges to the edges of the pie dough overhang and crimp the edges to seal.
- Brush the top and edges of the dough with the egg mixed with 1 tbsp water. Sprinkle the top with turbinado sugar.
- Place the pie on the baking sheet in the oven and bake for 20 minutes. Reduce the heat to 350°F (175°C) and bake for another 40-50 minutes until golden brown and bubbling. Cool for 3-4 hours then serve.
Notes
- Cover the crust edges with foil or a pie crust shield if they begin to brown too quickly during baking.
- The filling will look loose and syrupy when you pour it into the pie shell. This is normal. It thickens as it bakes and sets completely as it cools.
- Do not cut the pie before it has cooled for the full 3 to 4 hours, or the filling will run.
- The preheated baking sheet helps the bottom crust cook through. Do not skip this step.
- If using frozen cherries, thaw completely and drain off any excess liquid before using. Add an extra ½ tbsp of cornstarch to account for the additional moisture.
- The cinnamon is optional but adds a warm depth to the filling without being overpowering.
- Dough discs can be made up to 2 days ahead and stored wrapped tightly in plastic wrap in the refrigerator or frozen for up to 1 month. Thaw overnight in the fridge before rolling.
- If your lattice strips soften and become difficult to weave, slide the pie into the refrigerator for 10 minutes before continuing.
- Turbinado or Demerara sugar is recommended for the topping as it adds a light crunch and sparkle to the finished crust. Regular granulated sugar can be used in a pinch.
- Store covered with plastic wrap or foil at room temperature for up to 2 days, or refrigerate for up to 5 days.
- To freeze, wrap the whole pie or individual slices tightly in plastic wrap, followed by a layer of aluminum foil, and freeze for up to 3 months. Thaw overnight in the refrigerator and reheat at 325°F (160°C) for 15 to 20 minutes.
Nutrition
Nutrition information is automatically calculated, so should only be used as an approximation.
How to Make Gluten-Free Cherry Pie Step by Step
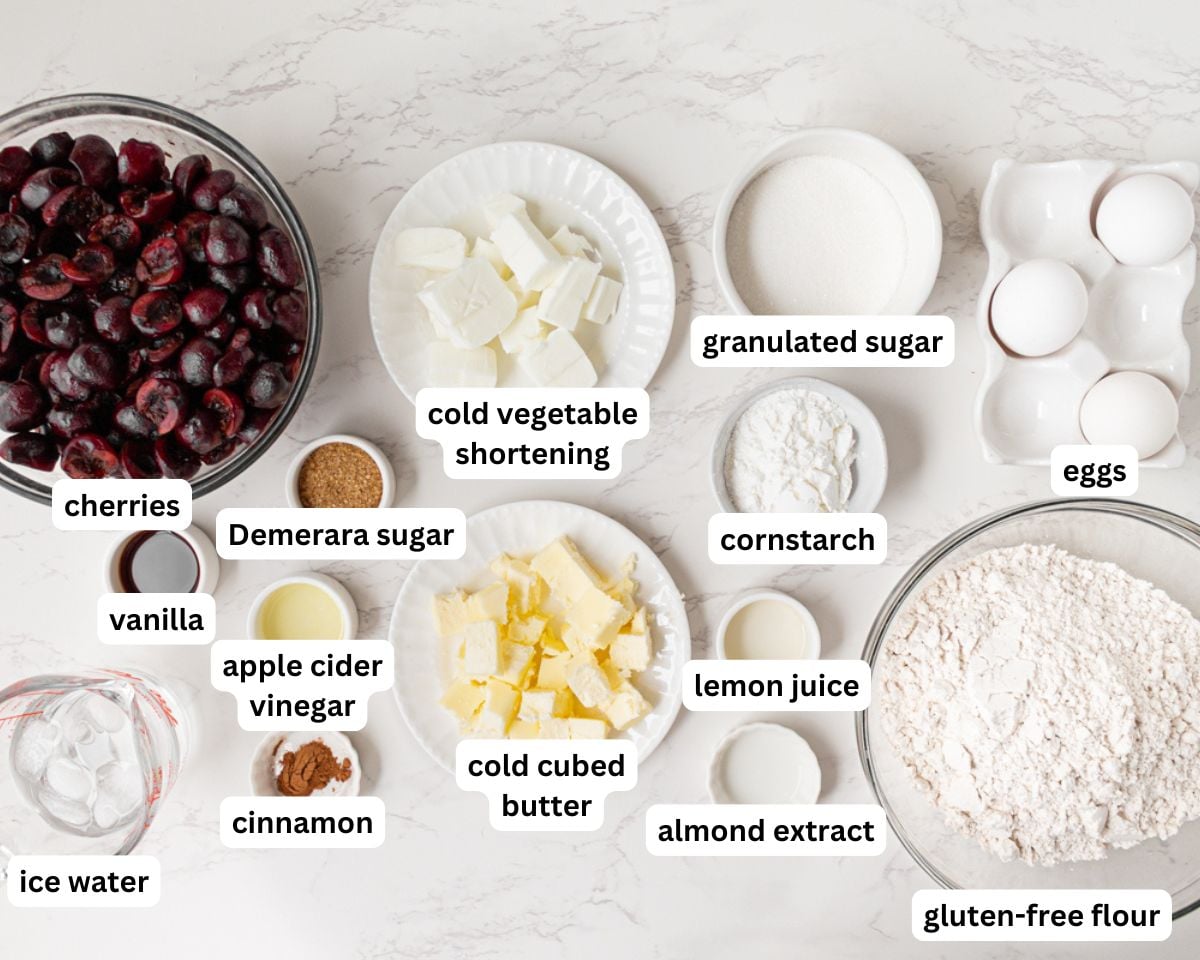
Gather all the ingredients together.
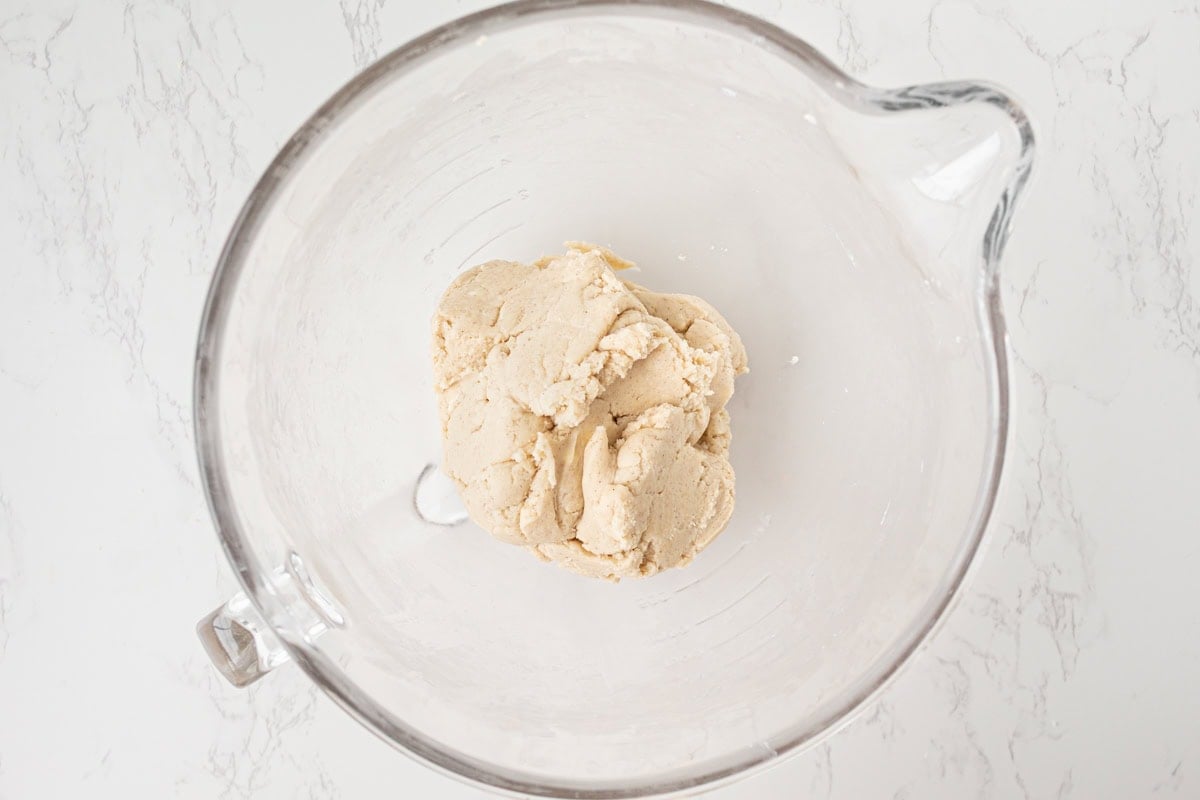
Make the crust: In the bowl of a stand mixer fitted with the paddle attachment, combine 2½ cups (390g) all-purpose gluten-free flour, ¼ cup (50g) granulated sugar, ½ cup (113g) cold cubed butter, ½ cup (92g) cold cubed shortening, 1 tsp apple cider vinegar, 2 cold large eggs, and 6 tbsp ice water. Mix on low speed until the dough comes together into a rough, shaggy mass that holds when you press it — it won’t be completely smooth, and that’s fine.
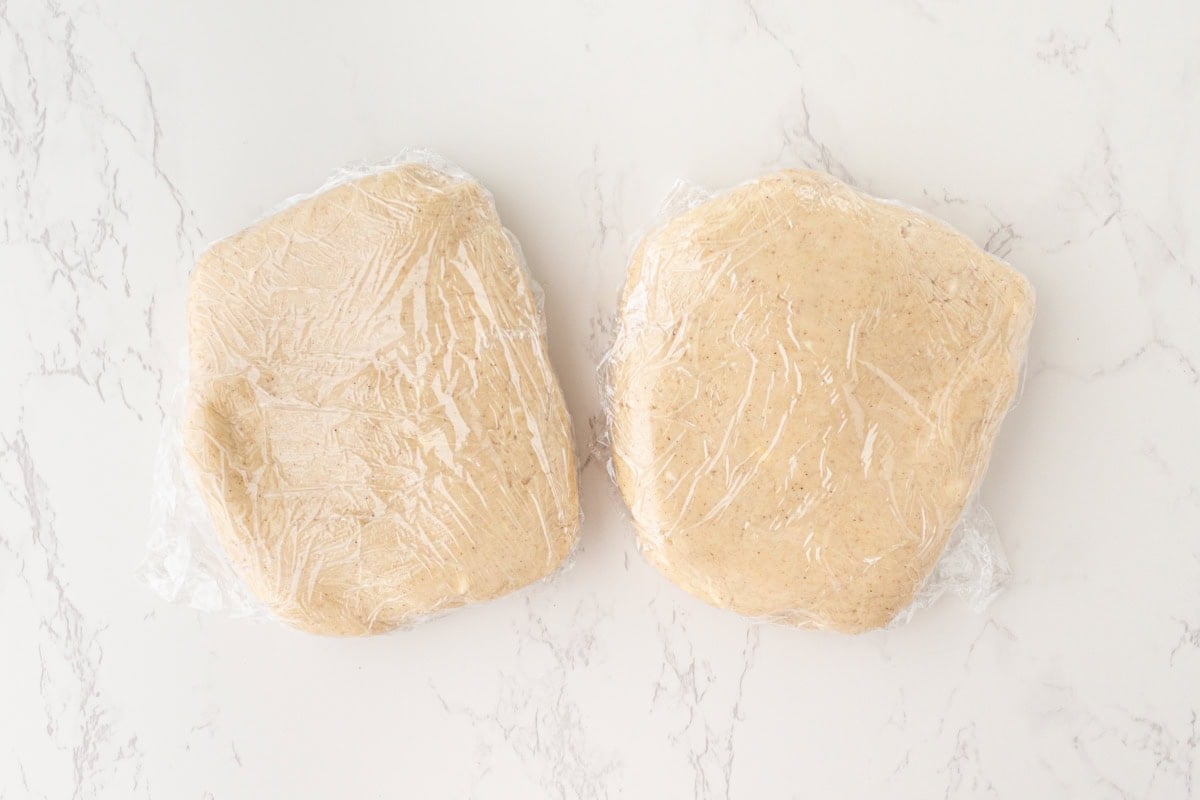
Divide and chill the dough: Turn the dough out and divide it in half. Flatten each half into a disc about 1 inch thick, wrap tightly in plastic wrap, and refrigerate for at least one hour. The dough should feel firm and cold when you take it out — if it’s still soft, give it more time. Place a rimmed baking sheet on the middle rack of your oven and preheat to 400°F (205°C).
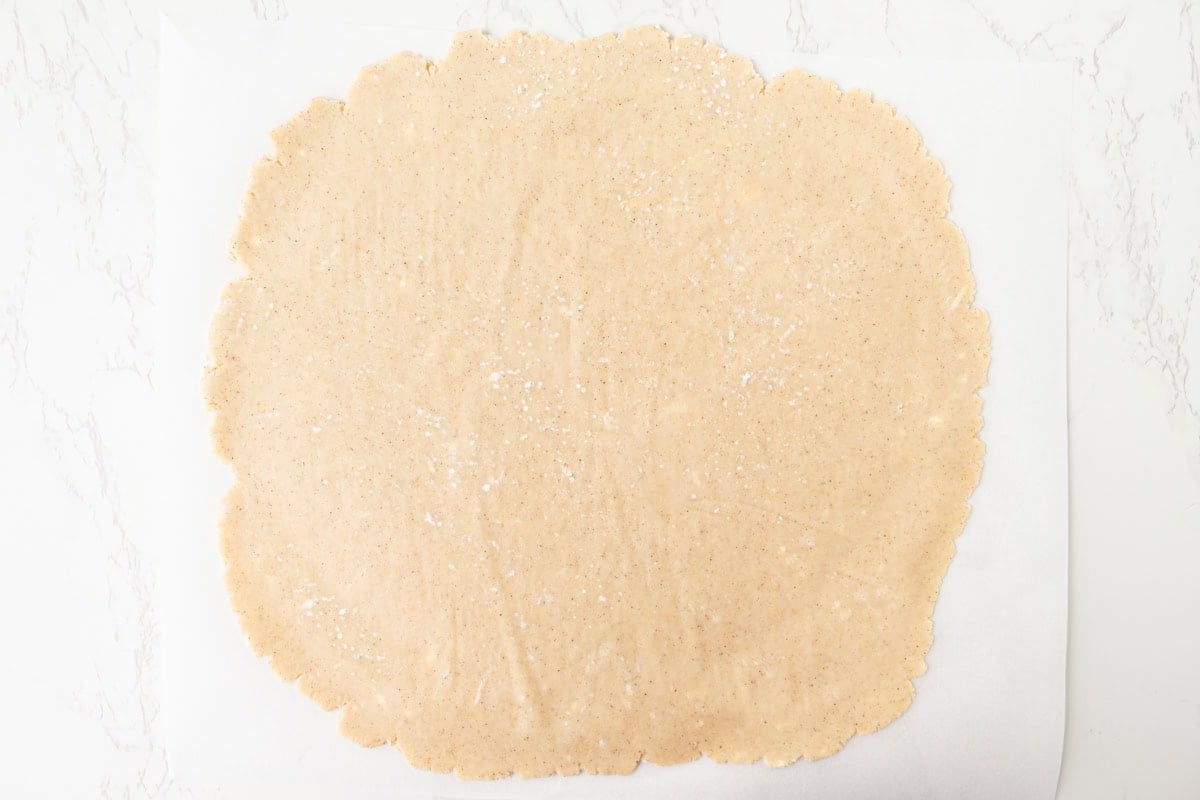
Roll out the dough: Take one dough disc from the fridge. Place it between two sheets of parchment paper and roll it out into a 12-inch (30cm) circle, working from the center outward and rotating the parchment as you go. The dough should be an even thickness throughout — about ⅛ inch.
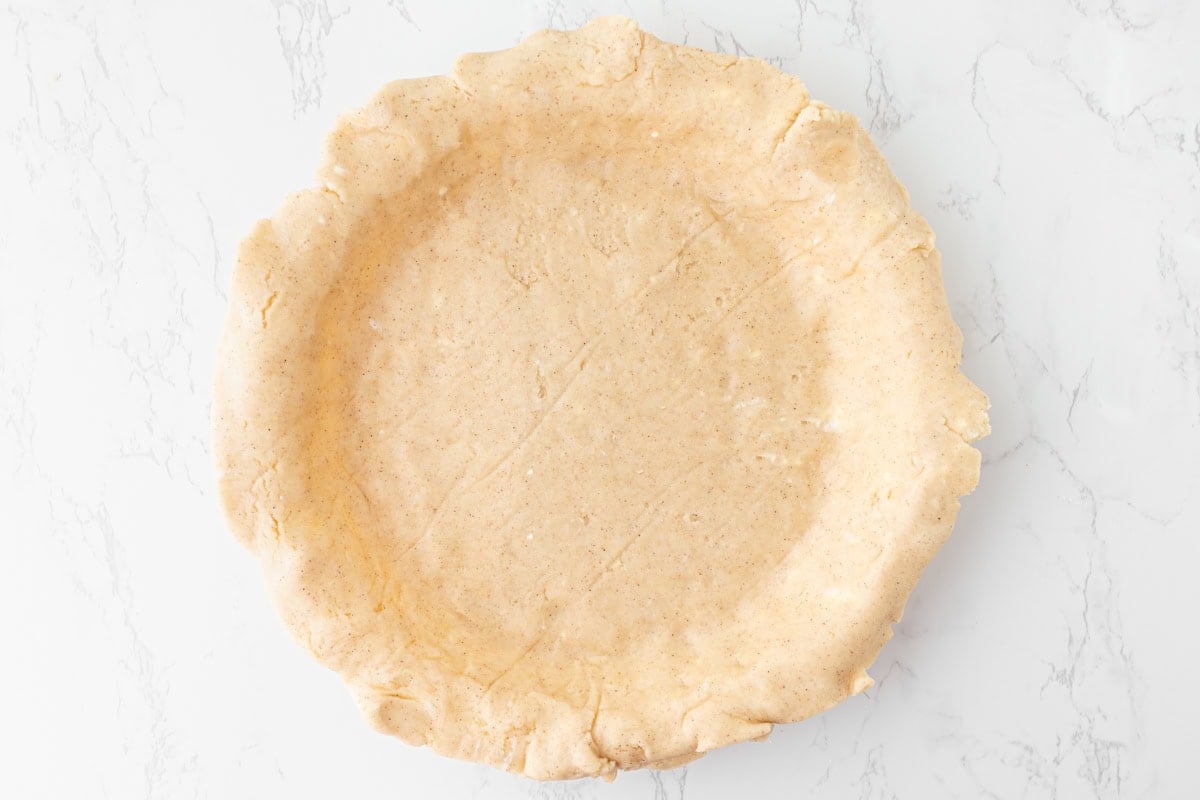
Add the bottom pie crust: Peel off the top sheet of parchment. Slide your hand under the bottom sheet and carefully flip the dough over your 9-inch pie plate, centering it as best you can. Gently peel back the parchment. If any spots tear, just press them back together with your fingers. Ease the dough down into the plate without stretching it; stretched dough will shrink back during baking. Trim any excess with kitchen scissors or a sharp knife, leaving about 1 inch (2.5cm) of overhang all the way around. Refrigerate the pie plate while you prepare the lattice and filling.
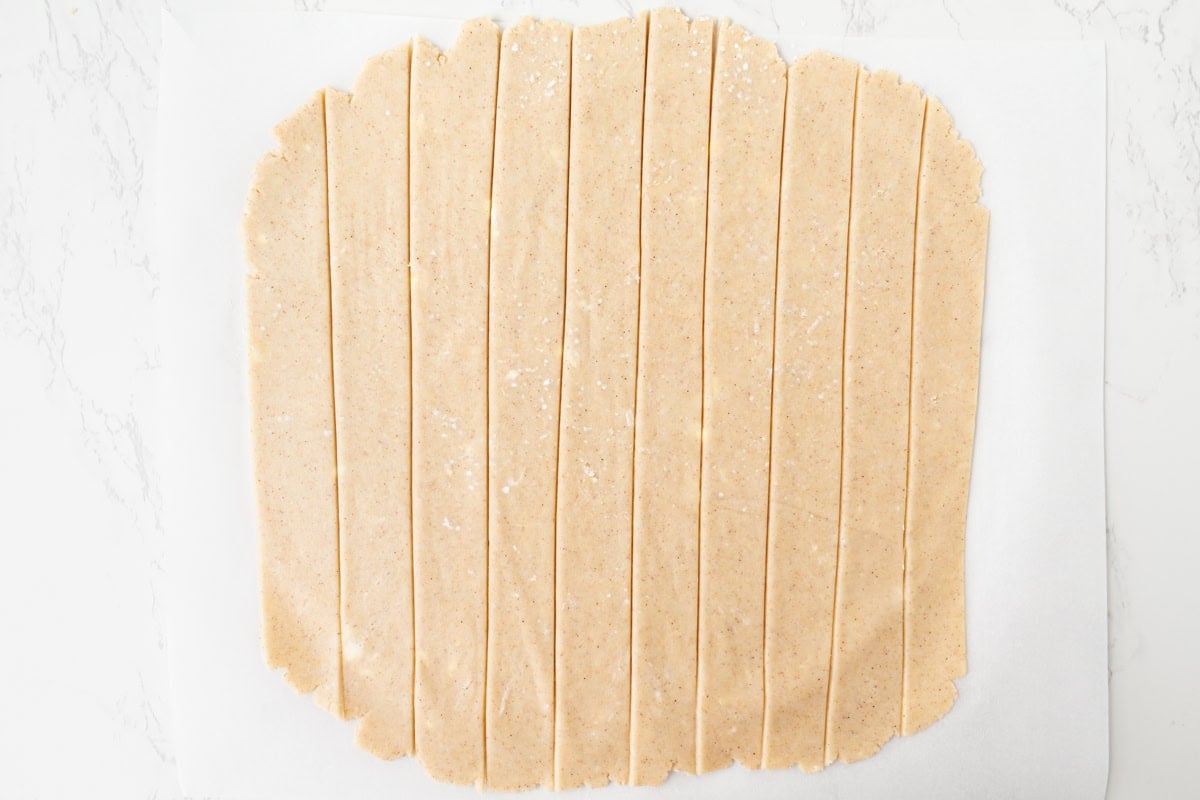
Make the lattice: Take the second dough disc from the fridge and roll it out between two sheets of parchment into a 12-inch (30cm) circle, the same way you did the first. Using a pizza cutter or pastry cutter, cut the dough into 10 strips, each about 1 inch (2.5cm) wide. Slide the parchment with the strips onto a flat baking sheet and refrigerate while you make the filling. The strips should feel cool and firm when you go to weave them. If they’ve softened, give them another 10 minutes in the fridge.
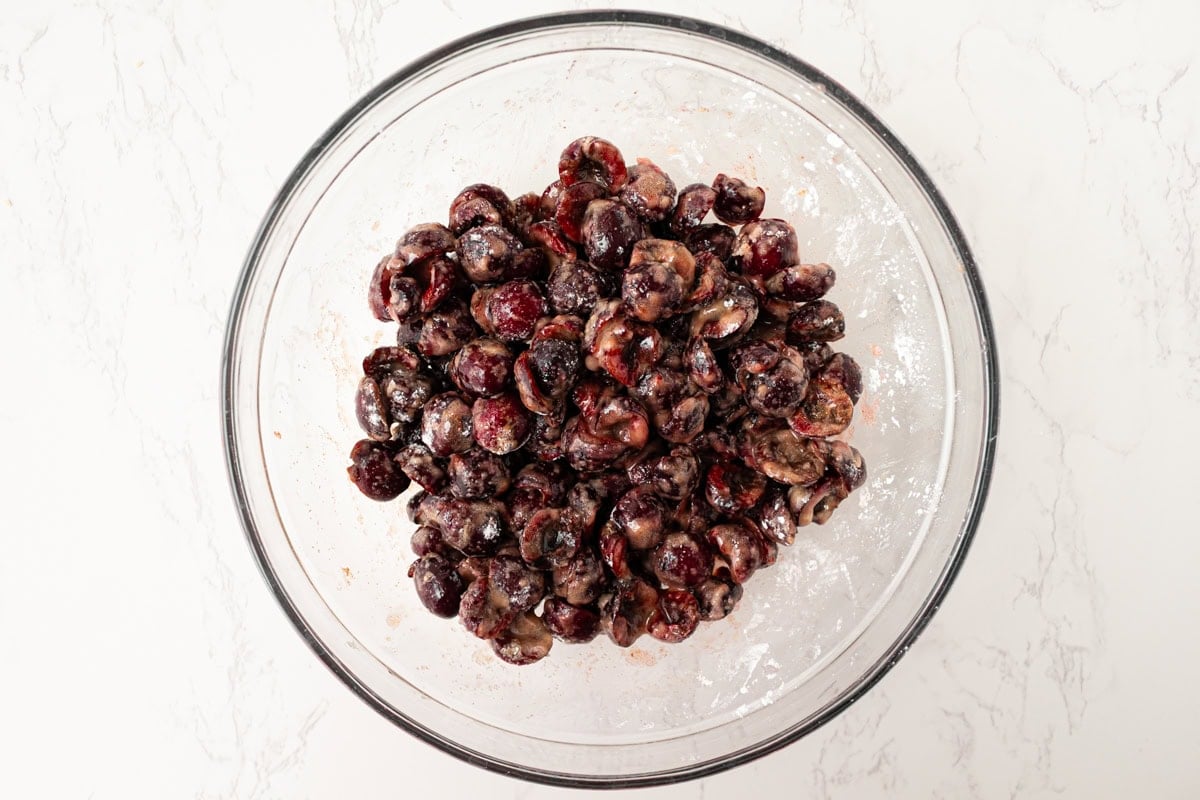
Make the cherry filling: In a large bowl, combine 5 cups (800g) pitted and halved fresh cherries, ⅔ cup (132g) granulated sugar, 3½ tbsp cornstarch (28g), ½ tsp cinnamon (if using), 1 tbsp lemon juice, 1 tsp vanilla extract, and ½ tsp almond extract. Stir until the cherries are evenly coated and the dry ingredients are fully dissolved into the juices. The mixture will look loose and syrupy at this stage. It will thicken in the oven.
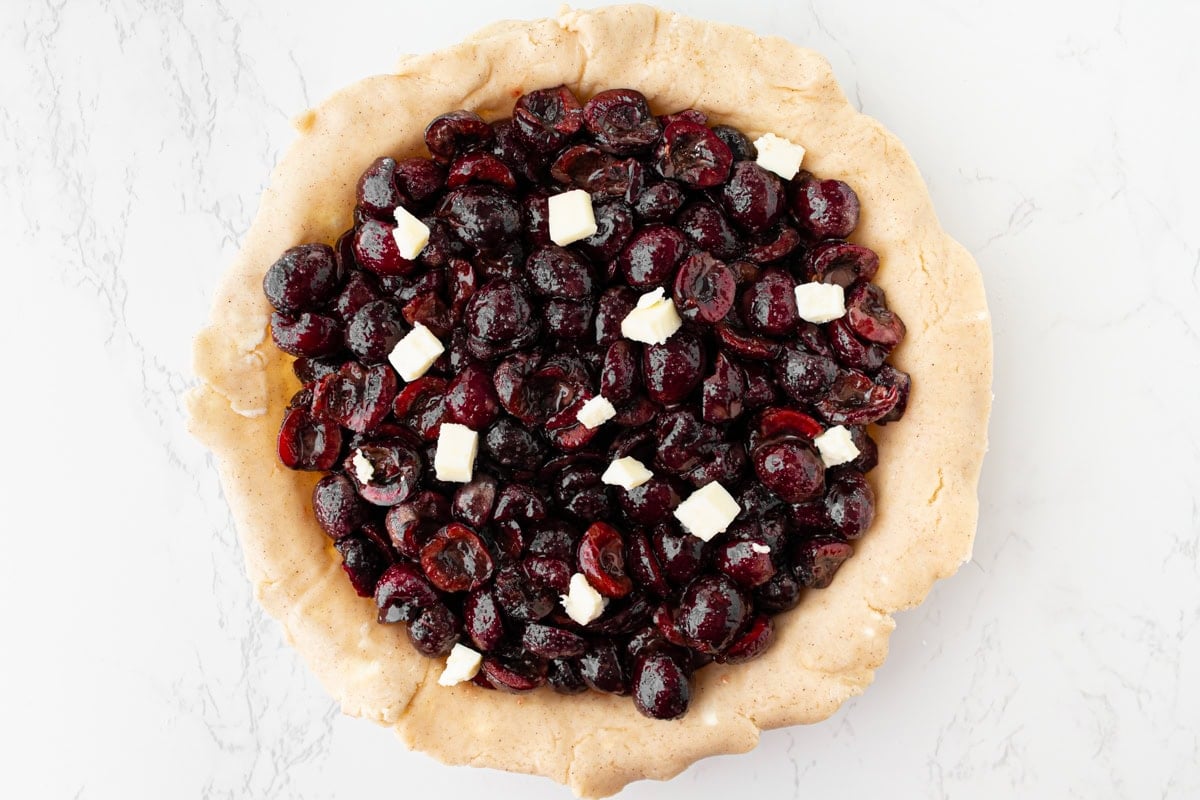
Assemble the pie: Pour the cherry filling into the chilled pie shell, spreading it into an even layer. Scatter 1 tbsp of small butter cubes evenly over the surface of the filling.
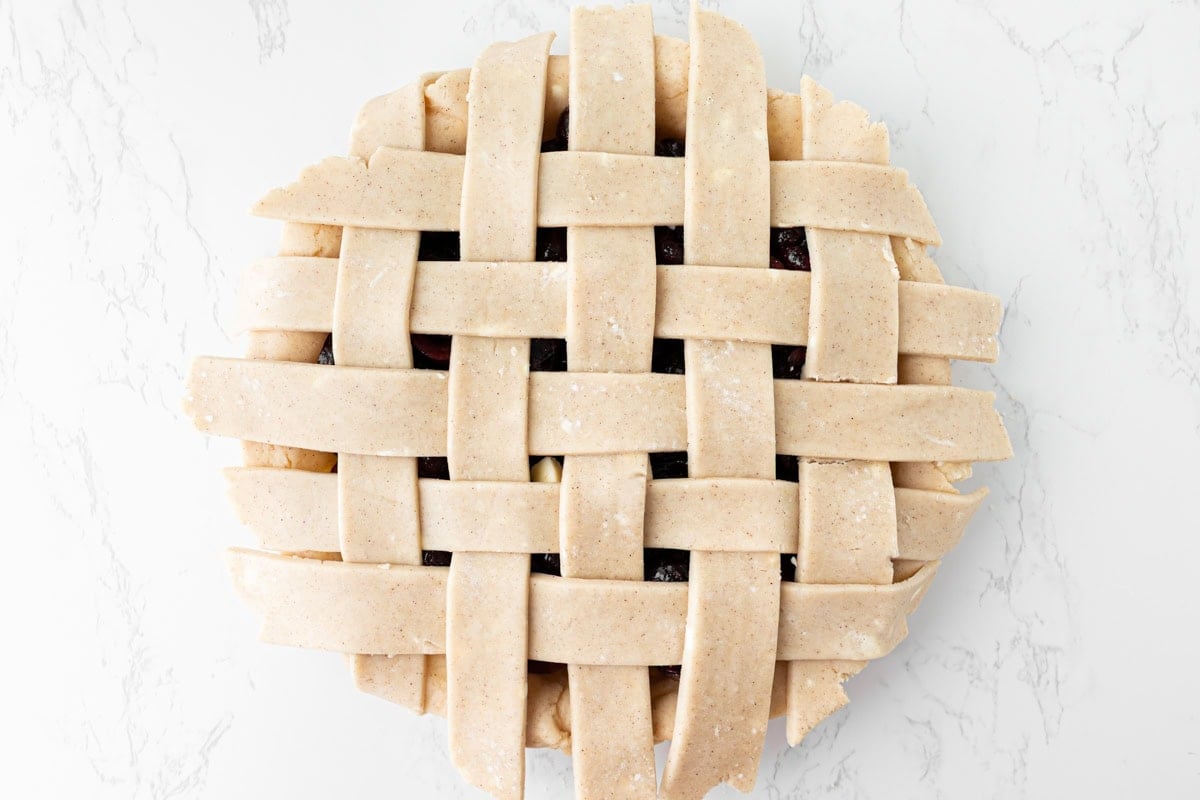
Add the lattice: Take the lattice strips from the fridge. Lay 5 strips evenly across the pie, parallel to each other and spaced about 1 inch apart. To weave: fold back every other strip halfway toward you, lay one perpendicular strip across the unfolded strips, then unfold the folded strips back over it. Repeat with the remaining 4 perpendicular strips, alternating which strips you fold back each time to create the over-under weave pattern. Work quickly. If the strips start to feel soft or sticky, slide the whole pie into the fridge for 10 minutes before continuing.
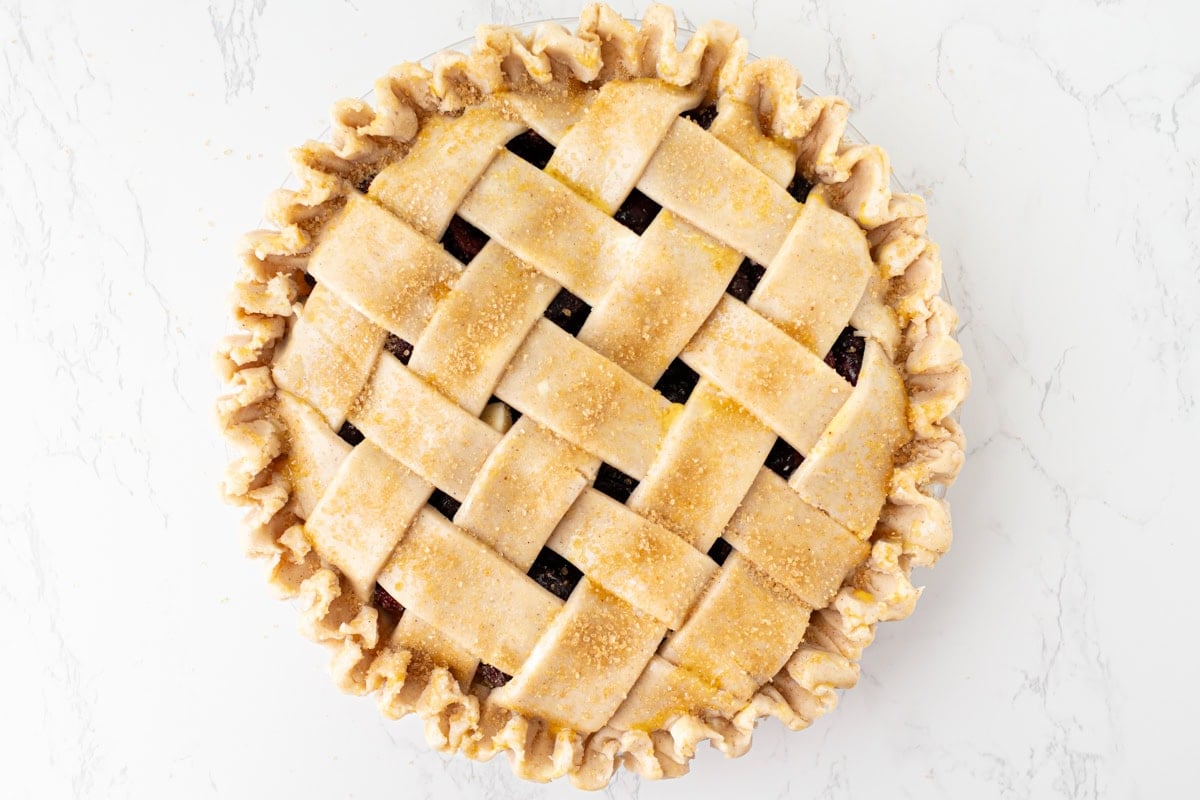
Seal the edges and egg wash: Trim the lattice strips to leave about ¾ inch (2cm) of overhang. Press the ends of the strips firmly down onto the rim of the bottom crust overhang, then fold the whole edge up and crimp firmly to seal. The edge should feel secure and hold its shape when pressed. In a small bowl, beat 1 large egg with 1 tbsp water until combined. Brush the egg wash evenly over the lattice and crust edges, making sure to get into the crevices of the weave. Generously sprinkle turbinado or Demerara sugar over the entire surface.
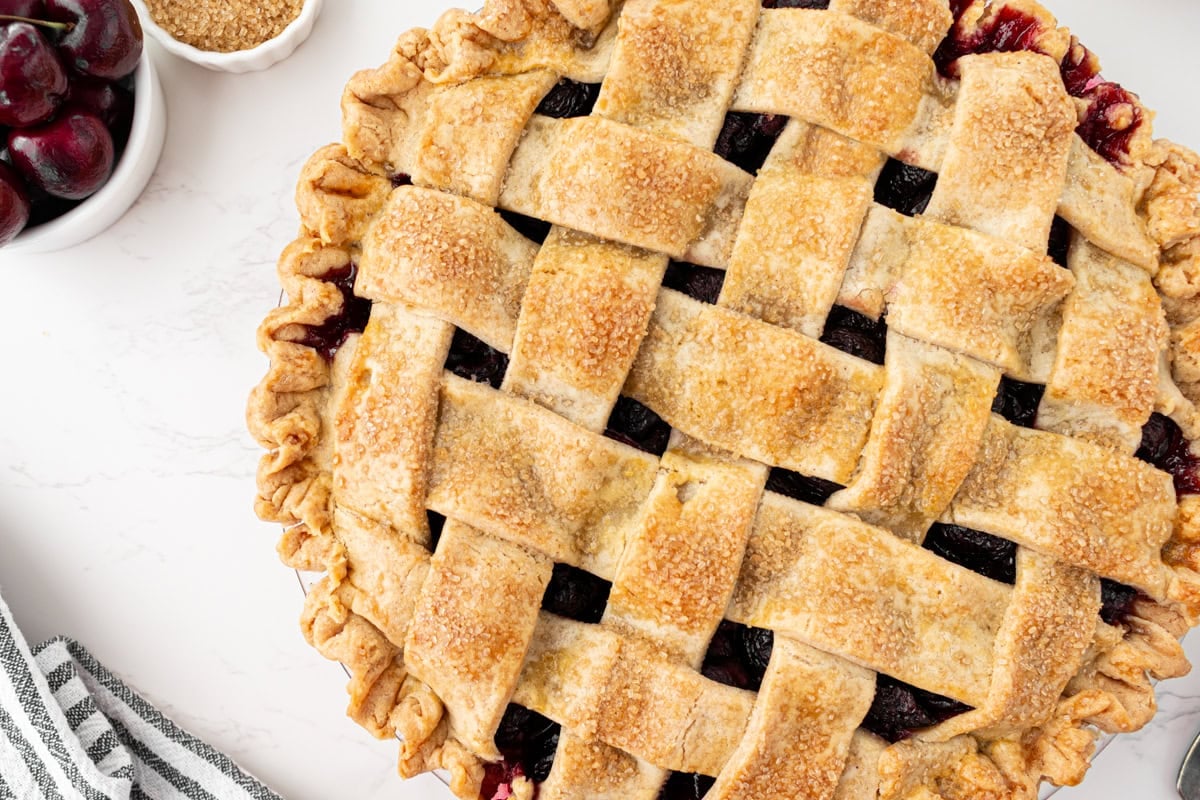
Bake the pie: Place the pie directly onto the preheated baking sheet in the oven and bake at 400°F (205°C) for 20 minutes, until the crust just begins to turn golden. Reduce the oven temperature to 350°F (175°C) and continue baking for another 40–50 minutes. The pie is done when the crust is a deep, even golden brown and the filling is bubbling steadily in the center — not just at the edges. Those center bubbles tell you the cornstarch has fully activated and the filling will set as it cools.
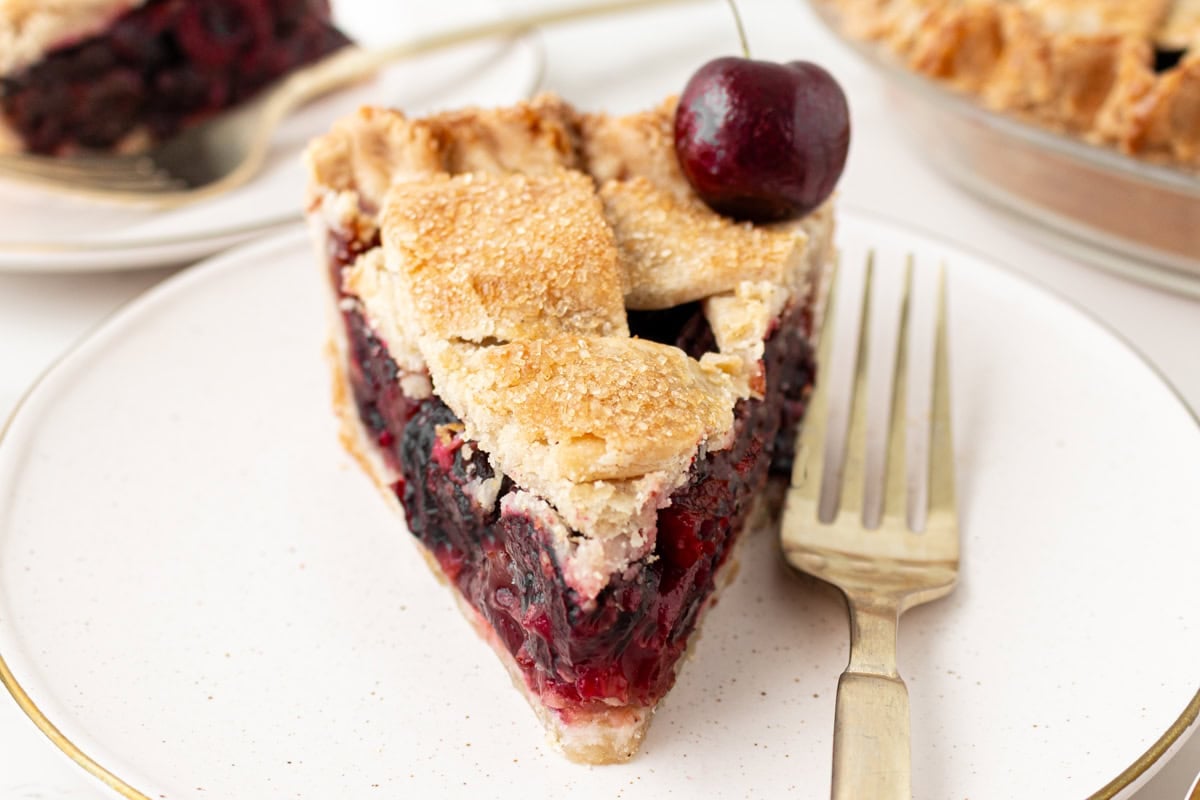
Cool and serve: Transfer to a wire rack and cool for 3–4 hours before slicing. The filling will look loose when the pie is hot. It sets completely as it cools. Slice up and serve.
Serving Suggestions
Cherry pie is one of those desserts that feels special no matter the occasion. We make it every Fourth of July without fail, but honestly, it shows up at our table all summer long and beyond. My go-to is a scoop of almond milk vanilla ice cream right on top of a warm slice. It melts slowly into the jammy filling and pools around the flaky crust edges in the best possible way. If you are putting together a fuller dessert table, I love pairing this pie alongside my gluten-free mini cheesecakes. The individual portions are easy to grab, and the creamy, tangy cheesecake is a natural complement to the bright cherry filling. Gluten-free lemon bars are another favorite to set out next to it. That pop of citrus cuts right through the richness of the pie and keeps the spread feeling fresh and summery. For a more casual cookout or backyard gathering, I’ll often throw a batch of gluten-free ice cream sandwiches in the freezer ahead of time. They are kid-friendly, easy to hand out, and disappear just as fast as the pie does.
Storage Instructions
Room Temperature
Once the pie has fully cooled, cover it loosely with plastic wrap or aluminum foil and store it at room temperature for up to 2 days.
Refrigerator
For longer storage, transfer it to the refrigerator, still covered with plastic wrap or foil, or slipped into a large airtight container if you have one that fits, and it will keep for up to 5 days.
Freezer
To freeze the whole pie, wrap it tightly in a layer of plastic wrap followed by a layer of aluminum foil and freeze for up to 3 months. You can also freeze individual slices the same way, which makes it easy to pull out just what you need. To thaw, transfer to the refrigerator overnight and then warm in a 325°F (160°C) oven for 15 to 20 minutes until heated through.
Make Ahead
If you want to get ahead, the pie crust dough discs can be made up to 2 days in advance and stored wrapped tightly in plastic wrap in the refrigerator, or frozen for up to 1 month. Thaw the dough overnight in the fridge before rolling.
More Fruity Summer Desserts
- Gluten-Free Blueberry Cobbler: This gluten-free blueberry cobbler is packed with juicy berries and topped with a tender, golden biscuit topping. It’s an easy fruit dessert that’s perfect for summer gatherings, potlucks, and backyard cookouts.
- Gluten-Free Key Lime Pie: For a lighter summer dessert, try this gluten-free key lime pie. The creamy, tart filling and crisp gluten-free crust offer a refreshing contrast to baked fruit desserts and are perfect for warm-weather entertaining.
- Gluten-Free Peach Crisp: This gluten-free peach crisp is a warm, cinnamon-spiced dessert made with juicy baked peaches and a crumbly oat topping, best served on its own or with vanilla ice cream.
- Gluten-Free Apple Crisp: If you’re a fan of the crispy oat topping in peach crisp, you’ll love this gluten-free apple crisp. Warm cinnamon-spiced apples and a crunchy crumble topping make it a cozy dessert you can enjoy year-round.


