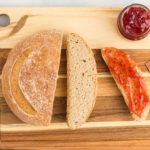
Gluten-Free Sourdough Bread
An easy recipe for homemade gluten-free sourdough bread that is super soft and packed with tangy flavor. Don’t forget to use our gluten-free sourdough starter recipe so you will be ready to go!
Servings: 16 slices
Ingredients
Preferment:
- 150 grams gluten-free sourdough starter active and at peak rise
- 100 grams room temperature filtered water
- 80 grams brown rice flour
Remaining Bread Ingredients:
- 20 grams psyllium husk not psyllium husk powder. I recommend the brands “Now” or “Anthony’s”
- 20 grams honey
- 300 grams room temperature filtered water
- 80 grams potato starch Substitute arrowroot powder, cornstarch, or tapioca starch
- 80 grams sorghum flour
- 80 grams brown rice flour
- 60 grams tapioca flour
- 15 grams salt
Instructions
- Make the preferment. In a medium bowl, stir together 150 grams active starter, water, and brown rice flour. Stir until well mixed. Cover lightly and let rest in a warm, draft-free area of your house for 6 to 18 hours. You’ll know it’s ready when it looks like it’s doubled in size and has lots of bubbles. Do not move onto the next step until your preferment is ready.
- In a medium bowl, stir together the psyllium husk, honey, and water. Set aside for a few minutes until it turns into a thick gel.
- In a large bowl, combine the potato starch, sorghum flour, brown rice flour, tapioca flour, and salt. Whisk together until well combined.
- Add the preferment mixture and the psyllium husk mixture to the dry ingredients and mix on low-medium speed with an electric mixer and dough hook. Use a spatula to scrape down the sides and bottom of the bowl to make sure all the dry ingredients are well combined.You can use your clean hands to work this mixture as well so that all the dry ingredients have been incorporated into the dough (the dough should feel gummy now and you should no longer see dry ingredients).
- Lightly flour (using brown rice flour) a clean, dry countertop and lightly knead the dough into a smooth ball. No stretching of the dough is needed. Simply knead the ingredients together gently until smooth. Don’t overwork the dough.
- Lightly flour a round, tea towel-lined bowl and place the dough ball smooth side down into the bowl so the seam is facing up.
- Lightly cover the bowl with a clean tea towel or food-safe plastic wrap and let the dough proof at room temperature for 3 to 4 hours. Depending on the temperature in your home, this could take longer, up to 6 to 8 hours. It’s ready once it has a soft, puffy texture and the dough rises back up slowly when you gently make an indent.
- An hour before your bread is ready to bake, preheat your oven to 425°F (218°C) with the Dutch oven inside.
- When your oven has been preheating for an hour, gently remove your proofed bread and place on a sheet of parchment paper. Gently move this so you don’t drop it down. Dropping it will limit the bread’s ability to rise properly. The loaf should now be sitting on the parchment paper smooth side up, seams down on the parchment paper.
- Use a sharp knife or a lame to cut lines into the dough to allow steam to escape while baking. Make any design you’d like, but make sure it’s deep enough (at least ¼ inch) or the bread will split in other areas.
- Use the parchment paper as a sling and place both the paper and bread gently inside the hot Dutch oven. Place the lid on and put the Dutch oven back into the oven. It’s important that you don’t leave the Dutch oven sitting out for long. We want this to say as hot as possible so as soon as you remove it from the oven, place the bread in and get the Dutch oven right back into the oven.
- Bake for 45 minutes with the lid on. Remove the lid then bake for an additional 25 to 40 minutes. The bread is done when it is golden brown and the internal temperature is 210°F (99°C). Underbaking will result in a gummy bread.
- Remove the baked bread from the Dutch oven and let it cool completely at room temperature before slicing.
Notes
-
- You don’t want the Dutch oven to be too far down in the oven. If the loaf is starting to burn on the bottom, place a baking tray on the rack under the Dutch Oven to try to block a bit of that direct heat.
- If you want to prepare everything ahead of time, once your dough gets to the proofing stage, you can cover it and place it in the fridge overnight.
- Let the bread cool completely before slicing. If you cut into it too early, you’ll release the steam, and the bread will turn out dense and gummy.
- Mama says, “Make sure to always check your labels!”
Nutrition
Serving: 1slice | Calories: 102kcal | Carbohydrates: 23g | Protein: 2g | Fat: 0.5g | Saturated Fat: 0.1g | Polyunsaturated Fat: 0.2g | Monounsaturated Fat: 0.1g | Sodium: 369mg | Potassium: 96mg | Fiber: 2g | Sugar: 1g | Vitamin C: 0.2mg | Calcium: 10mg | Iron: 0.5mg