Gluten-Free Sourdough Bread
Updated
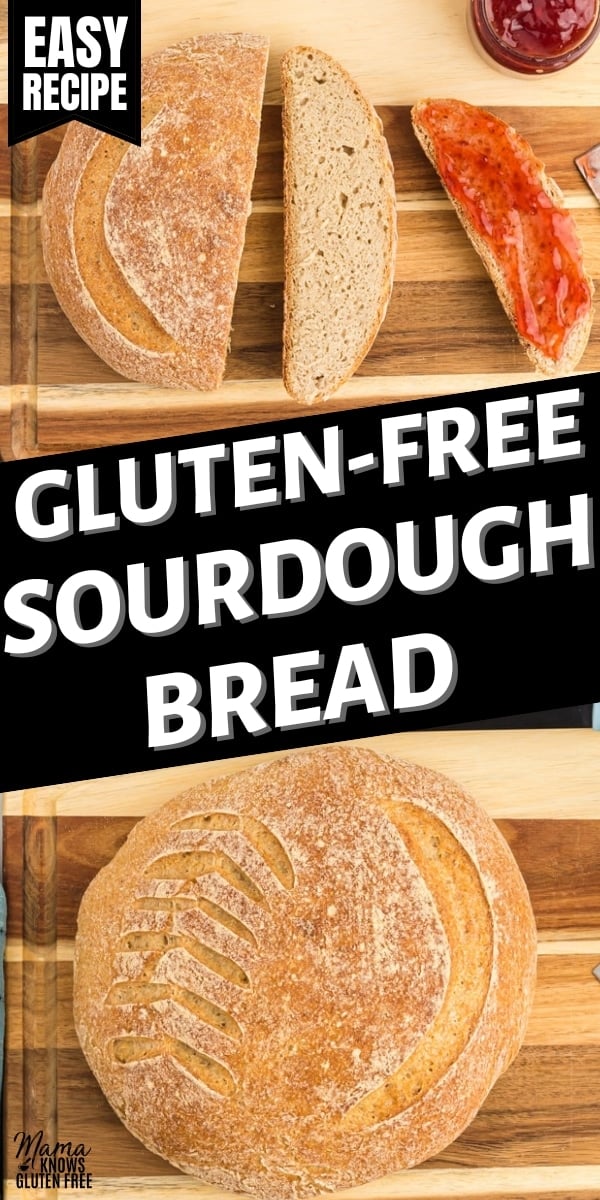
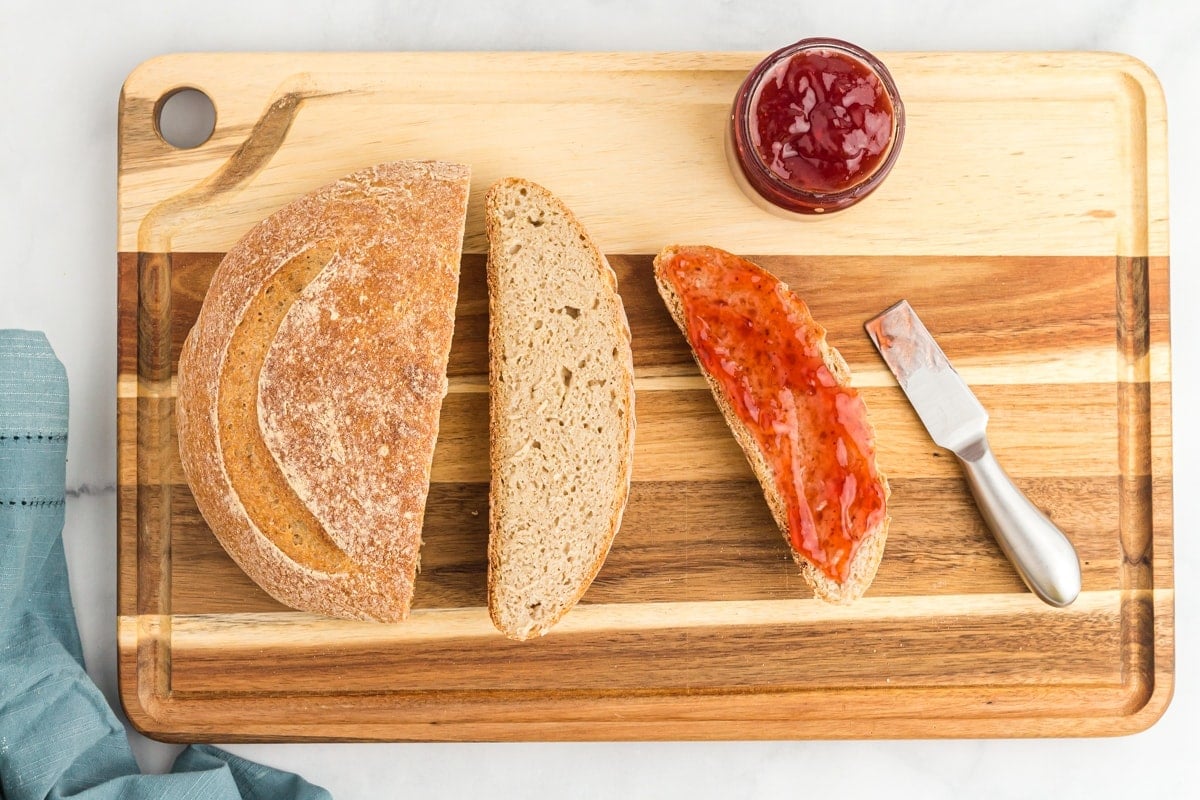
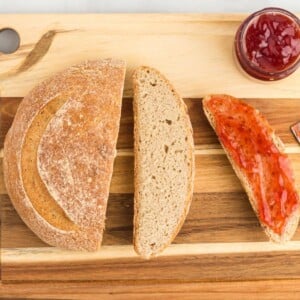
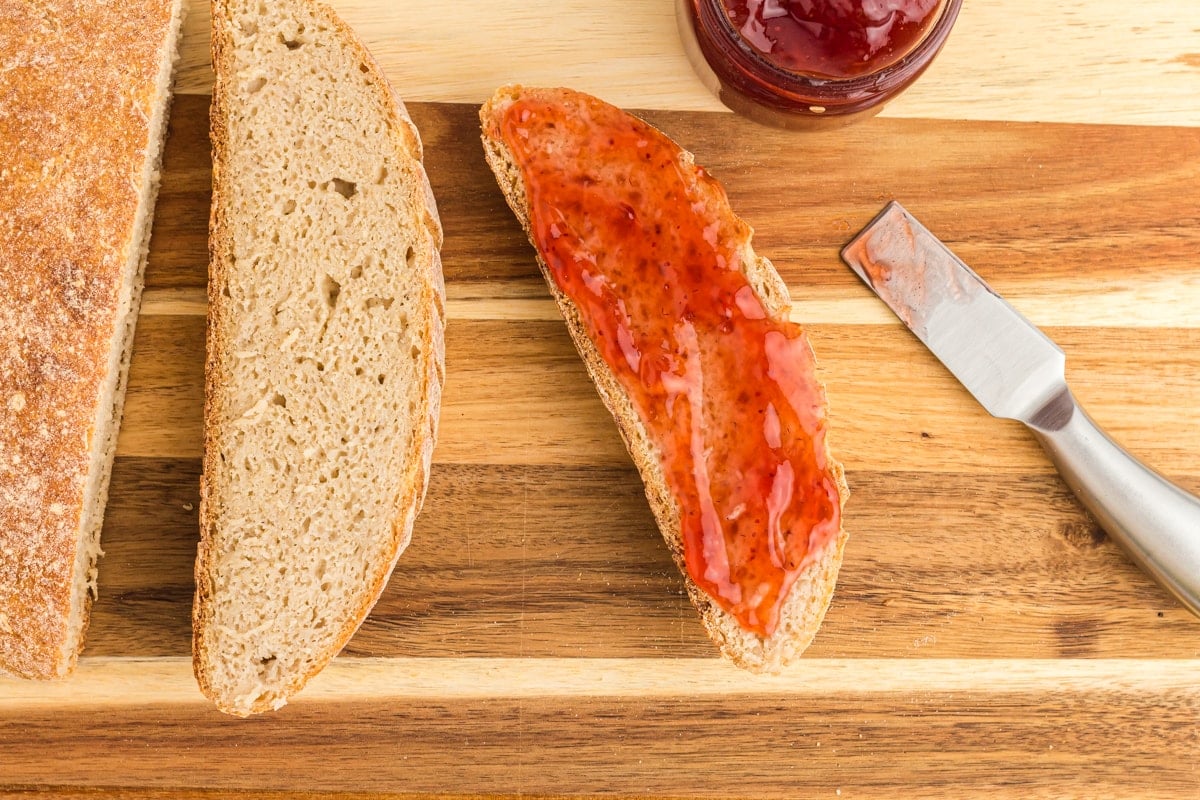
The idea of making gluten-free sourdough bread from scratch seemed so intimidating to me at first. But with the right ingredients, technique, and tips, making my own loaf from scratch was much easier than I thought. Don’t forget to use my gluten-free sourdough starter recipe so you will be ready to go! I love it for breakfast with jam, as a bread bowl with spinach dip, or in any way you enjoy bread.
I am brand new at making sourdough bread much less gluten-free sourdough bread.
– Berdjette
From my very first loaf, it turned out fantastic. Loaf after loaf it continues to be excellent. So grateful I found this recipe.
Every person who taste it raves about it, and in my opinion, it has no trace of tasting like gluten-free. As gluten-free people we had pretty much given up on ever eating any good bread again. This has changed everything.
Patience Makes Perfect
This gluten-free sourdough bread recipe is straightforward and simple, but requires some time and patience. When it comes to sourdough baking, many factors determine how your bread is going to turn out—weather, humidity, temperature, flour brands—but the more you make it, the more you’ll start to understand and adjust. So even if your first loaf doesn’t turn out perfectly, take the lessons you’ve learned and apply them to your next loaf.
This post includes step-by-step instructions and photos to help take the guesswork out of making gluten-free sourdough bread. Although there are just a few steps, each one is very important in the process. Read this post in full before you get started so you know what ingredients and supplies you’ll need and how to plan out your timeline for mixing, proofing, and baking.
Necessary Supplies
- Food Scale: Making sourdough bread is a science, and a food scale is a must to help measure ingredients precisely.
- Glass Mixing Bowls: Glass bowls of various sizes are needed for combining different ingredients throughout the mixing and proofing processes.
- Wooden Spoon: For mixing the ingredients together.
- Silicone Spatula: Use the spatula to transfer ingredients from one bowl to another and to combine them. Remember, quantities matter here, so make sure you’re scraping every last bit out of each bowl.
- Electric Mixer with Dough Hook: You can use your hands for mixing the dough together, but it can get quite messy. I recommend an electric mixer with a dough hook to do the majority of the mixing, then just get in with your hands at the end when it needs a little extra kneading to bring it all together.
- Clean Tea Towel or Food-Safe Plastic Wrap: When choosing a tea towel to line your bowl and cover the dough during the proofing process, be sure to find one that’s free of inks, colors, and lint. If you don’t have tea towels, food-safe plastic wrap will work. Just remember to place it on gently to allow airflow.
- Large Bowl with Round Bottom: When proofing your dough, it’s going to start taking on the shape of the bowl, so it’s important to select one with a round bottom.
- Dutch Oven with Lid: A Dutch oven is going to help keep the bread at a high, even temperature during the baking process. Make sure you choose one that’s around 5 quarts in size and can withstand heat up to 450°F. Watch out for plastic handles that aren’t designed to be oven-safe.
- Parchment Paper: Used to create a sling to gently lower the dough into the Dutch oven. Dropping the bread in will limit the bread’s ability to rise.
- Sharp Knife or Lame: You’ll use this to create cuts in the bread that allow steam to escape. If you don’t cut lines in the bread, the bread will split and make its own lines.
- Food Thermometer: This isn’t a requirement, but it does help to take the guesswork out of determining when the bread is fully baked.
Gluten-Free Sourdough Bread
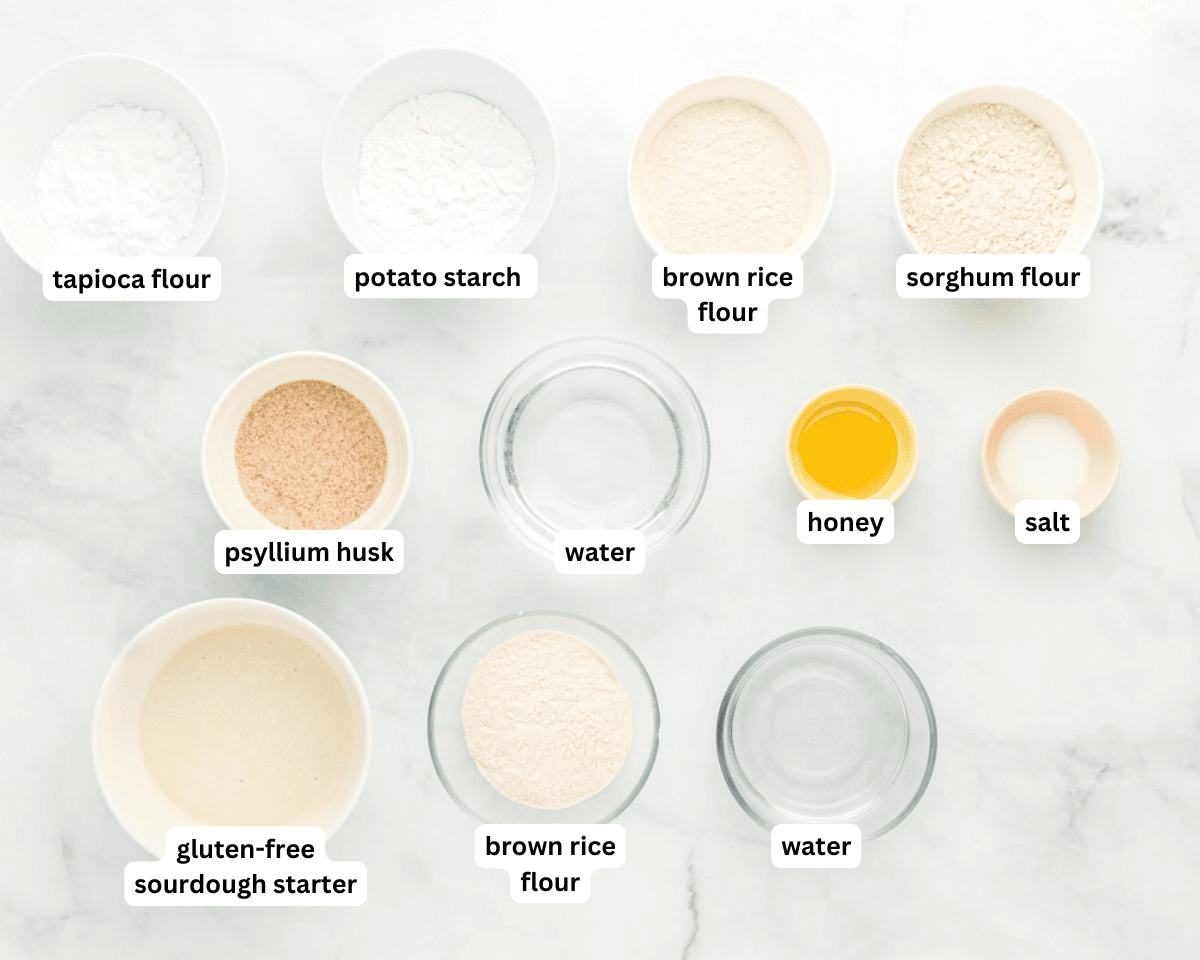
Ingredients
Preferment:
- 150 grams gluten-free sourdough starter, active and at peak rise
- 100 grams room temperature filtered water
- 80 grams brown rice flour
Remaining Bread Ingredients:
- 20 grams psyllium husk, not psyllium husk powder. I recommend the brands “Now” or “Anthony’s”
- 20 grams honey
- 300 grams room temperature filtered water
- 80 grams potato starch, Substitute arrowroot powder, cornstarch, or tapioca starch
- 80 grams sorghum flour
- 80 grams brown rice flour
- 60 grams tapioca flour
- 15 grams salt
Instructions
- Make the preferment. In a medium bowl, stir together 150 grams active starter, water, and brown rice flour. Stir until well mixed. Cover lightly and let rest in a warm, draft-free area of your house for 6 to 18 hours. You’ll know it’s ready when it looks like it’s doubled in size and has lots of bubbles. Do not move onto the next step until your preferment is ready.
- In a medium bowl, stir together the psyllium husk, honey, and water. Set aside for a few minutes until it turns into a thick gel.
- In a large bowl, combine the potato starch, sorghum flour, brown rice flour, tapioca flour, and salt. Whisk together until well combined.
- Add the preferment mixture and the psyllium husk mixture to the dry ingredients and mix on low-medium speed with an electric mixer and dough hook. Use a spatula to scrape down the sides and bottom of the bowl to make sure all the dry ingredients are well combined.You can use your clean hands to work this mixture as well so that all the dry ingredients have been incorporated into the dough (the dough should feel gummy now and you should no longer see dry ingredients).
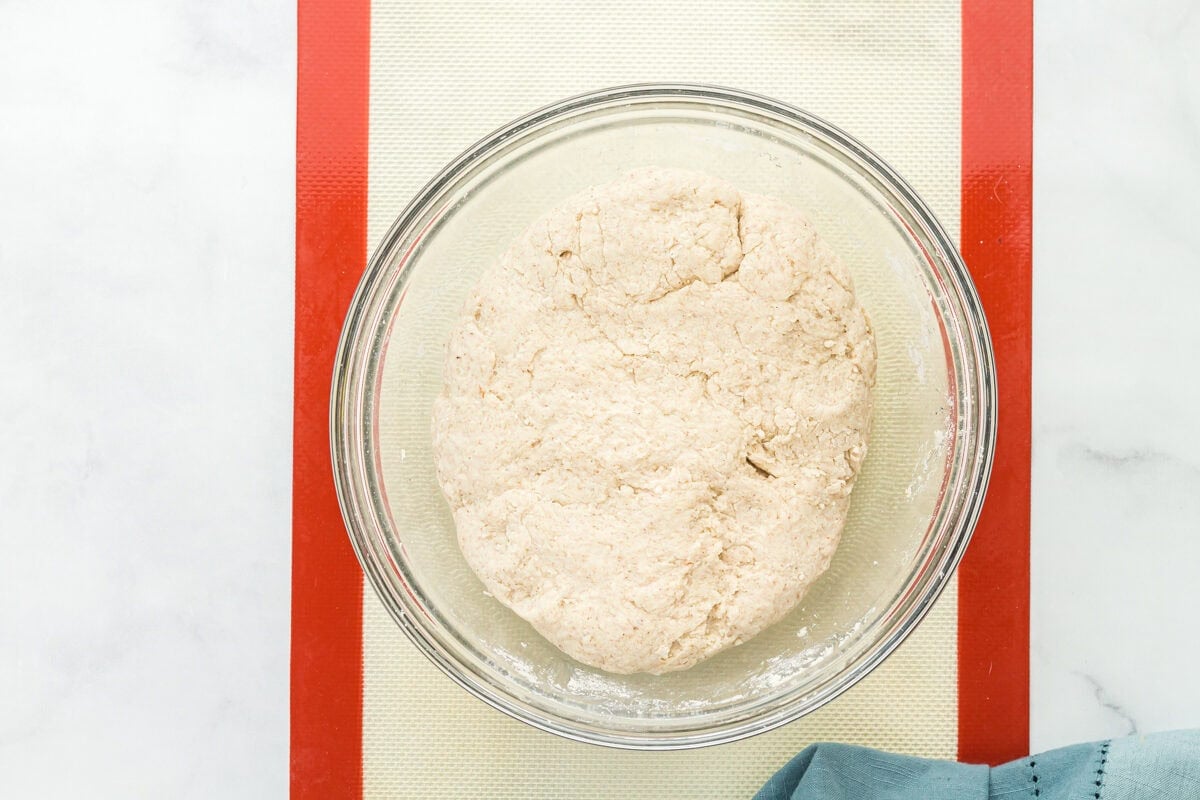
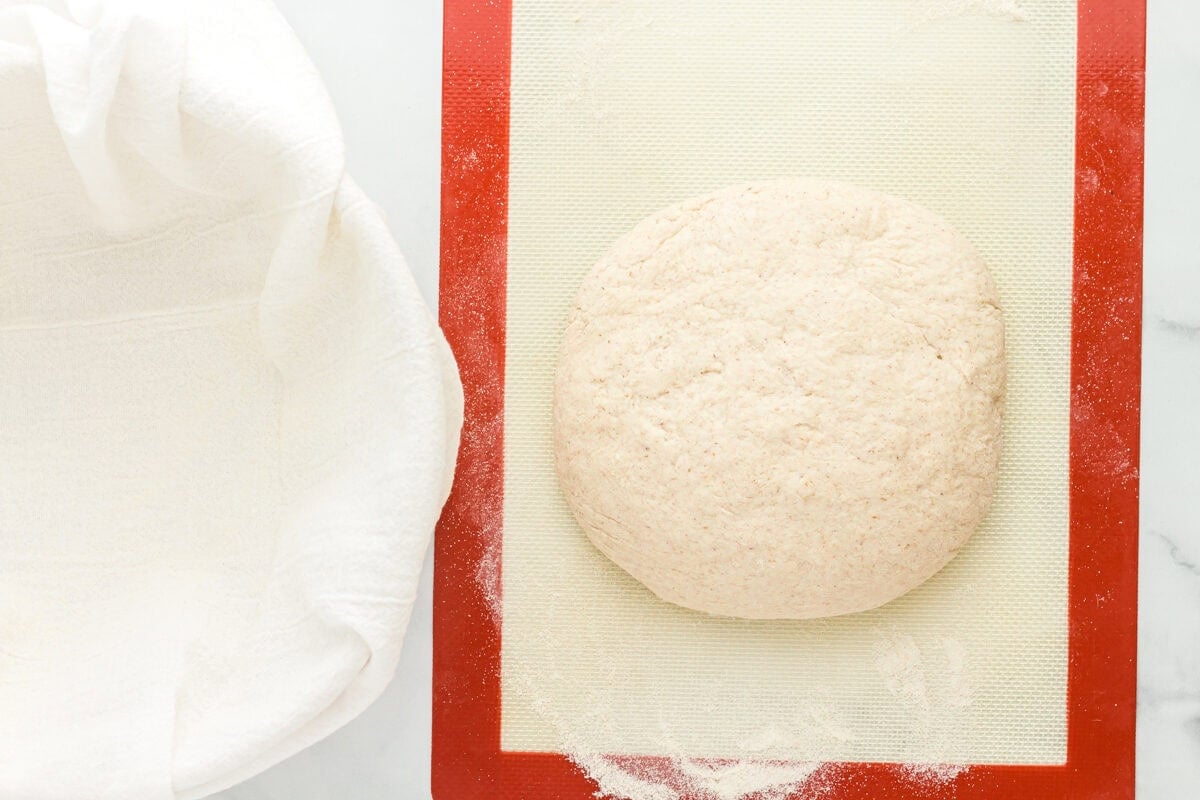
- Lightly flour (using brown rice flour) a clean, dry countertop and lightly knead the dough into a smooth ball. No stretching of the dough is needed. Simply knead the ingredients together gently until smooth. Don’t overwork the dough.
- Lightly flour a round, tea towel-lined bowl and place the dough ball smooth side down into the bowl so the seam is facing up.
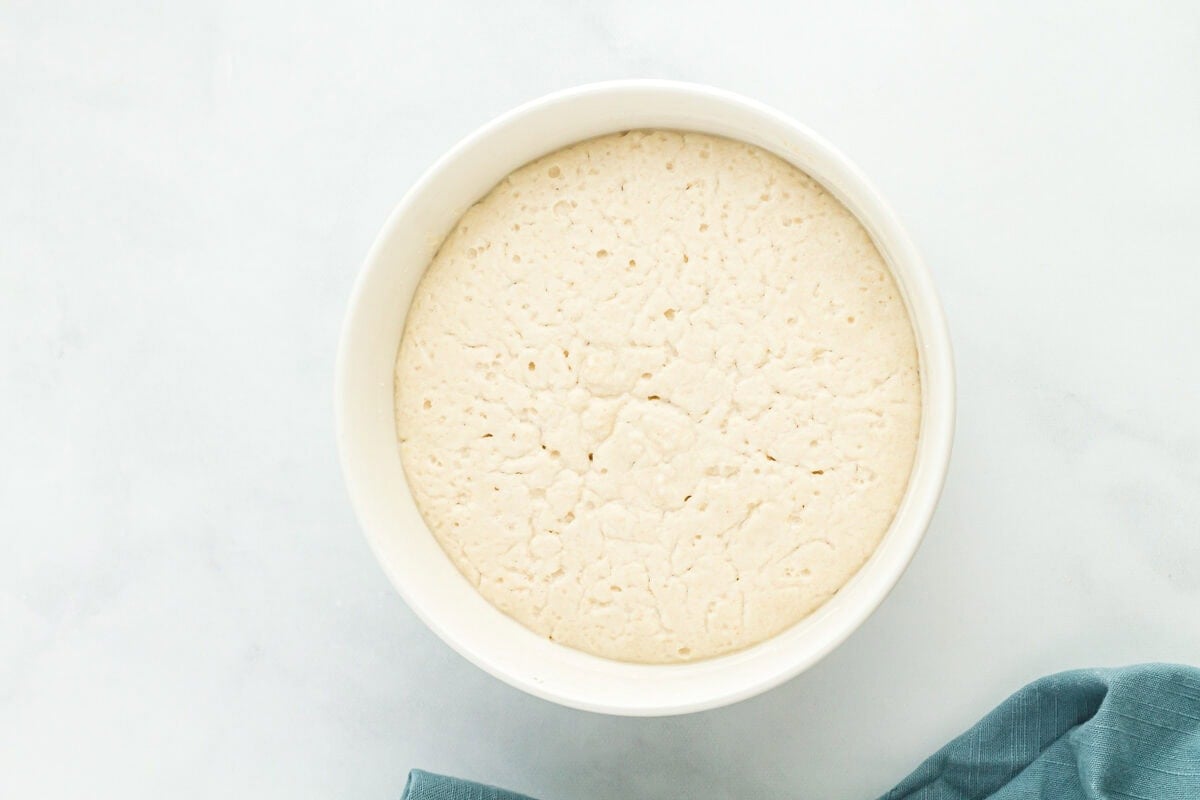
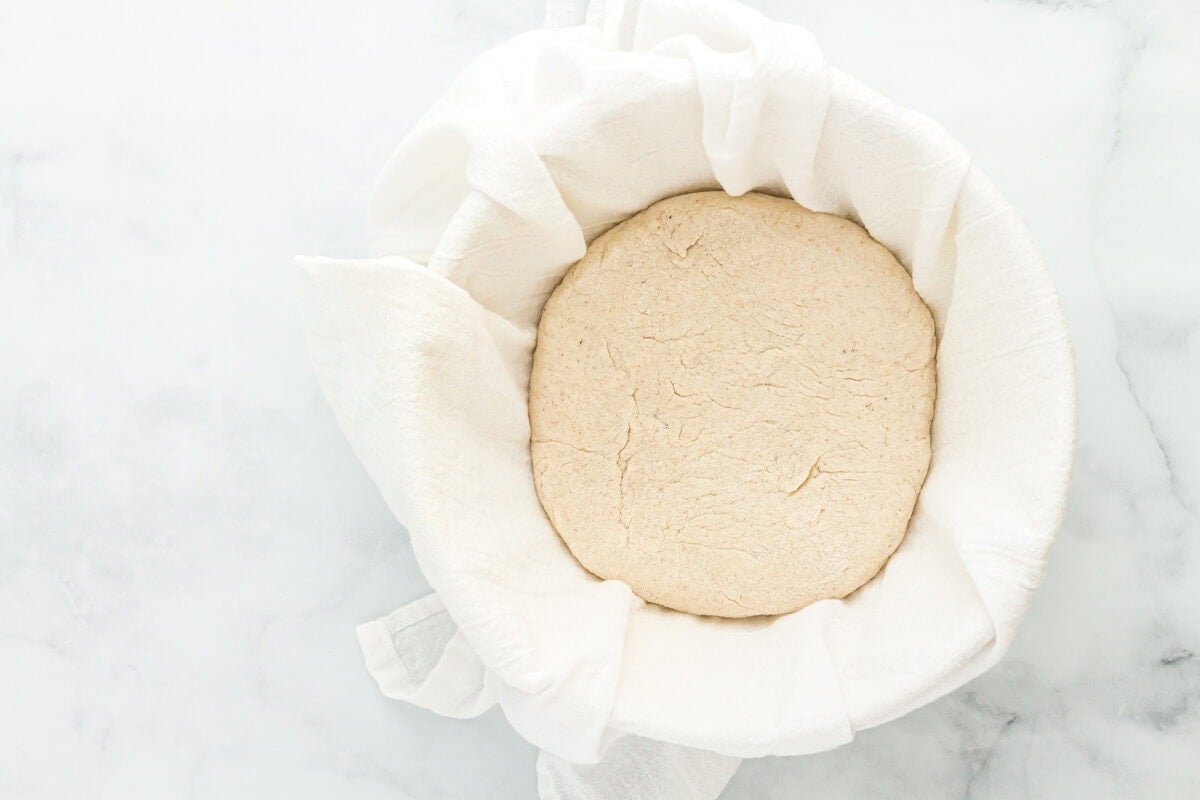
- Lightly cover the bowl with a clean tea towel or food-safe plastic wrap and let the dough proof at room temperature for 3 to 4 hours. Depending on the temperature in your home, this could take longer, up to 6 to 8 hours. It’s ready once it has a soft, puffy texture and the dough rises back up slowly when you gently make an indent.
- An hour before your bread is ready to bake, preheat your oven to 425°F (218°C) with the Dutch oven inside.
- When your oven has been preheating for an hour, gently remove your proofed bread and place on a sheet of parchment paper. Gently move this so you don’t drop it down. Dropping it will limit the bread’s ability to rise properly. The loaf should now be sitting on the parchment paper smooth side up, seams down on the parchment paper.
- Use a sharp knife or a lame to cut lines into the dough to allow steam to escape while baking. Make any design you’d like, but make sure it’s deep enough (at least ¼ inch) or the bread will split in other areas.
- Use the parchment paper as a sling and place both the paper and bread gently inside the hot Dutch oven. Place the lid on and put the Dutch oven back into the oven. It’s important that you don’t leave the Dutch oven sitting out for long. We want this to say as hot as possible so as soon as you remove it from the oven, place the bread in and get the Dutch oven right back into the oven.
- Bake for 45 minutes with the lid on. Remove the lid then bake for an additional 25 to 40 minutes. The bread is done when it is golden brown and the internal temperature is 210°F (99°C). Underbaking will result in a gummy bread.
- Remove the baked bread from the Dutch oven and let it cool completely at room temperature before slicing.
Notes
-
- You don’t want the Dutch oven to be too far down in the oven. If the loaf is starting to burn on the bottom, place a baking tray on the rack under the Dutch Oven to try to block a bit of that direct heat.
- If you want to prepare everything ahead of time, once your dough gets to the proofing stage, you can cover it and place it in the fridge overnight.
- Let the bread cool completely before slicing. If you cut into it too early, you’ll release the steam, and the bread will turn out dense and gummy.
- Mama says, “Make sure to always check your labels!”
Nutrition
Nutrition information is automatically calculated, so should only be used as an approximation.
How To Make Gluten-Free Sourdough Bread Step by Step
Gather the ingredients: Gather all the ingredients together.
Make the preferment: In a medium bowl, stir together 150 grams of active starter, 100 grams of room temperature filtered water, and 80 grams of brown rice flour. Stir until well mixed. Cover lightly and let rest in a warm, draft-free area of your house for 6 to 18 hours. You’ll know it’s ready when it looks like it’s doubled in size and has lots of bubbles. Do not move on to the next step until your preference is ready.
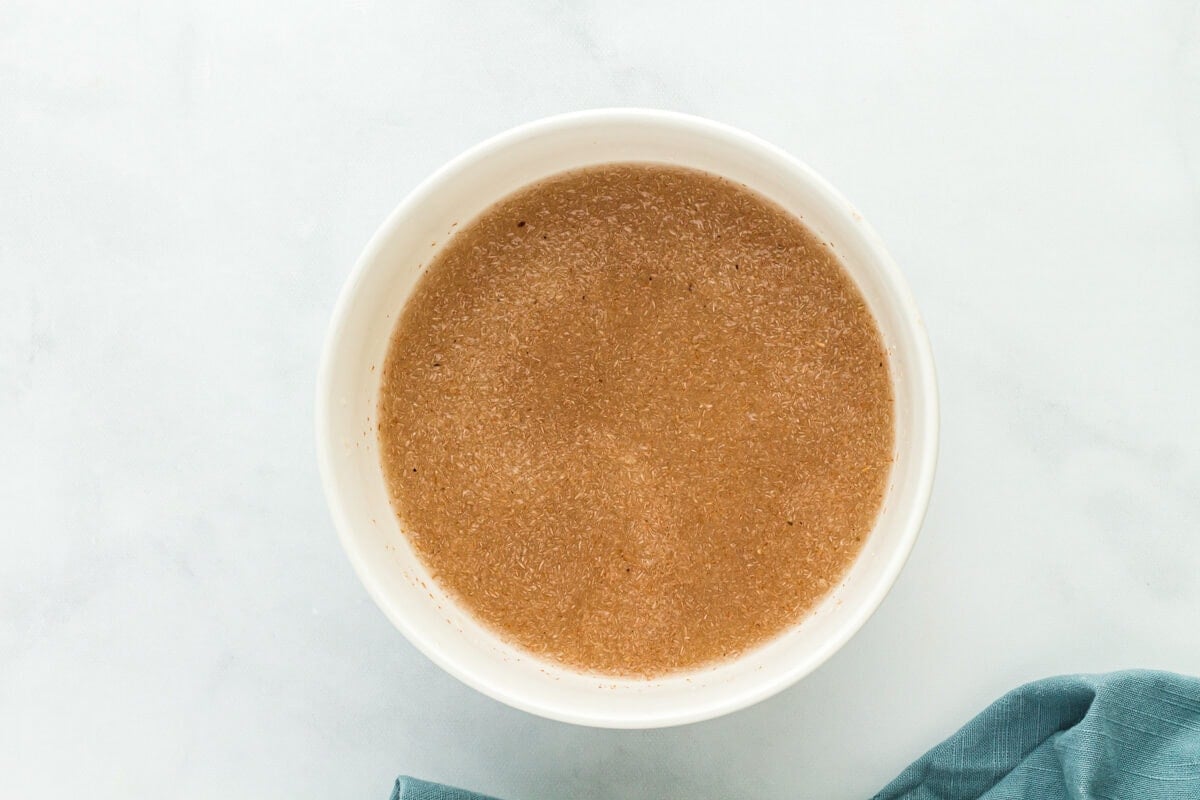
Prepare the psyllium gel: In a medium bowl, stir together the 20 grams of psyllium husk, 20 grams of honey, and 300 grams of room-temperature filtered water. Set aside for a few minutes until it turns into a thick gel.
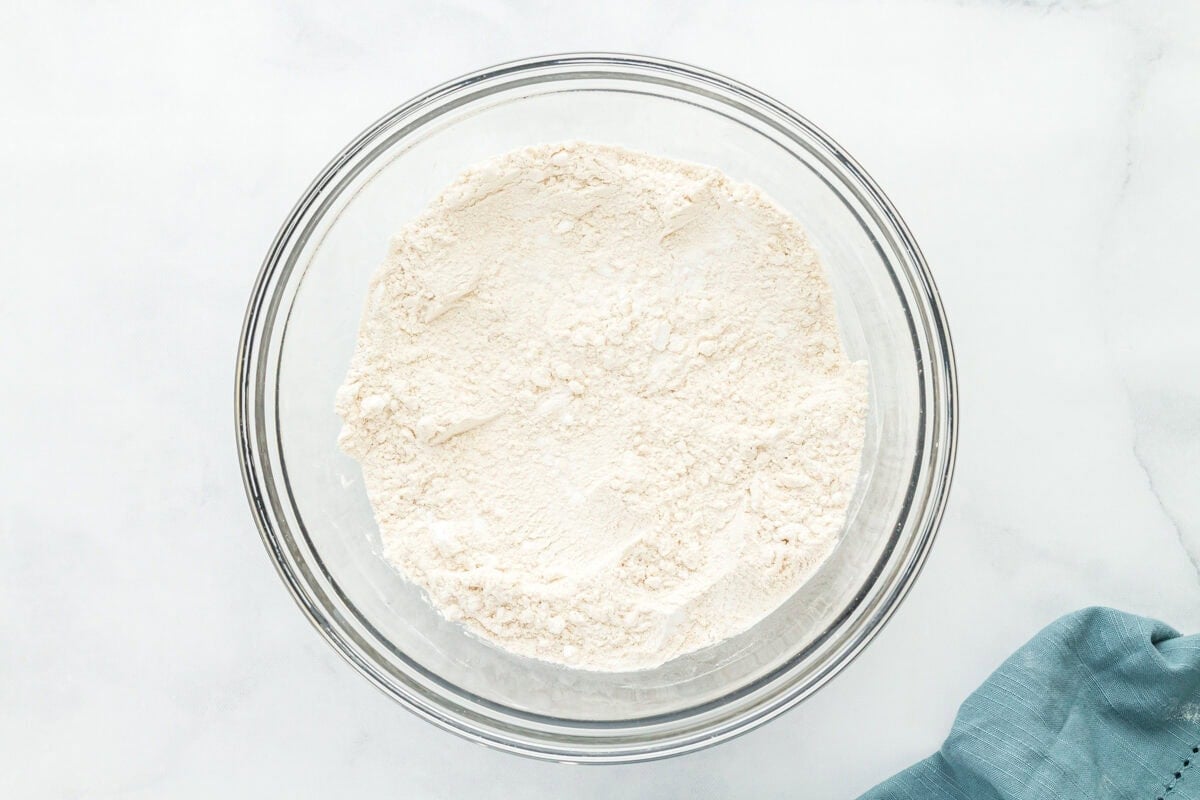
Mix the dry ingredients: In a large bowl, combine 80 grams of potato starch, 80 grams of sorghum flour, 80 grams of brown rice flour, 60 grams of tapioca flour, and 15 grams of salt. Whisk together until well combined.
Form the dough: Add the preferment mixture and the psyllium husk mixture to the dry ingredients and mix on low-medium speed with an electric mixer and dough hook. Use a spatula to scrape down the sides and bottom of the bowl to make sure all the dry ingredients are well combined. You can use your clean hands to work this mixture as well, so that all the dry ingredients have been incorporated into the dough (the dough should feel gummy now, and you should no longer see dry ingredients).
Gently knead the dough: Lightly flour (using brown rice flour) a clean, dry countertop and lightly knead the dough into a smooth ball. No stretching of the dough is needed. Simply knead the ingredients together gently until smooth. Don’t overwork the dough.
Shape and transfer the dough: Lightly flour a round, tea towel-lined bowl and place the dough ball, smooth side down, into the bowl so the seam is facing up.
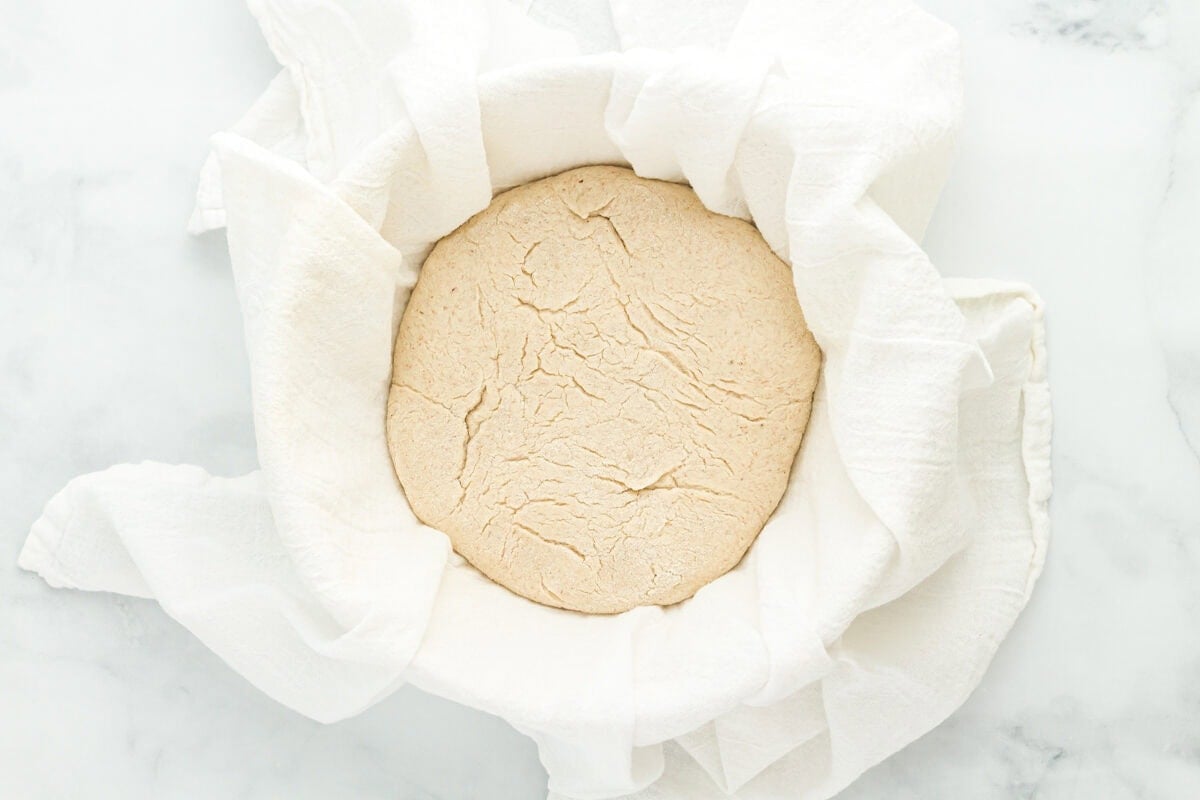
Proof the dough: Lightly cover the bowl with a clean tea towel or food-safe plastic wrap and let the dough proof at room temperature for 3 to 4 hours. Depending on the temperature in your home, this could take longer, up to 6 to 8 hours. It’s ready once it has a soft, puffy texture and the dough rises back up slowly when you gently make an indent.
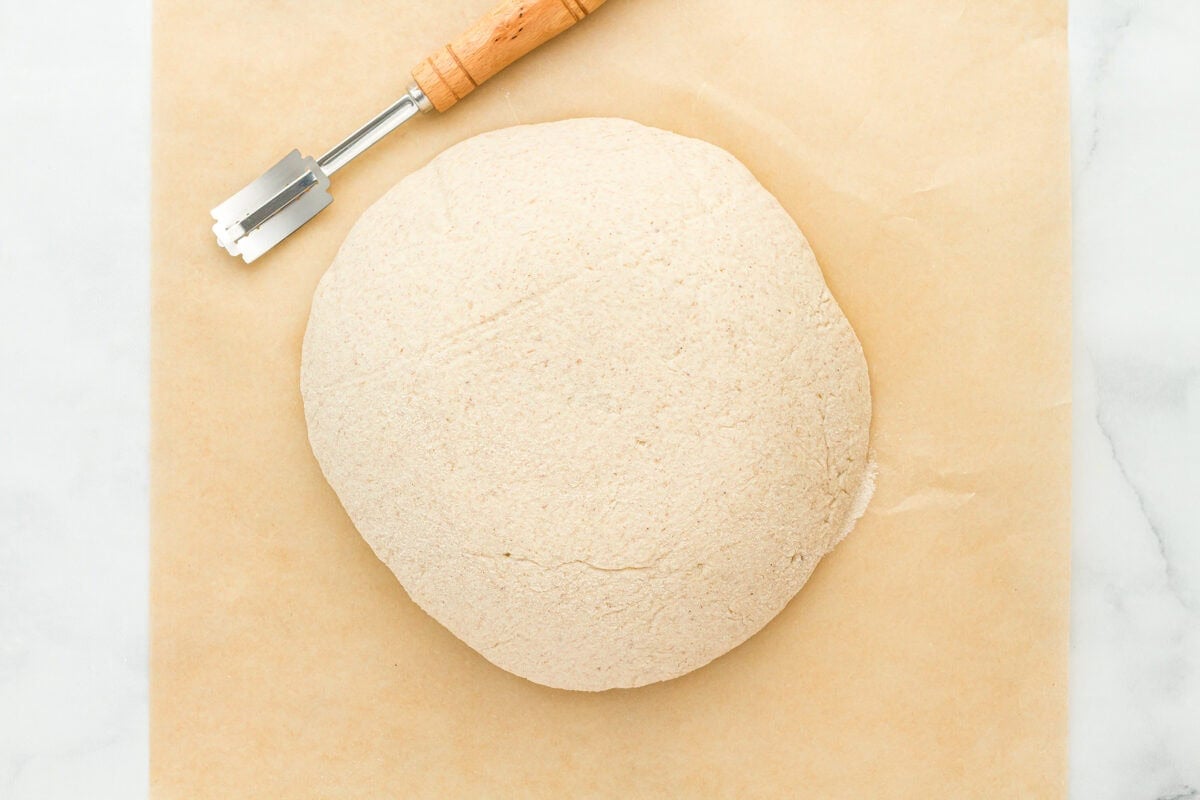
Preheat the oven and prepare the loaf: An hour before your bread is ready to bake, preheat your oven to 425°F with the Dutch oven inside. When your oven has been preheating for an hour, gently remove your proofed bread and place it on a sheet of parchment paper. Gently move this so you don’t drop it. Dropping it will limit the bread’s ability to rise properly. The loaf should now be sitting on the parchment paper, smooth side up, seams down on the parchment paper.
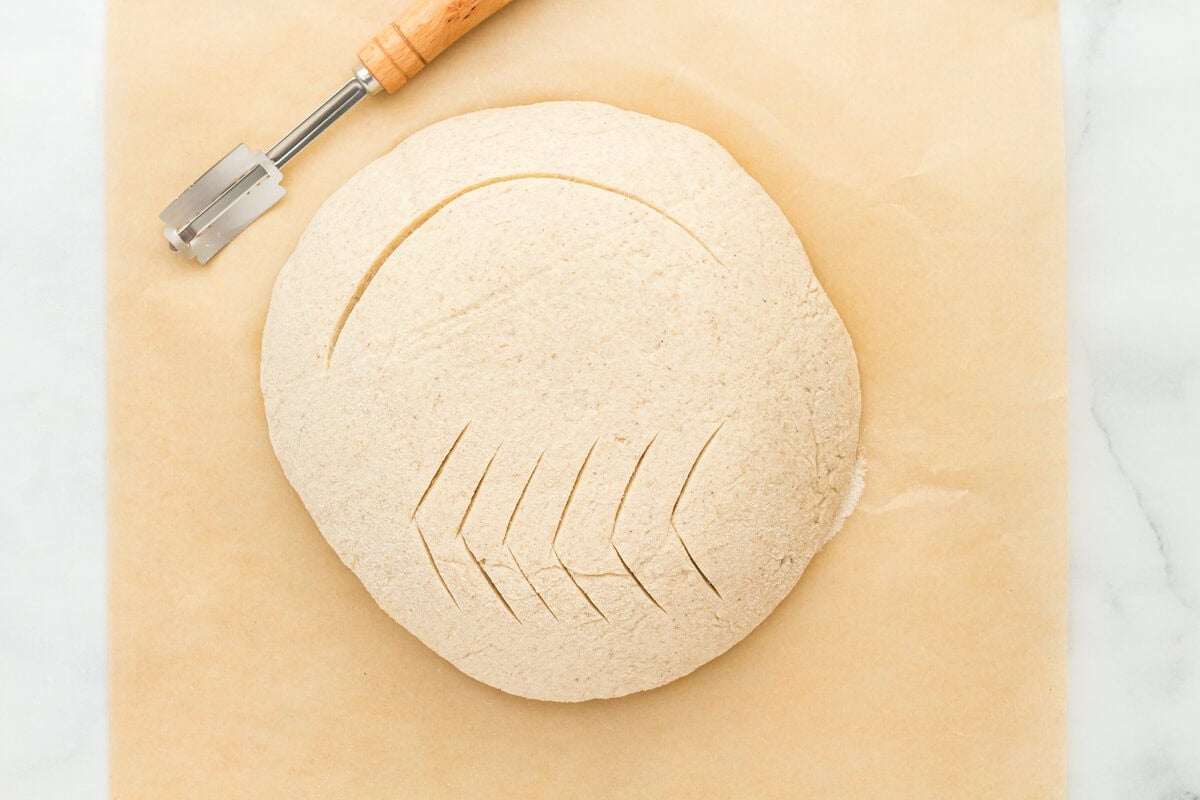
Score and add the dough to the hot Dutch oven: Use a sharp knife or a lame to cut lines into the dough to allow steam to escape while baking. Make any design you’d like, but make sure it’s deep enough (at least ¼ inch) or the bread will split in other areas. Use the parchment paper as a sling and place both the paper and bread gently inside the hot Dutch oven. Place the lid on and put the Dutch oven back into the oven. It’s important that you don’t leave the Dutch oven sitting out for long. We want this to say as hot as possible, so as soon as you remove it from the oven, place the bread in and get the Dutch oven right back into the oven.
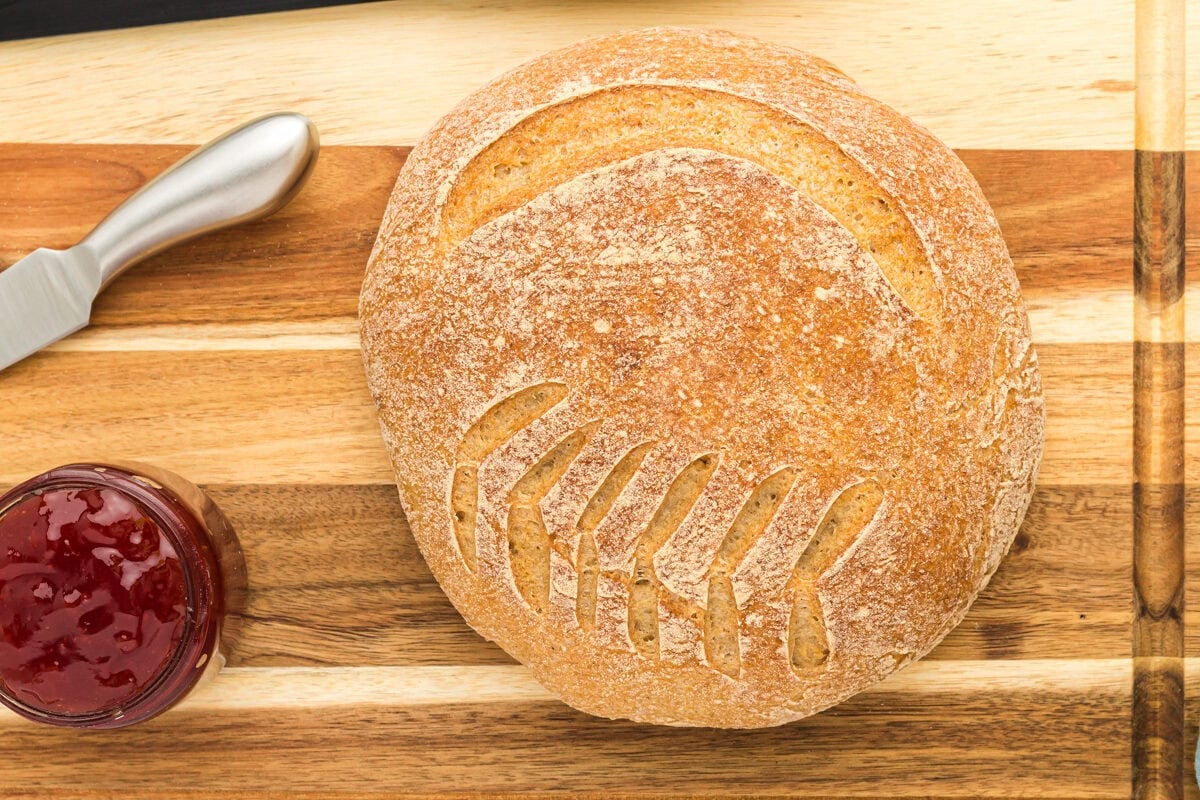
Bake and cool: Bake for 45 minutes with the lid on. Remove the lid, then bake for an additional 25 to 40 minutes. The bread is done when it is golden brown and the internal temperature is 210°F. Underbaking will result in a gummy bread. Remove the baked bread from the Dutch oven and let it cool completely at room temperature before slicing.
Common Questions and Mistakes to Avoid
- Getting gluten-free sourdough right takes some trial and error, especially when you’re working with a starter. One of the most common issues is using a starter that isn’t quite ready. Your gluten-free sourdough starter should be thick and paste-like, similar to Greek yogurt or thick pancake batter. If it’s too runny, try feeding it more flour and less water during the next feeding. It also needs to be active and at its peak, with lots of bubbles and nearly doubled in size. If your starter has been in the fridge, let it sit at room temperature for 24 hours and give it one or two feedings to bring it back to life.
- Many beginners try baking with a young starter, but patience pays off. While a two-week-old starter can technically be used, a mature starter that’s at least a month old will be more reliable and give you better rise and flavor.
- If you’re tempted to swap flours, be cautious. This recipe was specifically tested with superfine brown rice flour. While you can experiment with other gluten-free whole grain flours, keep in mind that each flour has a different absorbency. You’ll likely need to adjust the flour or water amounts to get the dough just right.
- Proofing is another step where things can go sideways. The longer your preferment sits, the tangier the flavor—but timing is key. Start checking your dough after about 3 hours of proofing. Overproofed dough can develop a large air pocket near the top and turn gummy at the bottom. Underproofed dough will feel heavy and lack air bubbles, leading to a dense, gummy texture as well.
- Don’t forget to preheat your oven with the Dutch oven inside. This step is crucial for helping your bread rise properly and develop a nice crust. If you want to prep ahead, you can refrigerate the dough overnight once it reaches the proofing stage—just bring it back to room temperature before baking.
- Finally, remember that gluten-free sourdough baking is part science, part intuition. Factors like weather, humidity, oven differences, and even the brands of flour you use can all impact your results. If your first loaf isn’t perfect, don’t get discouraged. Take notes, tweak your process, and try again. Each attempt brings you closer to your ideal loaf.
Why Isn’t My Dough Rising?
This could be due to too much handling. You’ll want to very lightly knead the dough just to get all the ingredients combined and to shape it. If you’re kneading too hard, you’ll knock the bubbles out. Do not knead the bread after proofing it.
A bread that isn’t rising could also be due to the starter not being ready yet. A more mature starter (a month or more) will likely give better rising results than one that’s only a couple of weeks old.
Did you proof your dough in too big a bowl? If you try to proof the dough on a flat surface or in a really large bowl, the dough is going to start to shape itself to what it is proofing in.
Why Is My Bread Gummy Inside?
This could be due to a variety of reasons. It’s important that your starter is at peak activity, that ingredients were measured properly, that the dough was properly proofed, and so on. Go back over your process to see if one of these reasons could be the problem.
Storage Instructions
Store leftover gluten-free sourdough bread tightly wrapped in plastic wrap at room temperature for up to 4 days. Freeze individual slices tightly wrapped in plastic wrap for up to 3 months. Let thaw overnight in the refrigerator before enjoying.


I am wondering about the preferment starter. Do I use the 150 gms of starter in my jar from the fridge or use a ratio of the fridge starter to make 150 gms? 50 gms starter, 50 gms water and 50gms brown rice flour to make the 150 gms starter for preferment?
Hi Elizabeth, You want to use 150 grams of active, recently fed starter for the preferment, not 150 grams of unfed discard straight from the fridge. If your starter has been stored in the refrigerator, remove it, feed it first, and let it rise until it’s bubbly and at peak activity before measuring out the 150 grams needed for the preferment. For example, you can feed 50 grams starter with 50 grams water and 50 grams brown rice flour to create 150 grams of active starter for the recipe.
Thank you.
Thanks for coaching me on this new adventure in gf sourdough bread making. I began with your starter in February and have made 3 loaves that look nice, taste great, but are a bit too heavy and wet inside. I’ve been tweaking lots of variables and wonder if the size of my cast iron dutch oven is partly to blame. It’s a 2-qt d.o. and I’m wondering if I should go larger to allow the dough to expand more. Your recipe doesn’t mention a size. Can you help, please?
Hi Joanne, Your 2-quart Dutch oven could definitely be part of the issue—it can restrict how the dough expands and trap too much steam in a tight space, which can lead to a denser loaf with a wetter interior. Most sourdough recipes are designed to be baked in a 4.5–5.5 quart Dutch oven, which gives the dough enough room to rise properly while still creating the right steamy environment for a good crumb. So upgrading to a larger size should help improve the texture, though a slightly heavy interior can also be influenced by hydration and bake time.
When I was able to eat wheat I used to make my own sourdough bread. But I used to spray water on it about every 15 – 20 min while it was baking to give it that San Francisco hard crust. Can that be done with gluten-free sourdough bread?
Hi Mark, Yes you can! But, I’d suggest only doing this for the first half of baking as the gluten-structure differs and could make the crust softer if you over spray.
I am looking to do first the sourdough and then bake with it. Can I bake the bread in a n electric bread machine?
Hi there, I don’t recommend baking this recipe in a bread machine. Gluten-free sourdough behaves more like a thick batter than a kneadable dough, and bread machines typically run multiple knead and rise cycles that don’t work well for gluten-free breads. This recipe was developed to be mixed gently and baked in the oven so the texture sets properly.
My starter is over 5 weeks old, it doubles and bubbles nicely. My preferment bubbles but even at 18 hours in the oven with the light on it but doesn’t double. I’ve made 2 loaves of bread, both dark on the outside, 210 degrees inside, completely cooled before cutting but both were dense and a little sticky inside. Threw 2 other preferential out because they didn’t double. Any suggestions?
Hi Sandra, It sounds like your starter is healthy, which is great. With gluten-free sourdough, the preferment doesn’t always fully double like wheat dough, even when it’s ready — bubbles, a slightly domed top, and a tangy smell are better indicators than volume alone. If your bread is dense and a little sticky, it’s often due to cool proofing temps (aim for 78–82°F), slightly low hydration, or not quite enough structure from psyllium or gum. I’d try feeding your starter once or twice before mixing, proofing a bit warmer, and making sure the dough is properly hydrated and baked a little lower and longer so the inside sets before the crust gets too dark.
My First attempt at sourdough with a 10 day old George as my starter. He did great for being so young.
I started with this recipe from Mama Knows Gluten Free. Hers was the first loaf of bread I had baked so I stuck with tradition on my first sourdough loaf.
In the recipe I had to substitute corn starch for the potato starch and had to supliment about 13 g of millet flour for the sorghum ( already on order along with some other goodies ).
Kudos to all of y’all on the sourdough as this was an all day adventure! I am very happy for the results (as is my family – they all love my new “hobby”). It is a little gummy even after letting it rest for +/- 15 hours after baking. Someone I the comments of the recipe said they let the temp go to 220f and had better results. I got to 211f but we had dinner reservations at 8 and a 35 min drive to get there. Speaking of dinner – they had a cast iron poblano corn bread that was to die for – you know imma make that soon. Overall the sourdough taste was mild but I believe that to be expected with a young starter. Cannot wait to do my next loaf. Definitely learned some lesson on the preferment and the proofing. Speaking of proofing I used my own rendition of a proofing box (big ole insulated grocery bag with a 2 QT glass measuring cup and hot water at a temp range of 97 – 88 deg. I heated the water up I think 3 times).
Thanks y’all for all the tips and reviews.
Thank you so much Todd!
how do I bake my bread in a cast iron loaf pan with a cast iron lid, and for how long
Hi Sandra, Preheat the empty pan and lid in the oven to 450°F. Carefully transfer your proofed dough into the hot pan, cover immediately, and bake with the lid on for about 20–30 minutes to trap steam and help the loaf rise. Then remove the lid and bake another 15–25 minutes until the crust is golden and the internal temperature reaches about 205–210°F. Total bake time is usually 40–50 minutes. Let us know how it comes out!
my stand mixer with dough hook had a metal bowl, ccan I use that bowl?
Hi Sandy, yes that works!
What about Bobs 1:1 gluten free flour for starter then adding xanthan gum when ready to bake? Can I use that for the starter ? Thanks!
I am allergic to psyllium husk, what can i use instead?
Hi Betty, A good substitute for psyllium husk is soaking ground chia or flax seeds. For every 1 tbsp of psyllium husk- use 1 tbsp ground chia seeds mixed with 3 tbsp of water. Let it sit for 10-15 minutes to form a gel before adding it to the dough.