Gluten-Free Cinnamon Rolls
Updated


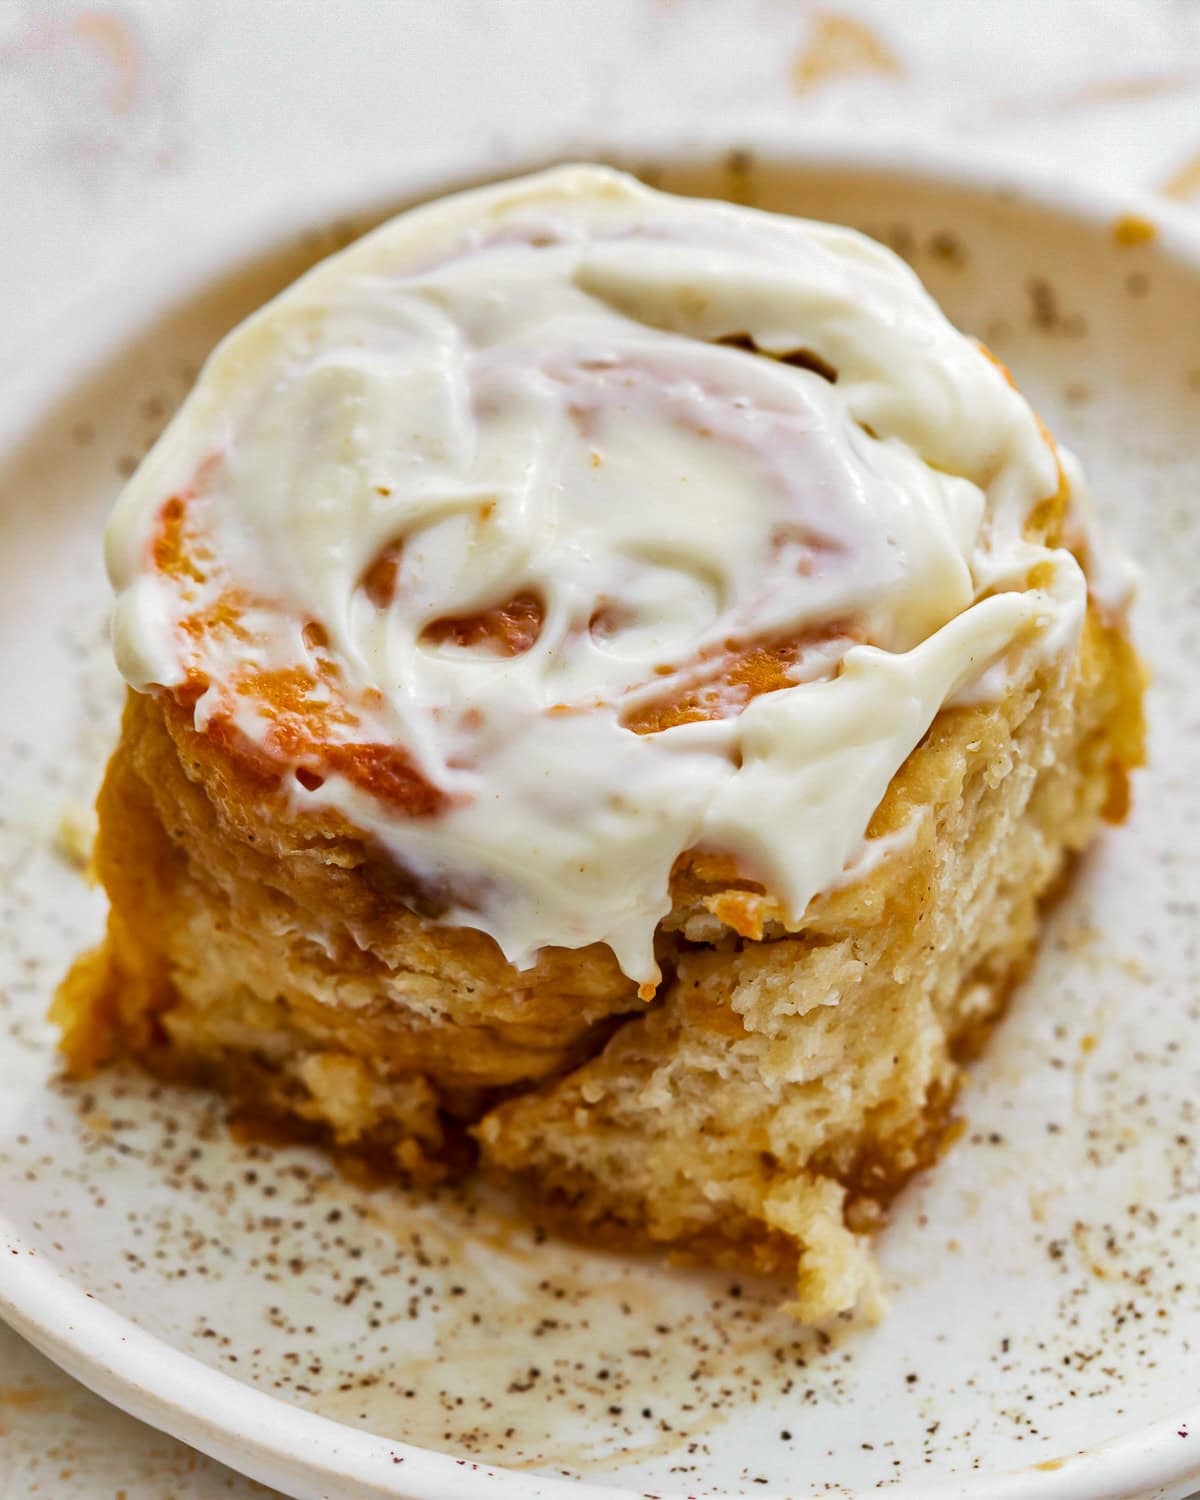
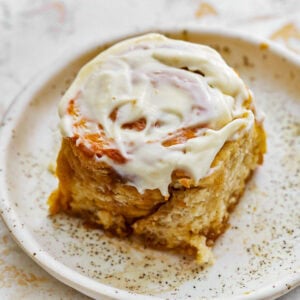
In my opinion, there’s no better breakfast than a warm, gooey gluten-free cinnamon roll. Whether you like them topped with tangy cream cheese frosting or drizzled with vanilla icing, I’ve got you covered! These easy gluten-free cinnamon rolls are soft, fluffy, and packed with cinnamon! They can also easily be made dairy-free, egg-free, or vegan!
Crazy good!!! We used the cream cheese frosting that oozed down between tender layers of cinnamon dough. Best gf cinnamon roll I’ve ever had, AND better than most gluten ones!
– Gina
Gluten-Free Cinnamon Rolls Recipe
Cinnamon rolls are always a crowd favorite, especially for a sweet breakfast or brunch treat. While they’re often served on Easter or Christmas morning, you don’t need a special occasion to enjoy them! These gluten-free cinnamon rolls come together with simple, step-by-step instructions, a quick-rise method, and two delicious topping options—classic cream cheese frosting or a sweet vanilla glaze.
Gluten-Free Baking Tips
- Use a yeast-friendly gluten-free flour blend. For soft, well-risen cinnamon rolls, choose a gluten-free blend that includes a binder like xanthan gum or psyllium husk. Good options: Pillsbury GF, King Arthur GF Bread Flour, Better Batter, or Cup4Cup. Avoid single flours (like almond or oat) and blends without binders—they won’t rise properly and result in dense, gummy dough. If your blend doesn’t contain a binder, add 1 teaspoon xanthan gum per cup of flour.
- Do not overheat the milk or the butter. It could kill the yeast, and the cinnamon rolls will not rise. They should be warm to the touch like bathwater.
- Microwave the milk. I use a glass measuring cup for 1 minute to bring it to 110-115°F. I also use a thermometer to check the temperature.
- Do not roll the dough too thin. Gluten-free yeast dough is not as pliable as traditional cinnamon roll dough.
- Seal cracks in the dough with warm water. Dip your fingers in warm water during rolling, and smooth over the dough.
- Roll the dough up tightly, but not so tightly that it squeezes out the filling. A gentle tension is ideal.
- The second rise happens directly in the oven while it is preheating! Watch carefully and start the timer to bake the rolls as soon as the oven reaches temperature.
Gluten-Free Cinnamon Rolls
Ingredients
Gluten-Free Dough
- ½ cup granulated sugar
- 1 cup milk, warmed to 110-115°F (43-46°C)
- 1 tbsp instant yeast/rapid yeast
- ¼ cup unsalted butter, melted and cooled
- 2 large eggs, room temperature
- 1 tsp apple cider vinegar
- 3¼ cups gluten-free all-purpose flour with xanthan gum recommended for yeast baking, (we recommend Pillsbury or Better Batter Brand)
- 2 tsp baking powder
- ¼ tsp salt
- ½ cup heavy whipping cream, warmed
Cinnamon Filling
- ¼ cup unsalted butter, softened
- ½ tsp pure vanilla extract
- 1 cup brown sugar, packed
- 1½ tbsp ground cinnamon
Cream Cheese Frosting
- 6 oz. cream cheese, softened
- ⅓ cup unsalted butter, softened
- 2 cups powdered sugar
- 1 tsp pure vanilla extract
- ⅛ tsp salt
Vanilla Icing
- 2 cups powdered sugar
- 5 tbsp milk
- 1 tsp pure vanilla extract
Instructions
For the Rolls:
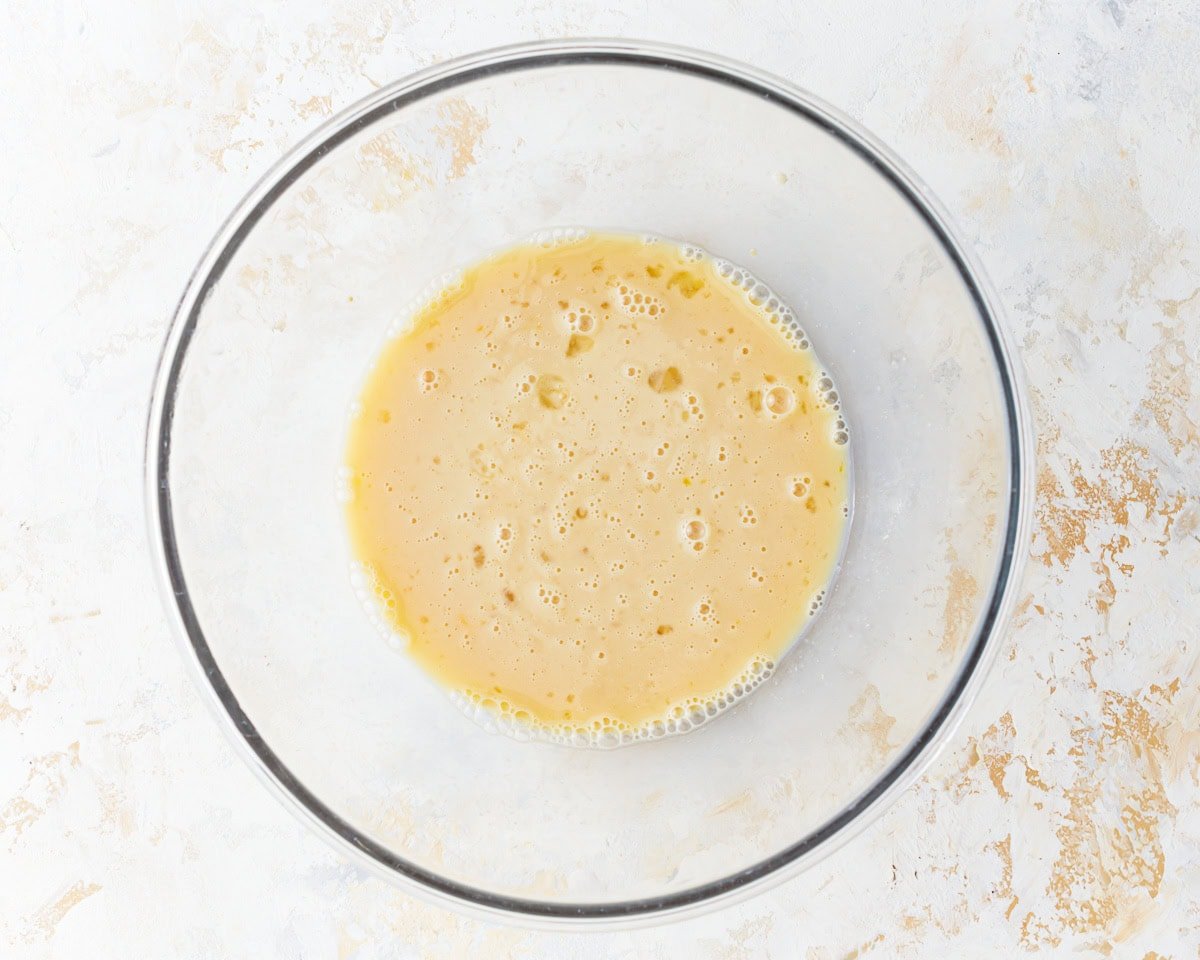
- Pour the warm milk into a large mixing bowl. Add the granulated sugar to the warm milk and stir to combine. Pour the instant yeast over the milk mixture, cover with a kitchen towel, and allow it to bubble up for 1-2 minutes.
- Whisk the room-temperature eggs in a small bowl. Add the whisked eggs and the apple cider vinegar into the mixing bowl. Mix until the ingredients are combined.
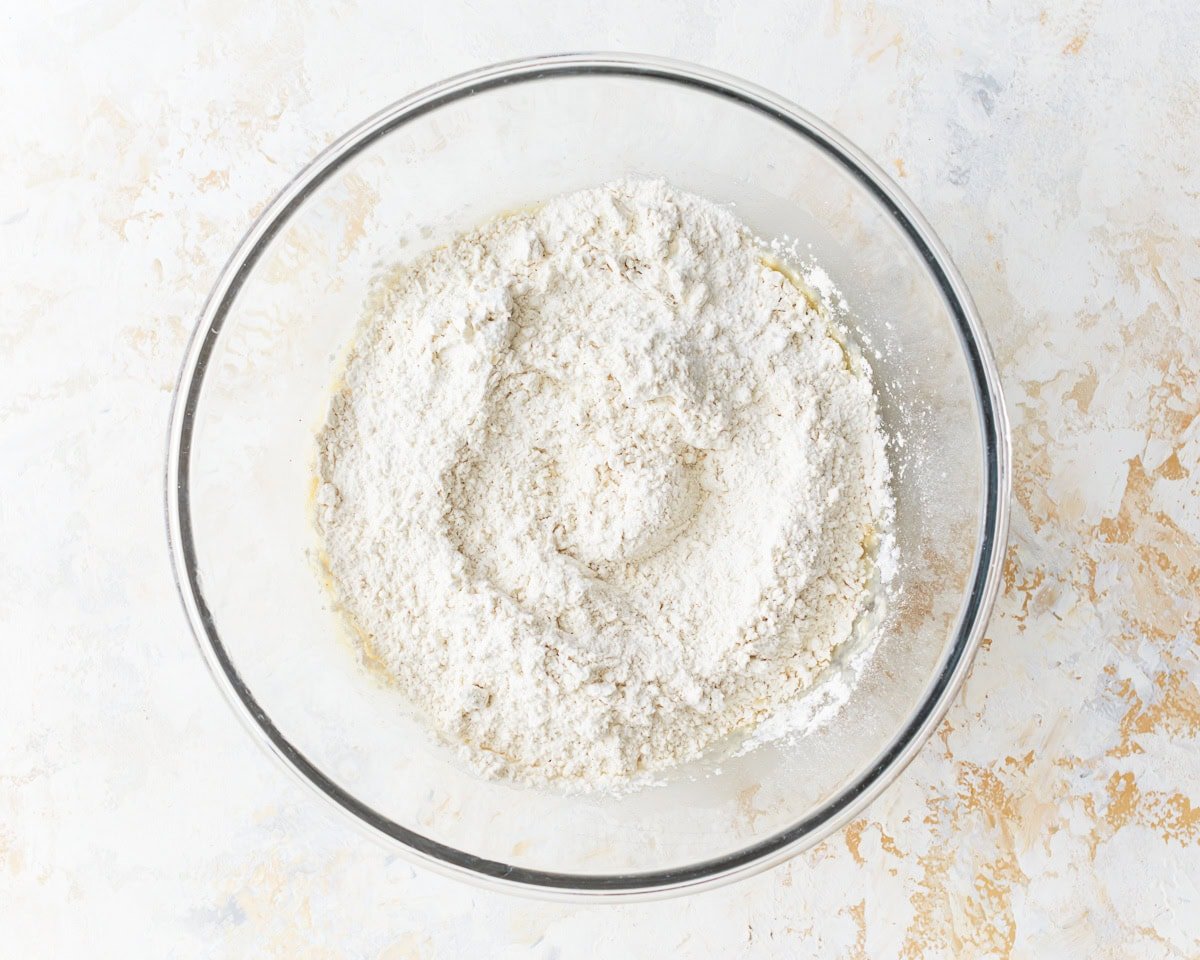
- Add the gluten-free flour, baking powder, and salt to the mixing bowl.
- Add the melted butter to the flour mixture and mix for 1-2 minutes, or until the ingredients are fully combined. I used the paddle attachment to my KitchenAid stand-up mixer. Scrape down the sides of the bowl.
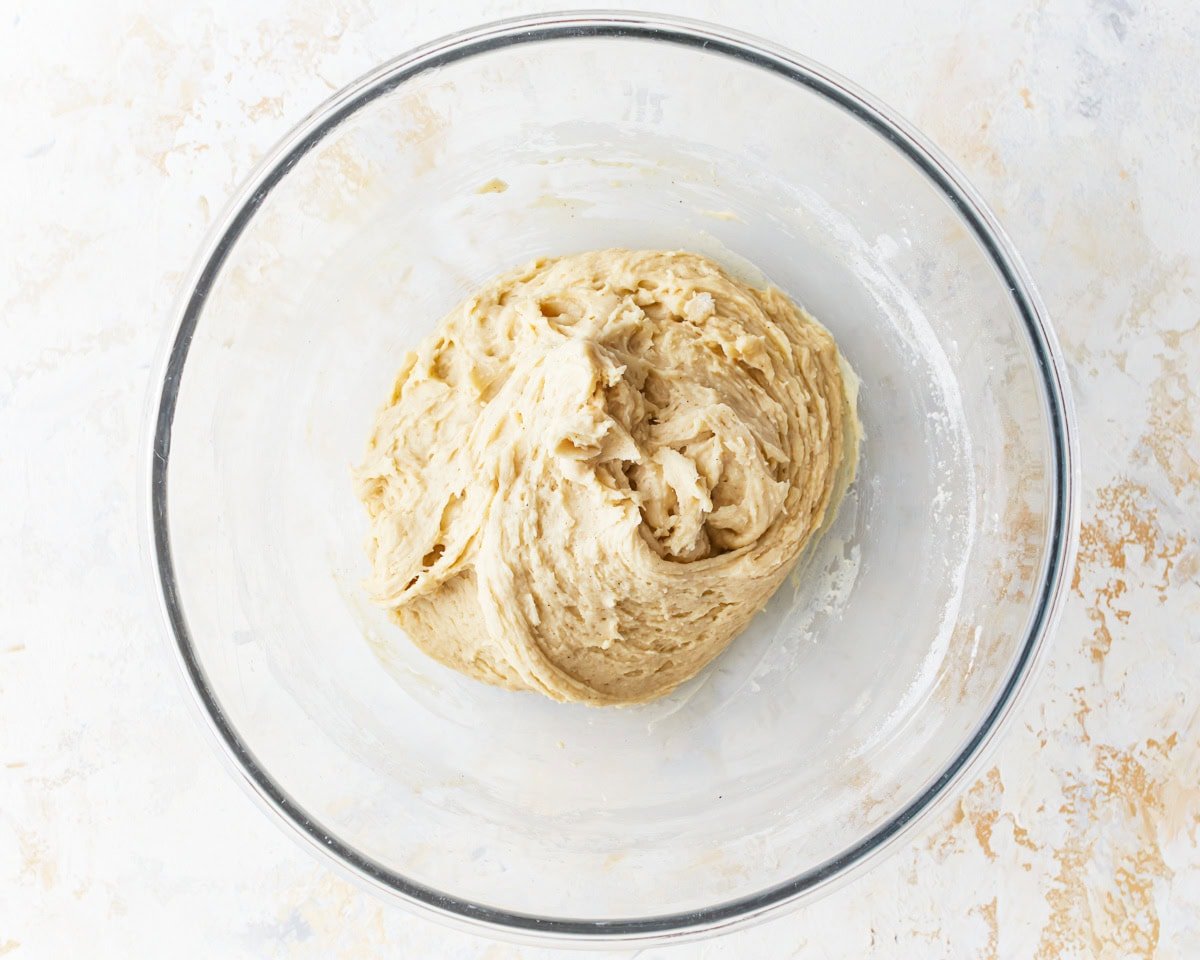
- Change the paddle attachment to the dough hook and mix on medium speed for 3-5 minutes. Your dough will start to pull away from the sides of the bowl. The dough will be tacky and soft. Do not add more flour! Gluten-free yeast dough is softer than traditional yeast dough.
- Place the dough in a greased, heat-proof bowl. Wet your hands with warm water and rub the dough ball to make it smooth. This step also adds moisture for the rise. Cover the bowl with plastic wrap.
- Place the bowl with the dough inside of a larger heat-proof bowl. Heat 2 cups of water in the microwave for 2 minutes. Carefully pour the hot water into the larger bowl, and do not get water into the covered dough bowl. Cover the bowls with a kitchen towel and allow the dough to rise for 20 minutes.
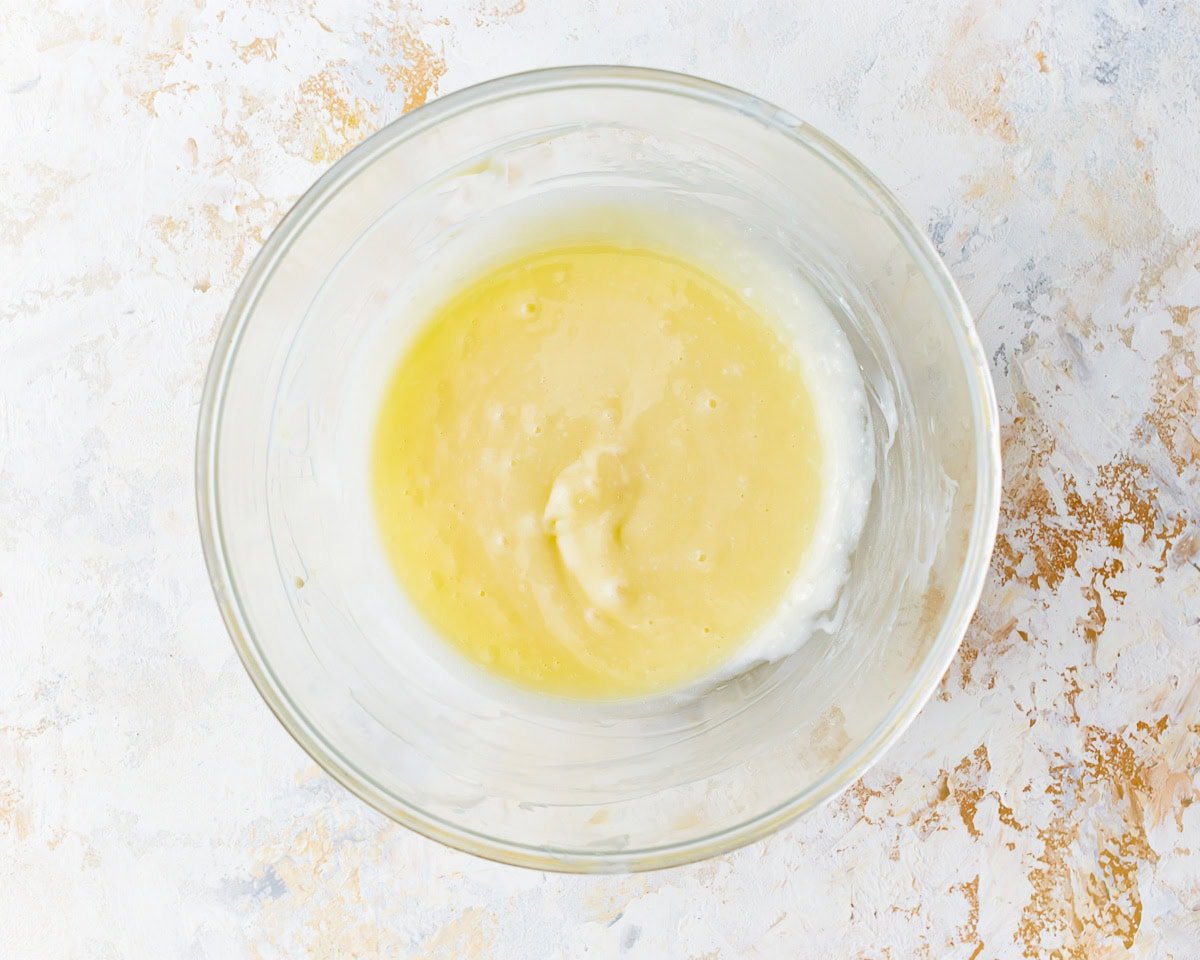
- While the dough is rising, make the cinnamon filling: In a small bowl, mix together the softened 1/4 cup of butter and the pure vanilla extract until combined and smooth.
- In another small bowl, mix together the brown sugar and cinnamon.
- Spray a piece of parchment paper with gluten-free cooking spray or grease with oil/butter. Place the risen dough on top of the greased parchment paper, dust the top of the dough with 1 tablespoon of gluten-free flour, and shape the dough into a rectangle. Dust your rolling pin with gluten-free flour and roll out the dough to about 1/2-inch thick and a 12×14-inch rectangle.
- Using a spatula, spread the butter mixture on top of the rolled-out dough all the way to the edges.
- Sprinkle the brown sugar mixture over the butter. Pat down with your hands.
- Using the edge of the parchment paper, fold the longest edge up to start the roll. Slowly roll the dough, keeping it tight, to form a log shape.
- Cut the dough log in half. Then cut each half into 6 equal rolls. I use dental floss to easily cut the dough.
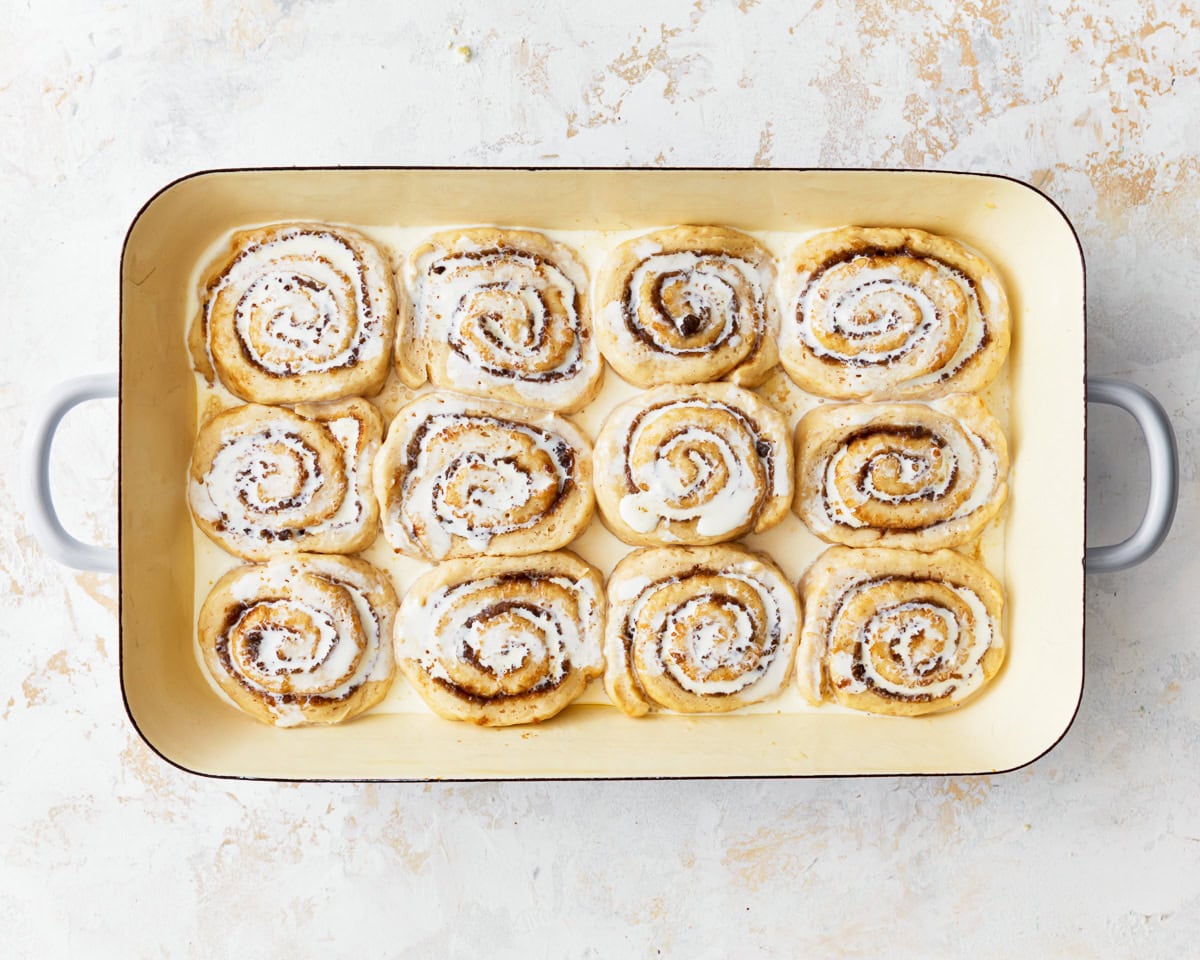
- Place the rolls in a greased 9×13-inch baking dish.
- Heat the heavy cream in the microwave for 30 seconds. Pour the warm cream over the cinnamon rolls.
- Place the cinnamon rolls on the middle rack of your oven. Turn your oven to 375°F (190°C). This is the second rise. Once your oven comes to temperature (375°F), bake the rolls for 15-20 minutes until light golden brown. Please check your rolls at the 15-minute mark.
- Allow the cinnamon rolls to cool for a few minutes before frosting or icing them.
For the Cream Cheese Frosting:
- In a medium-sized bowl, beat together cream cheese, butter, pure vanilla extract, and salt until smooth. Add the powdered sugar one cup at a time and mix until smooth. Do not chill the frosting. Keep it at room temperature until the cinnamon rolls are baked. Spread the cream cheese frosting on the warm cinnamon rolls.
For the Vanilla Icing:
- In a medium-sized bowl, stir together all of the ingredients until smooth. Spread the icing over the warm cinnamon rolls.
Notes
- No stand mixer? You can mix the dough with a spoon and knead by hand—it’s more effort but totally doable.
- Bring eggs to room temperature — Place whole (uncooked) eggs in a bowl of warm water for 5 minutes to help them incorporate more easily.
- Flour your rolling pin — Prevents sticking and makes shaping the dough easier.
- Use dental floss to cut the rolls — It makes cleaner cuts without flattening the swirls like a knife might.
Nutrition
Nutrition information is automatically calculated, so should only be used as an approximation.
How To Make Gluten-Free Cinnamon Rolls Step by Step
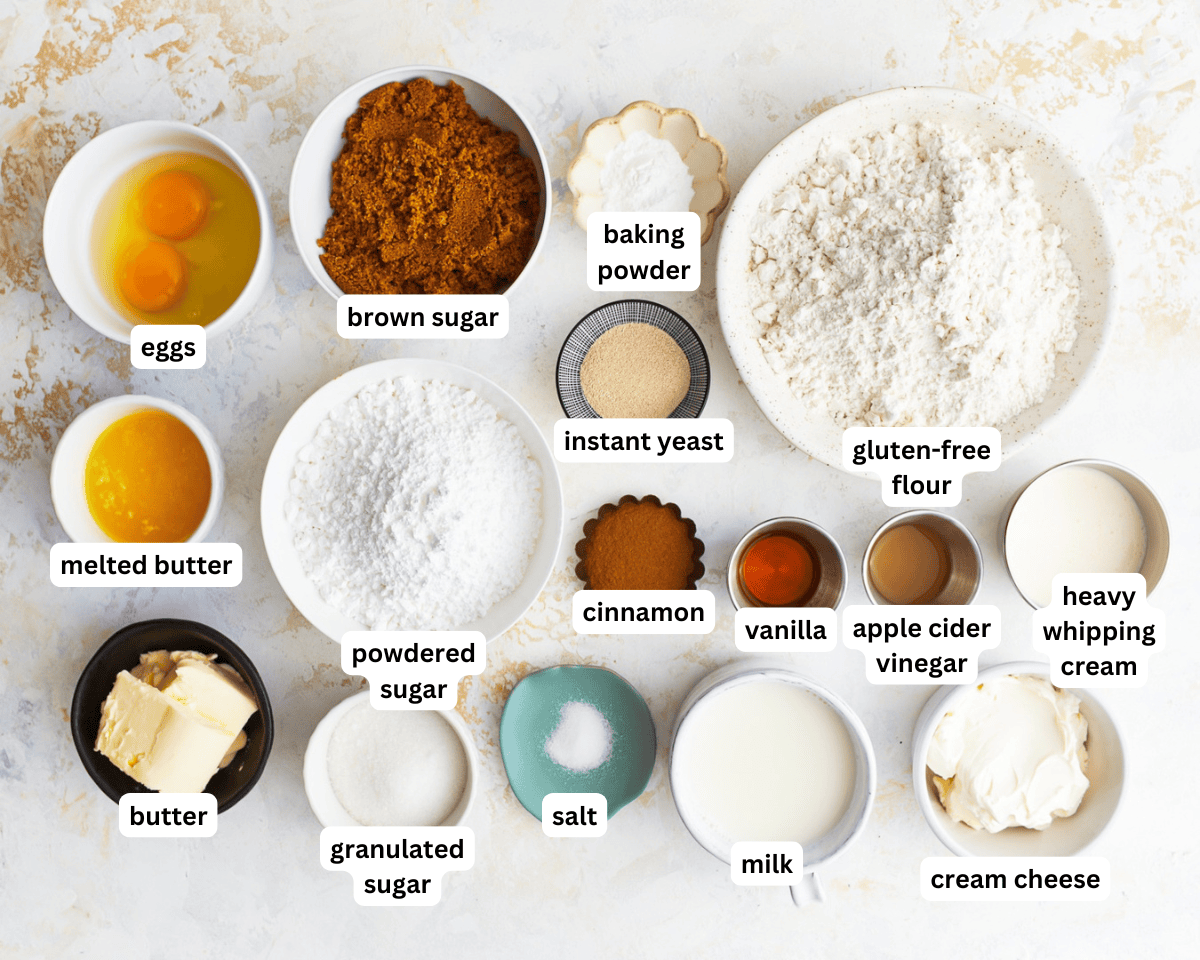
Gather all the ingredients together.

Proof the yeast base: Pour 1 cup of warm milk into a large mixing bowl. Add 1/2 cup of granulated sugar to the warm milk and stir to combine. Pour 1 tbsp of instant yeast over the milk mixture, cover with a kitchen towel, and allow it to bubble up for 1-2 minutes.
Add eggs and vinegar: Whisk 2 room-temperature eggs in a small bowl. Add the whisked eggs and 1 tsp of apple cider vinegar into the mixing bowl. Mix until the ingredients are combined.
Combine the dry ingredients: Add 3 1/4 cups of gluten-free flour, 2 tsp of baking powder, and 1/4 tsp of salt to the mixing bowl.
Add the melted butter: Add the melted butter to the flour mixture and mix for 1-2 minutes, or until the ingredients are fully combined. I used the paddle attachment on my KitchenAid stand-up mixer. Scrape down the sides of the bowl.
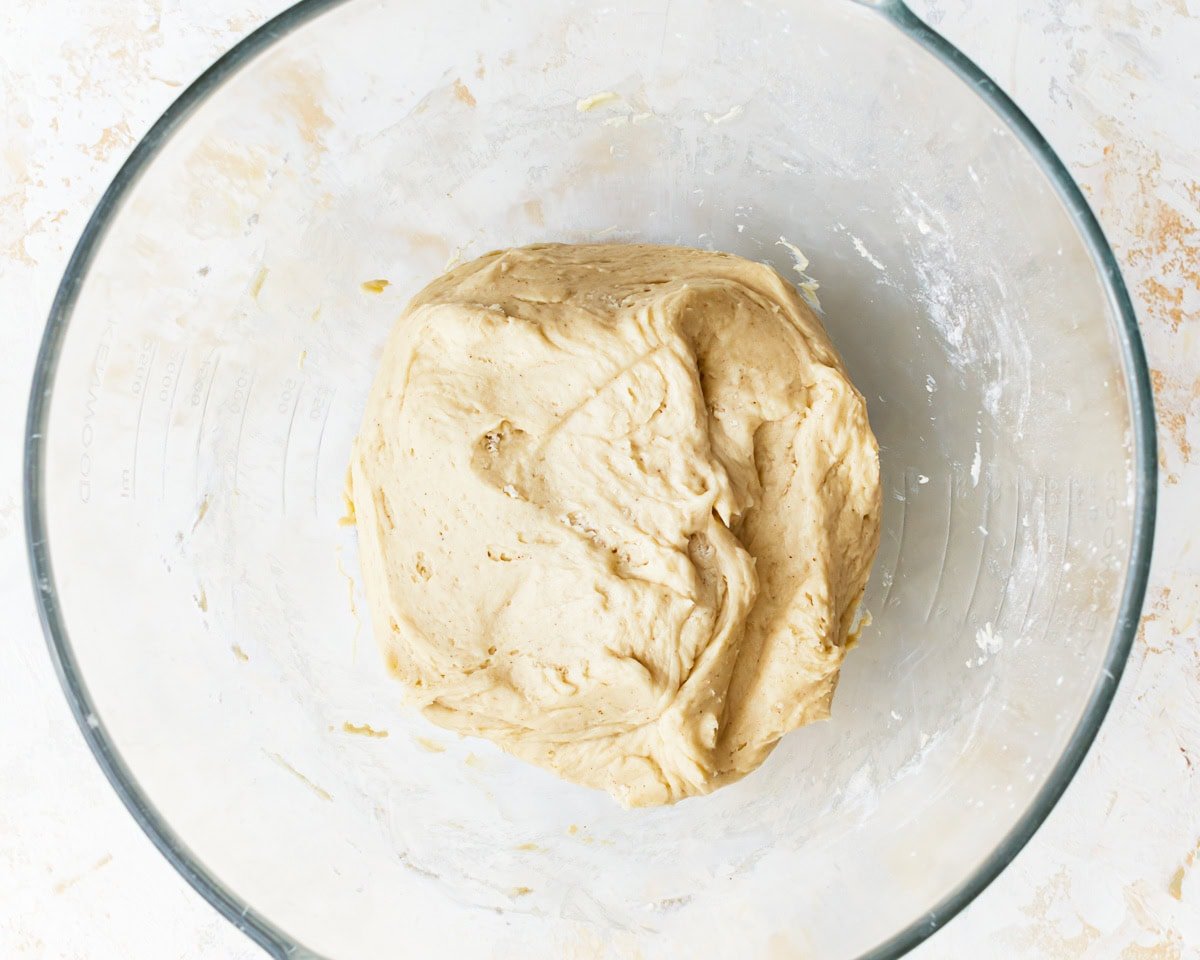
Gently knead the dough: Change the paddle attachment to the dough hook and mix on medium speed for 3-5 minutes. Your dough will start to pull away from the sides of the bowl. The dough will be tacky and soft. Do not add more flour! Gluten-free yeast dough is softer than traditional yeast dough.
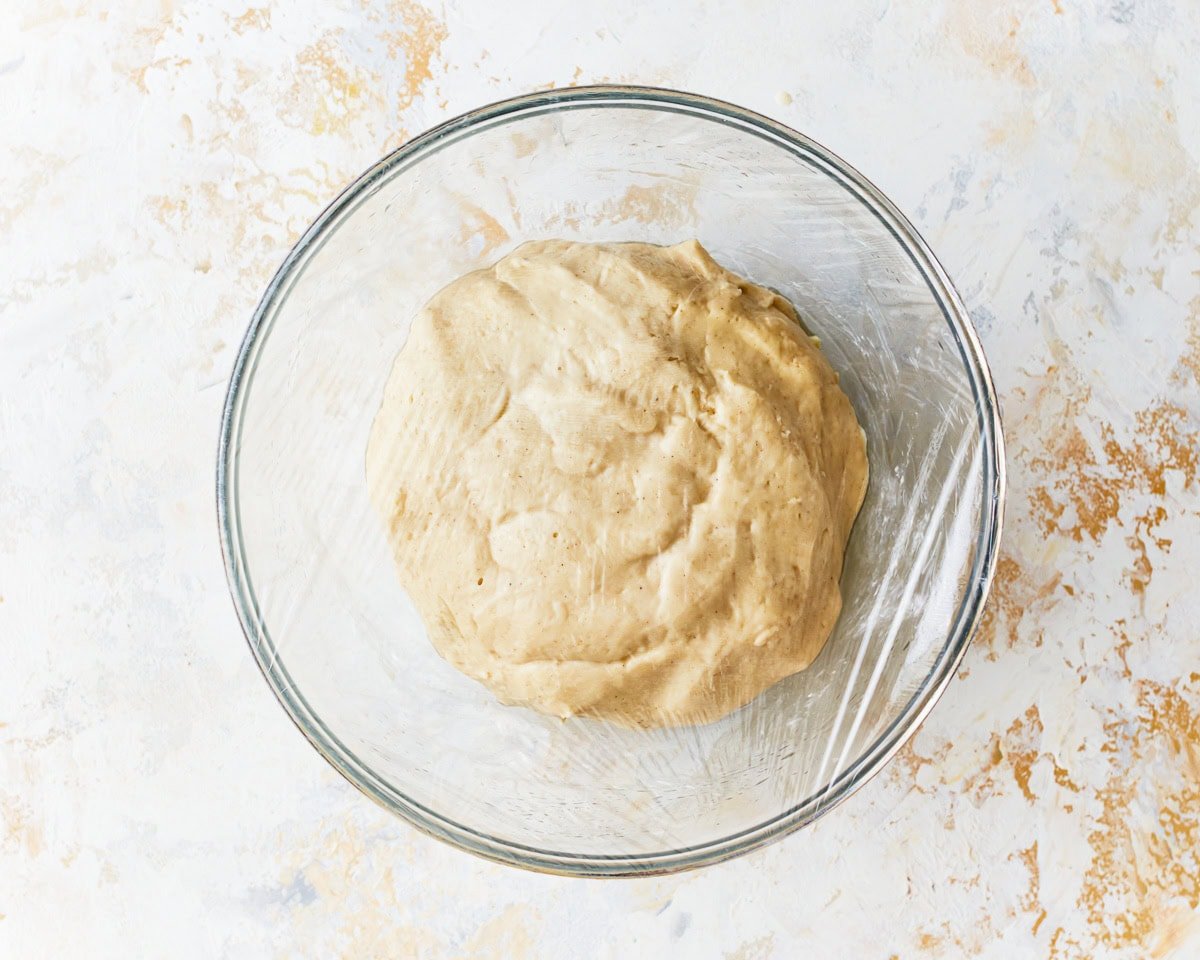
First rise: Place the dough in a greased, heat-proof bowl. Wet your hands with warm water and rub the dough ball to make it smooth. This step also adds moisture for the rise. Cover the bowl with plastic wrap. Place the bowl with the dough inside a larger heat-proof bowl. Heat 2 cups of water in the microwave for 2 minutes. Carefully pour the hot water into the larger bowl, and do not get water into the covered dough bowl. Cover the bowls with a kitchen towel and allow the dough to rise for 20 minutes.
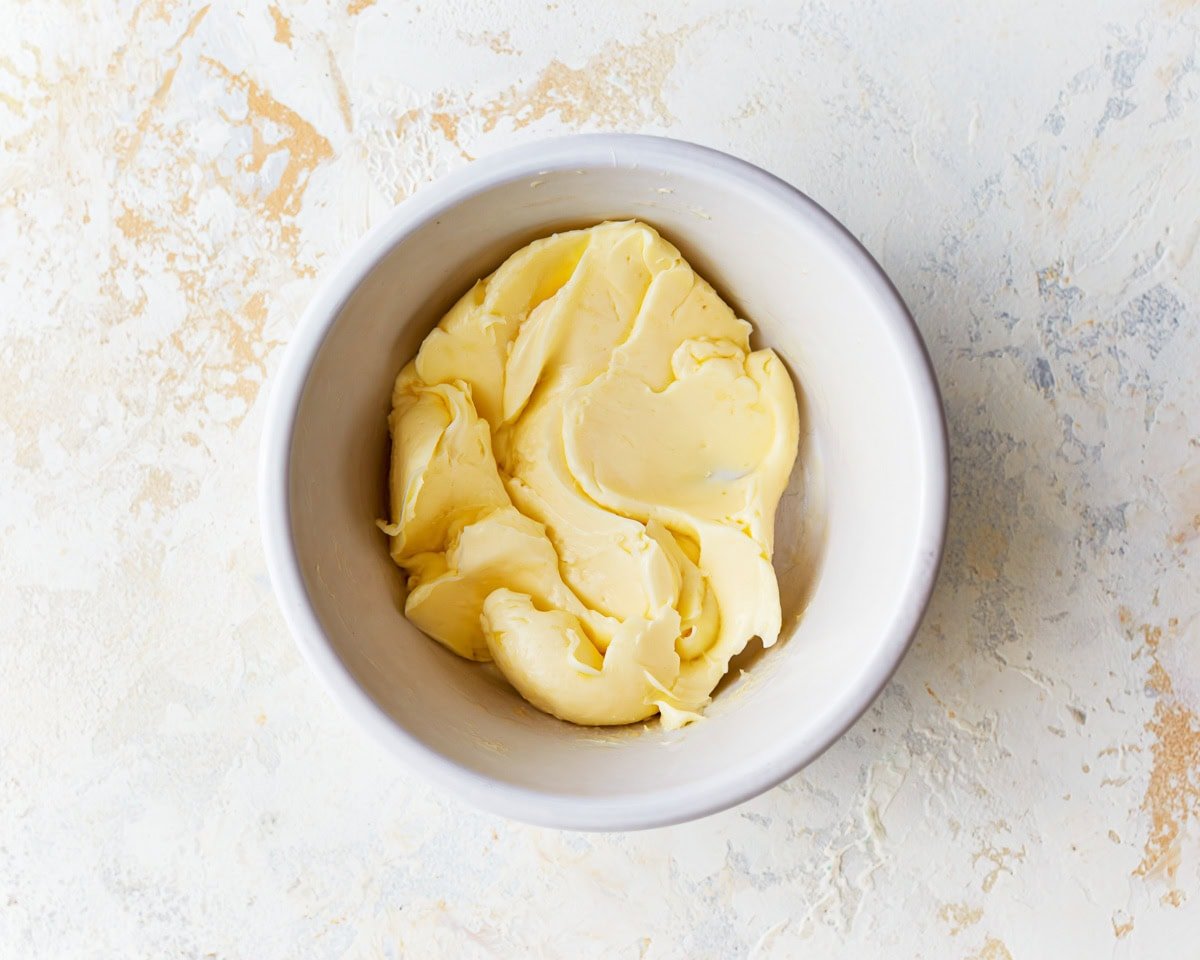
Make the cinnamon filling: While the dough is rising, make the cinnamon filling. In a small bowl, mix together the softened 1/4 cup of butter and 1/2 tsp of pure vanilla extract until combined and smooth.
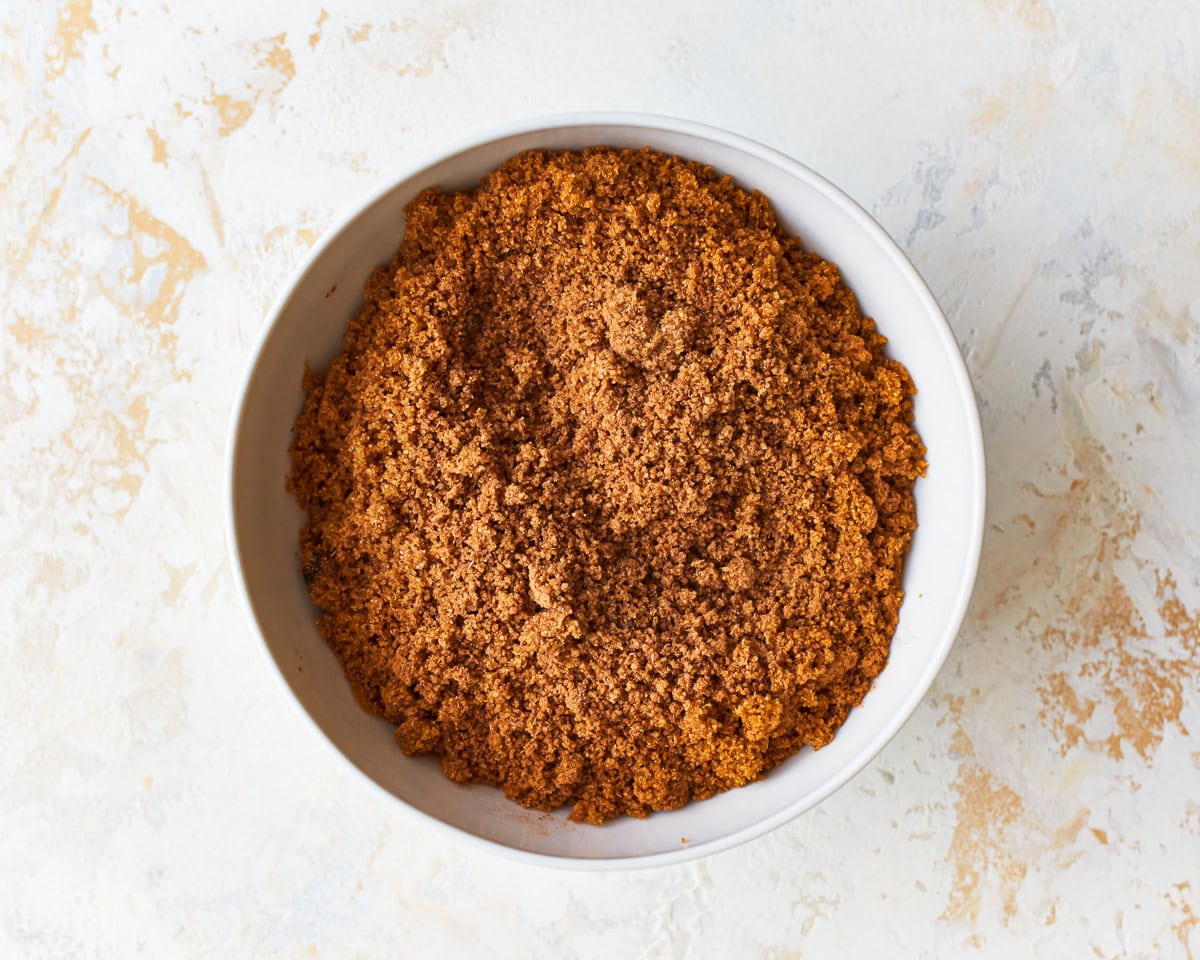
Add the cinnamon & sugar: In another small bowl, mix together 1 cup of brown sugar and 1 1/2 tbsp of ground cinnamon.
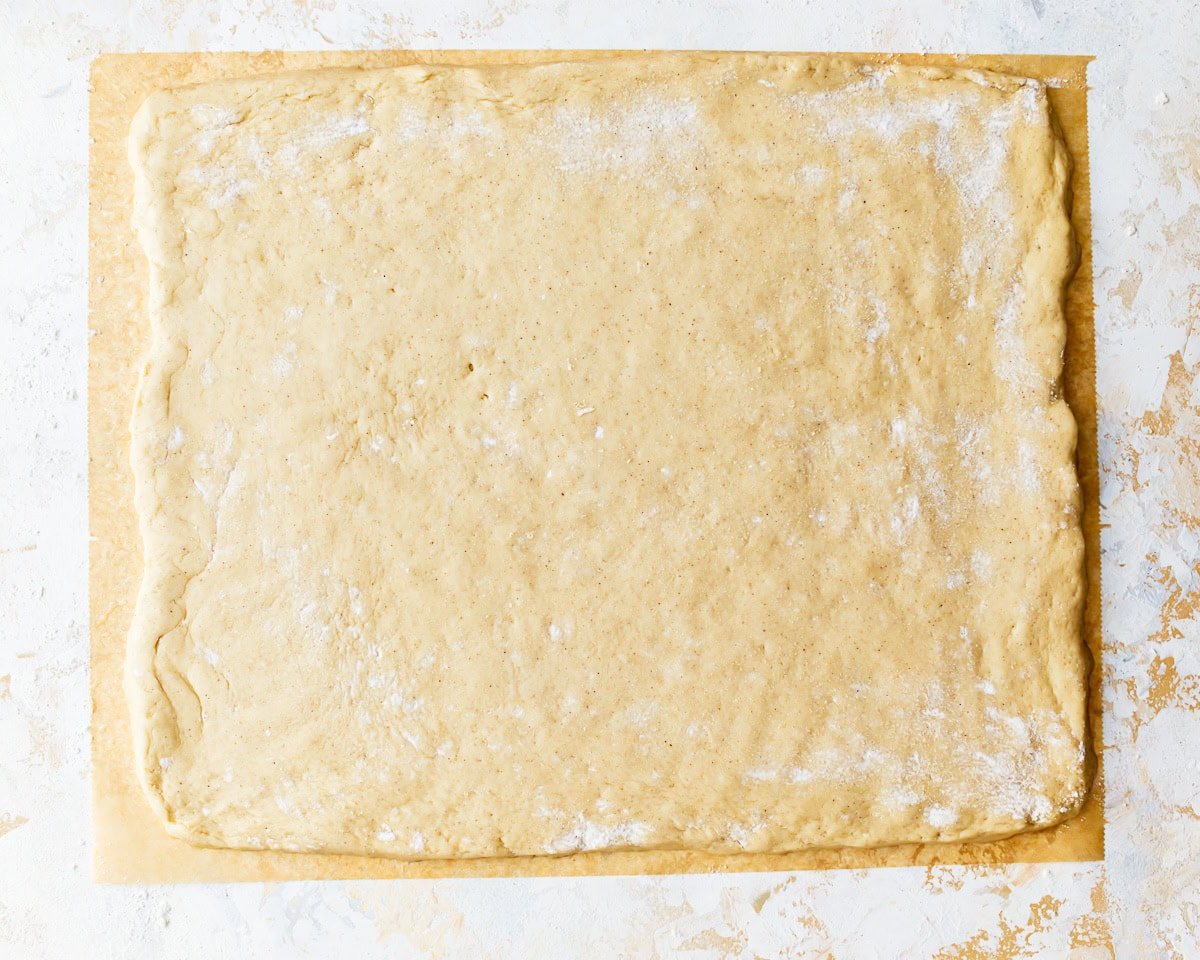
Roll out the dough: Spray a piece of parchment paper with gluten-free cooking spray or grease it with oil/butter. Place the risen dough on top of the greased parchment paper, dust the top of the dough with 1 tbsp of gluten-free flour, and shape the dough into a rectangle. Dust your rolling pin with gluten-free flour and roll out the dough to about 1/2-inch thick and a 12×14-inch rectangle.
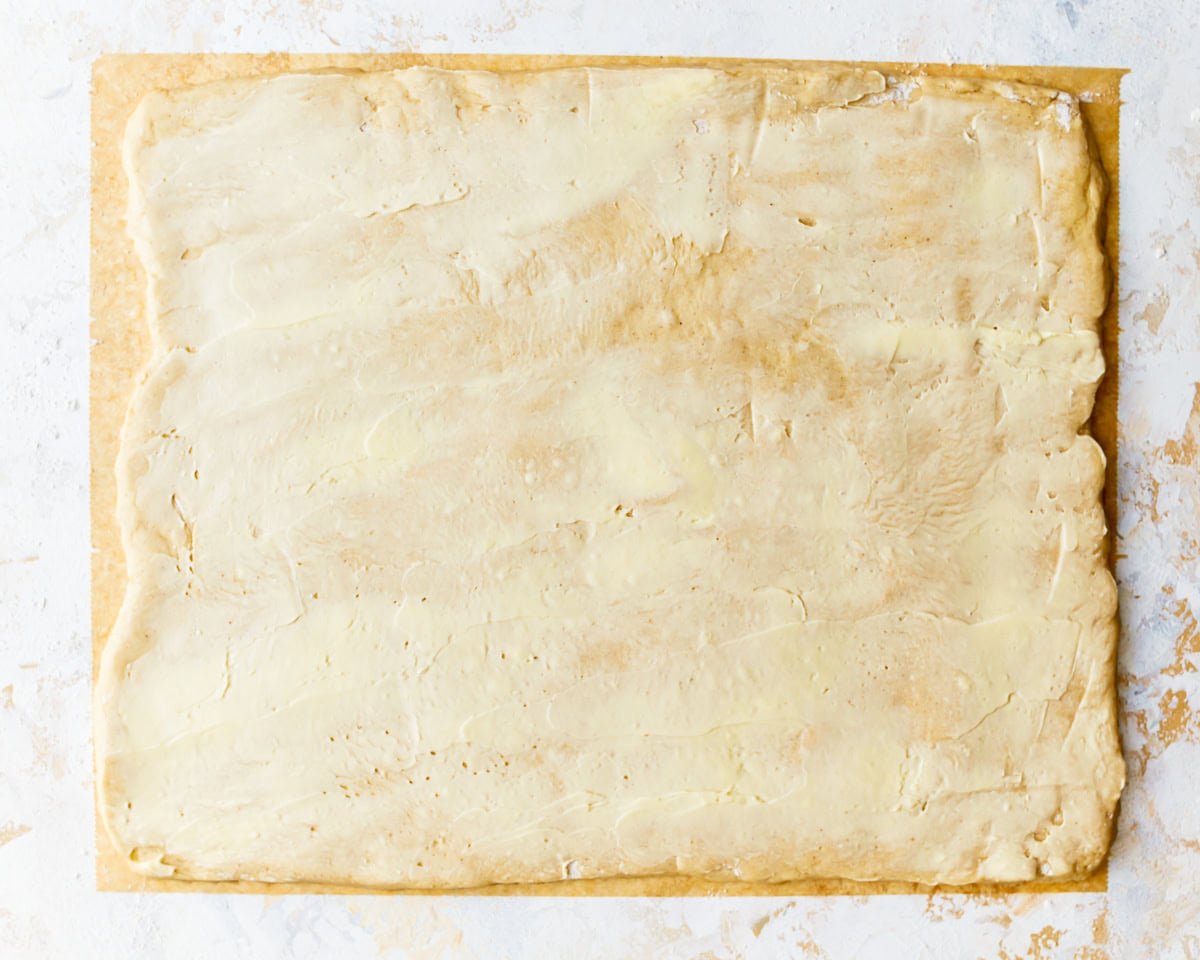
Butter the dough: Using a spatula, spread the butter mixture on top of the rolled-out dough all the way to the edges.
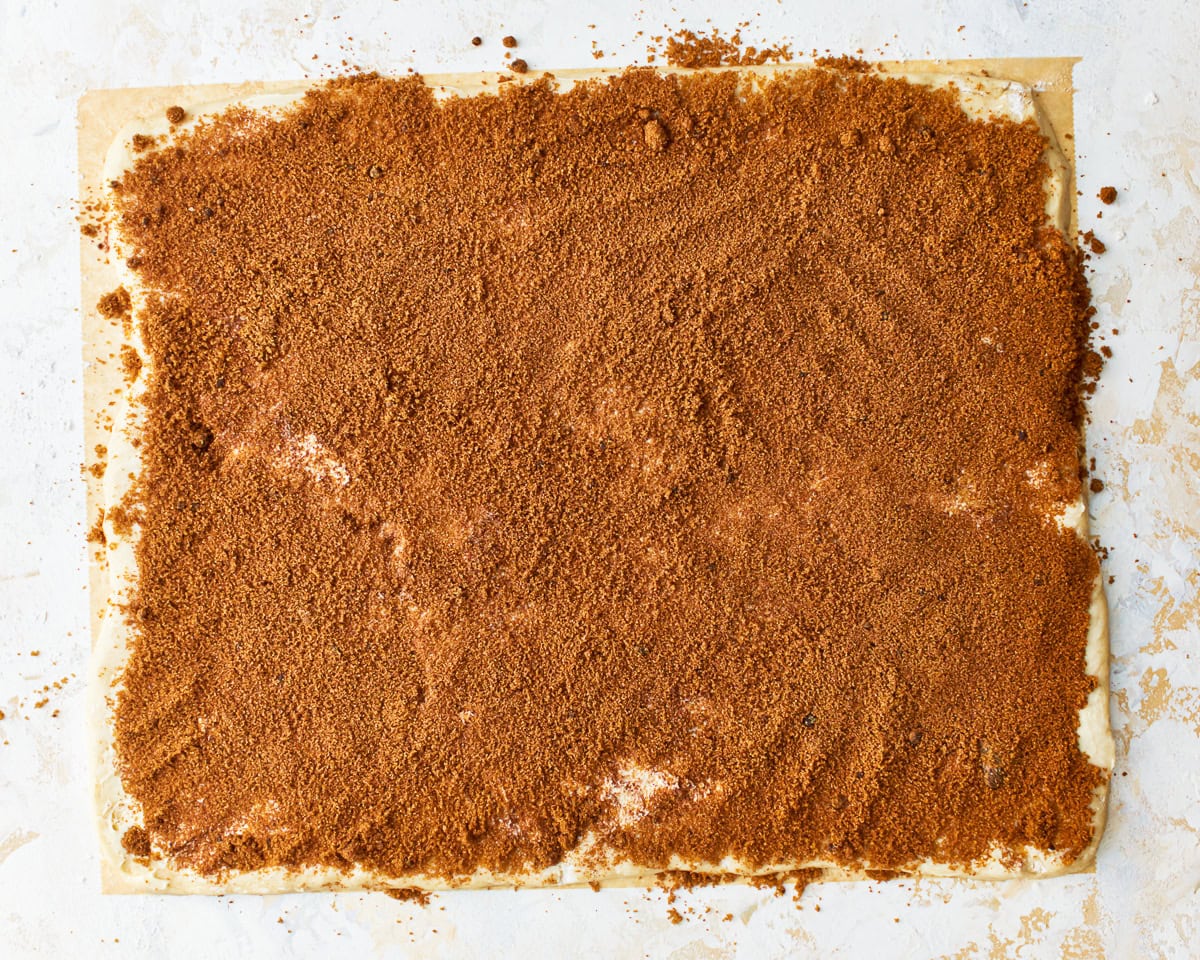
Add the cinnamon filling: Sprinkle the brown sugar mixture over the butter. Pat down with your hands.
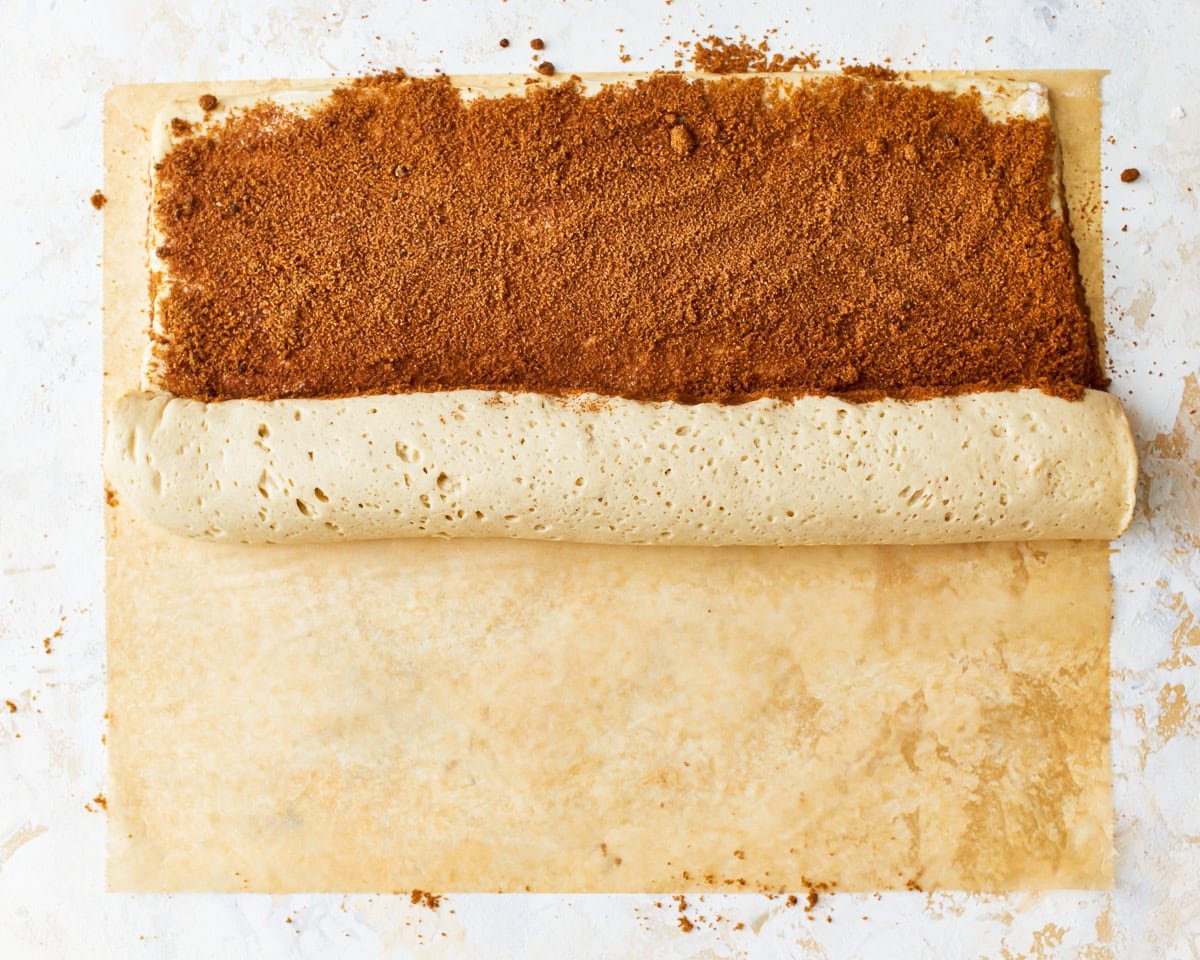
Make the dough log: Using the edge of the parchment paper, fold the longest edge up to start the roll. Slowly roll the dough, keeping it tight, to form a log shape.
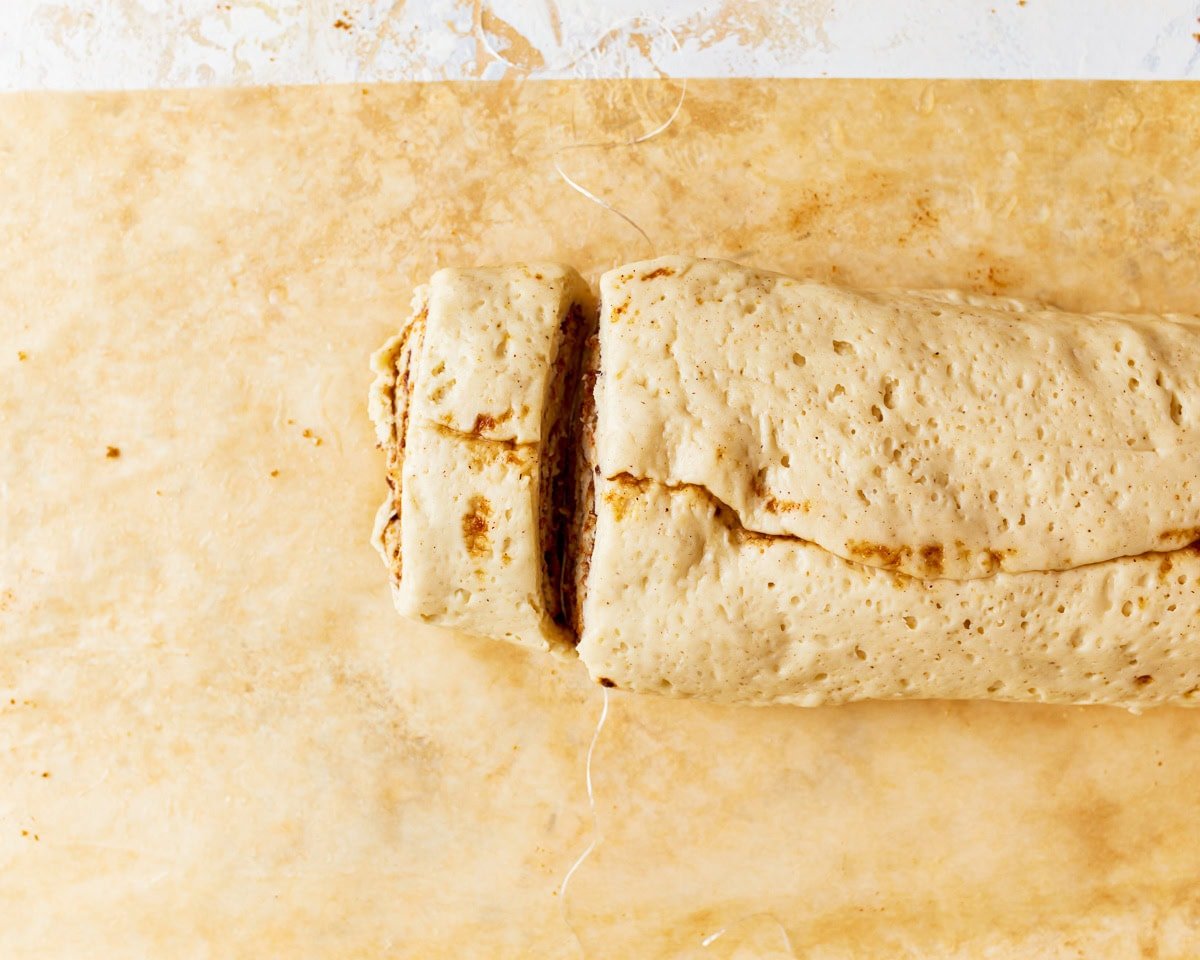
Slice even rolls: Cut the dough log in half. Then cut each half into 6 equal rolls. I use dental floss to easily cut the dough.
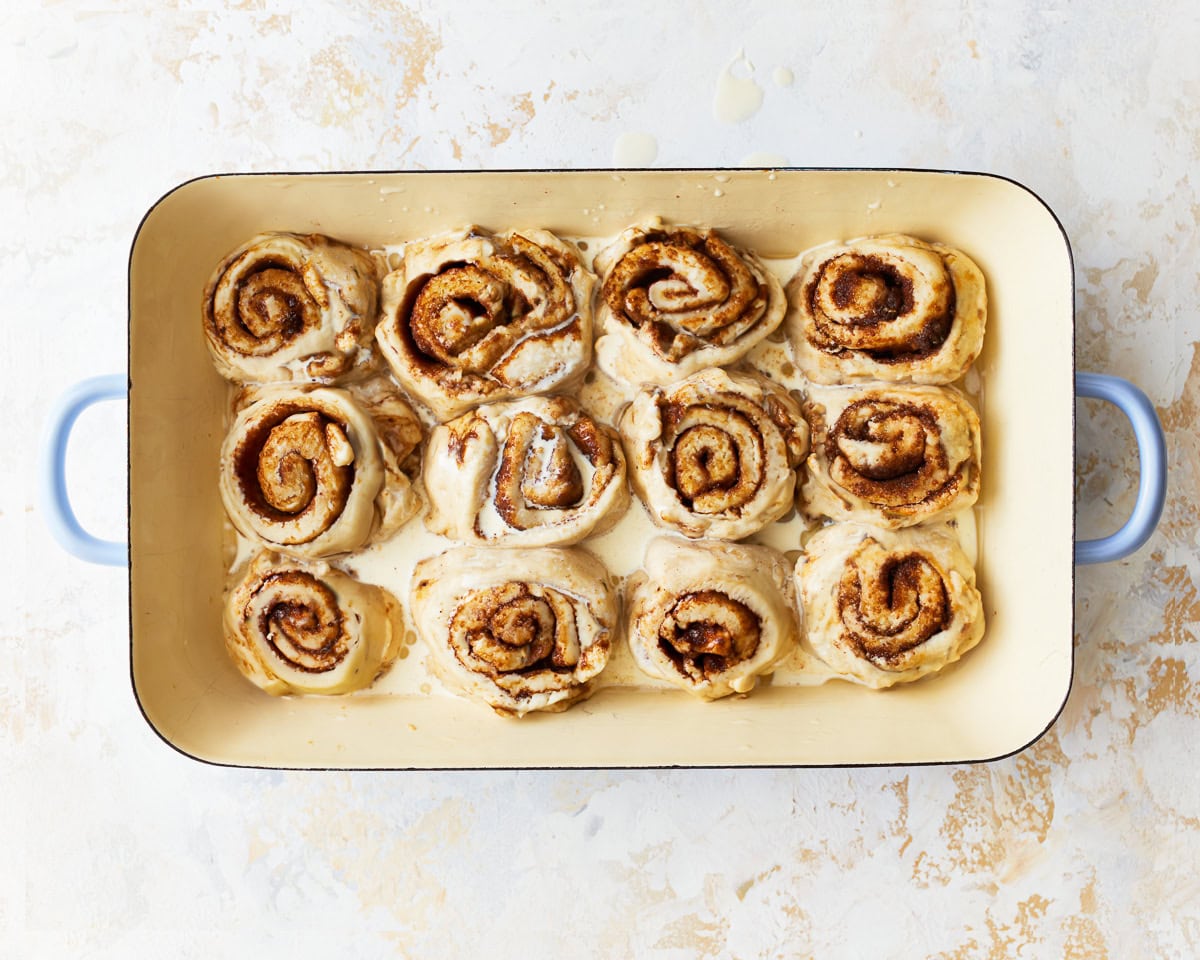
Arrange the rolls and add the cream bath: Place the rolls in a greased 9×13-inch baking dish. Heat 1/2 cup of heavy cream in the microwave for 30 seconds. Pour the warm cream over the cinnamon rolls.
Second rise and bake: Place the cinnamon rolls on the middle rack of your oven. Turn your oven to 375°F (this is the second rise). Once your oven comes to temperature (375°F), bake the rolls for 15-20 minutes until light golden brown. Please check your rolls at the 15-minute mark. Allow the cinnamon rolls to cool for a few minutes before frosting them.
Make the frosting: In a medium-sized bowl, beat together 6 ounces of cream cheese, 1/3 cup of unsalted butter, 1 tsp of pure vanilla extract, and 1/8 tsp of salt until smooth. Add 2 cups of powdered sugar, one cup at a time, and mix until smooth. Do not chill the frosting. Keep it at room temperature until the cinnamon rolls are baked. (Option to make icing instead in recipe card).
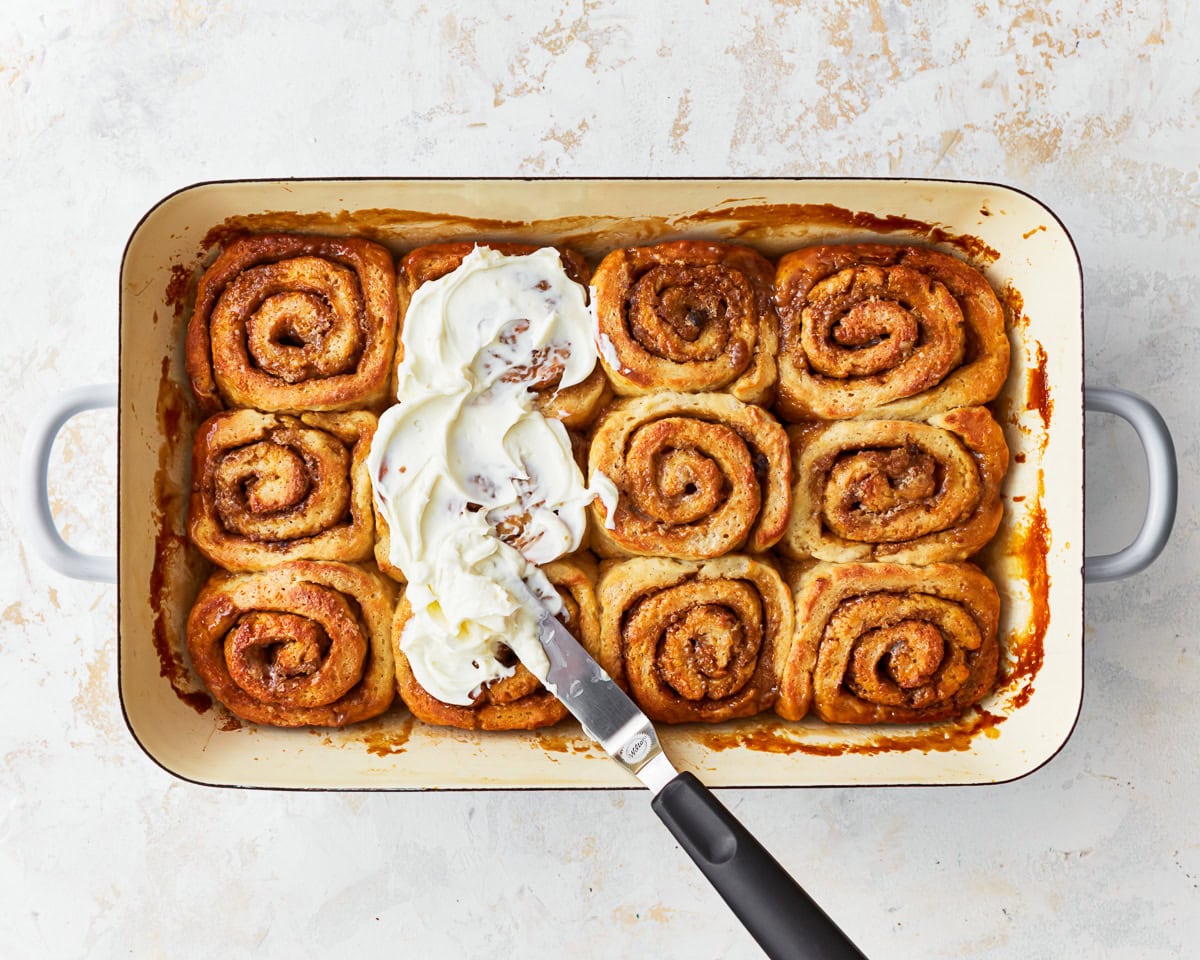
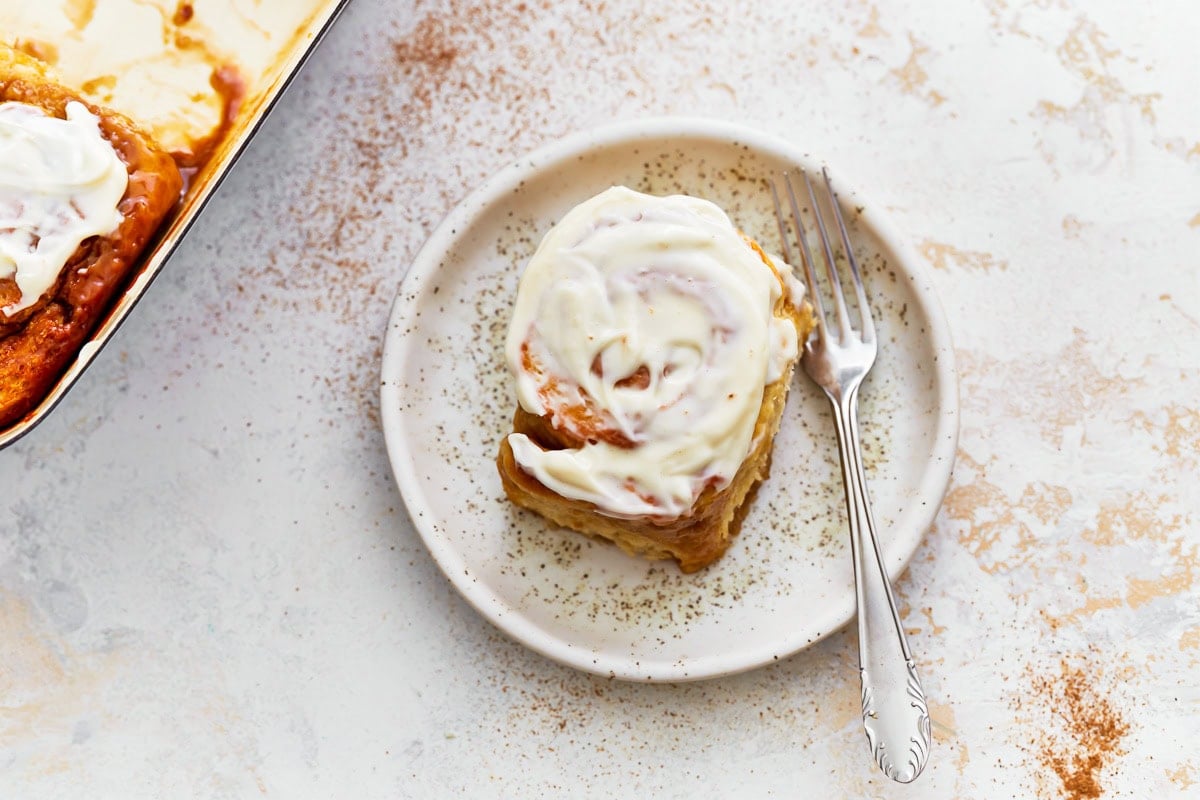
Cool and frost: Spread the cream cheese frosting or drizzle the vanilla icing on the warm cinnamon rolls. Serve and enjoy!
Recipe Substitutions
Dairy-Free:
- Use unsweetened almond, coconut, or cashew milk in place of regular milk or cream.
- Replace butter with vegan butter (like Earth Balance or Miyoko’s).
- Swap cream cheese with dairy-free cream cheese or chilled coconut cream for the glaze.
Egg-Free Alternatives:
- Replace each egg with a chia or flax egg (1 Tbsp ground seed + 3 Tbsp water, rested until gelled).
- You can also use a commercial egg replacer like Bob’s Red Mill.
Flour & Starch:
- Use a rice flour-based gluten-free blend that contains xanthan gum (such as Pillsbury or Better Batter).
- If you need to avoid tapioca starch, substitute with cornstarch or arrowroot in equal amounts.
Buttermilk Substitute:
- Mix 1 cup dairy-free milk with 1 tbsp lemon juice or vinegar and let sit for 5–10 minutes.
Storage Instructions
Make ahead: Cover the cinnamon rolls with plastic wrap, and then place them in the refrigerator overnight. When you are ready to bake, bring the cinnamon rolls to room temperature. Remove the plastic wrap and place the cinnamon rolls on the middle rack of your oven. Proceed with the recipe from the second rise.
Refrigerator: Store leftover gluten-free cinnamon rolls in an airtight container at room temperature (if plain or iced) for up to 2 days or in the refrigerator (if frosted) for up to 4 days. Reheat in the oven at 350°F for 10-15 minutes or individually microwave for 20-30 seconds.
Freezer: You can freeze these gluten-free cinnamon rolls either before or after baking them.
- To freeze before baking: The dough should be frozen after it is rolled up with the filling, and the rolls are cut. Cover the pan with foil, then place it in the freezer for up to 1 month. When you are ready to bake, let the dough thaw in the refrigerator overnight, then bring it to room temperature. Proceed with the recipe from the point of the second rise.
- To freeze after baking: Allow the cinnamon rolls to completely cool. Wrap the rolls with foil and then place them in a plastic freezer bag or in a freezer-safe container for up to 2 months. When ready to eat, defrost the cinnamon rolls to room temperature. Warm the rolls in the oven at 350°F for 10-15 minutes or individually in the microwave for 20-30 seconds.
More Brunch Pastries to Make
Gluten-Free Beignets: If you love the soft, pillowy texture of gluten-free cinnamon rolls, these powdered sugar-dusted beignets deliver that same tender dough experience in a fun, fried treat.
Gluten-Free Danish: These pastries bring the same bakery-style comfort as cinnamon rolls with a flaky texture and sweet filling that feels just as special for breakfast or brunch.
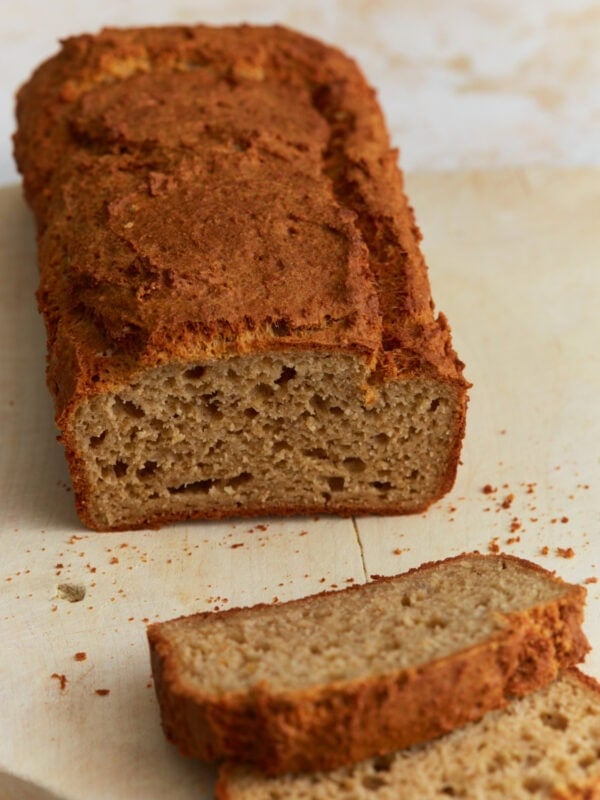
Gluten-Free Banana Bread: Moist, warmly spiced, and comforting, this quick bread gives you the same cozy flavors you love in cinnamon rolls without the yeast or rising time.


Dough was too sticky. Needs measurements in grams and cups to avoid confusion. As I tried to roll it just stuck so to not waste i had to scrape into a ball and bake.
Hi Jus, we’re sorry this didn’t turn out for you. If you click the “Metric” in the recipe card, it shows the ingredients in grams.
hi could I substitute the yeast with my sourdough discard?
Hi Lea, We have not tested it with discard, so we can’t recommend it will work. However, you can certainly try. You’ll need to adjust the flour and liquid amounts and allow a much longer rise.
Awesome recipe that turned out so well. Cinnamon buns are my favourite and this is the second recipe I have loved to make. I like that all the flour is accessible and you are able to find it in Canada. Definitely worth the time and energy to make this incredible recipe
Audrey, if I am making ahead do I wait to pour the milk over the rolls until I take them out of the refrigerator and bring them to room temp?
Hi Katie, Do everything up until the point of heavy cream. Then pull them out of fridge Christmas morning let them warm up a bit then put heavy cream on and do the second rise and bake. You may need a bit more time for the second rise since you’re starting from cold.
Thank you!!!
I found this recipe randomly one day and the first time I made it was great! I got a bunch of delicious fluffy GF cinnamon rolls. Ever since that one time, it hasn’t worked out for me again. I’ve tried to make it at least 5 times since and the results are nothing like the pictures or the ones I got the first time. I have measured every single ingredient to the dot and somehow the dough is barely rising. The texture of the dough is dry and breaks so easily. It takes forever to roll the dough and make the rolls because the dough keeps cracking. Additionally, It doesn’t spread as much giving me only half a dozen rolls (If not they break).
Please help!!! My wife trully loves cinnamon rolls but I just cant get them right. Was it just beginners luck? 🙁
Hi there, Sorry you are having trouble! The dough should be tacky and soft before the rise, not crumbly. It sounds like your flour to moisture ratio was off. Could you tell me which flour you used so I can better troubleshoot for you? Other reasons could be lack of moisture, if you feel the dough is too dry, add 1 tbsp more milk until it feels soft and pliable. Or there could be an issue with the yeast. Make sure it’s not expired. Yeast that doesn’t foam when proofed = no rise. When proofing yeast the milk should be between 110-115F to activate without killing it.
Weellll. I was confused about the heavy cream and added it to the dough. Didn’t read ahead far enough. I saved it by adding more flour to get to a workable dough. They actually still look good!! Next time they will be even better.
Audrey! Giving you 5 plus stars!! I used meijer all purpose gluten free flour with xanthan gum included. My dough was very easy to work with. It came out of my kitchen aid bowl in a nice dough ball. To shape it into a 12×14 rectangle I just dusted both my hands and rolling pin with gluten free flour. It rolled up nicely into a log. I cut my slices by dipping a long knife into the gluten free flour. The taste test was absolutely awesome. Thanks for another winner!
I did. Not care for this recipe.the dough was extremely tacky almost impossible to roll and came out hard and crunchy Instead of fluffy and soft.
Sorry this didn’t turn out for you Marie
Olivia, I used King Arthur 1:1 as well and my results were every bit as atrocious as yours. Beyond inedible. Audrey recommended the King Arthur GF *Bread* Flour and maybe that’s where we’re going wrong?
I ended up with a very liquidy batter-like dough. But I think I figured it out. Bc I am dairy-free, I used almond milk, which is mostly water so I need to reduce my liquids by a bit. I turned it into a cake type dessert and it was delicious 😂
so the first time I made these I put in extra flour and they were great, today I did it and thought I would follow the instructions just to see what happens. I had a similar results to others with it becoming a bit of a sticky mess when I was cutting them up and not holding together in the pan. I decided to plop them in my silicon muffin cases in the muffin pan and baked them that way. They were so delicious I don’t stop at one.