Gluten-Free Yeast Donuts
Updated


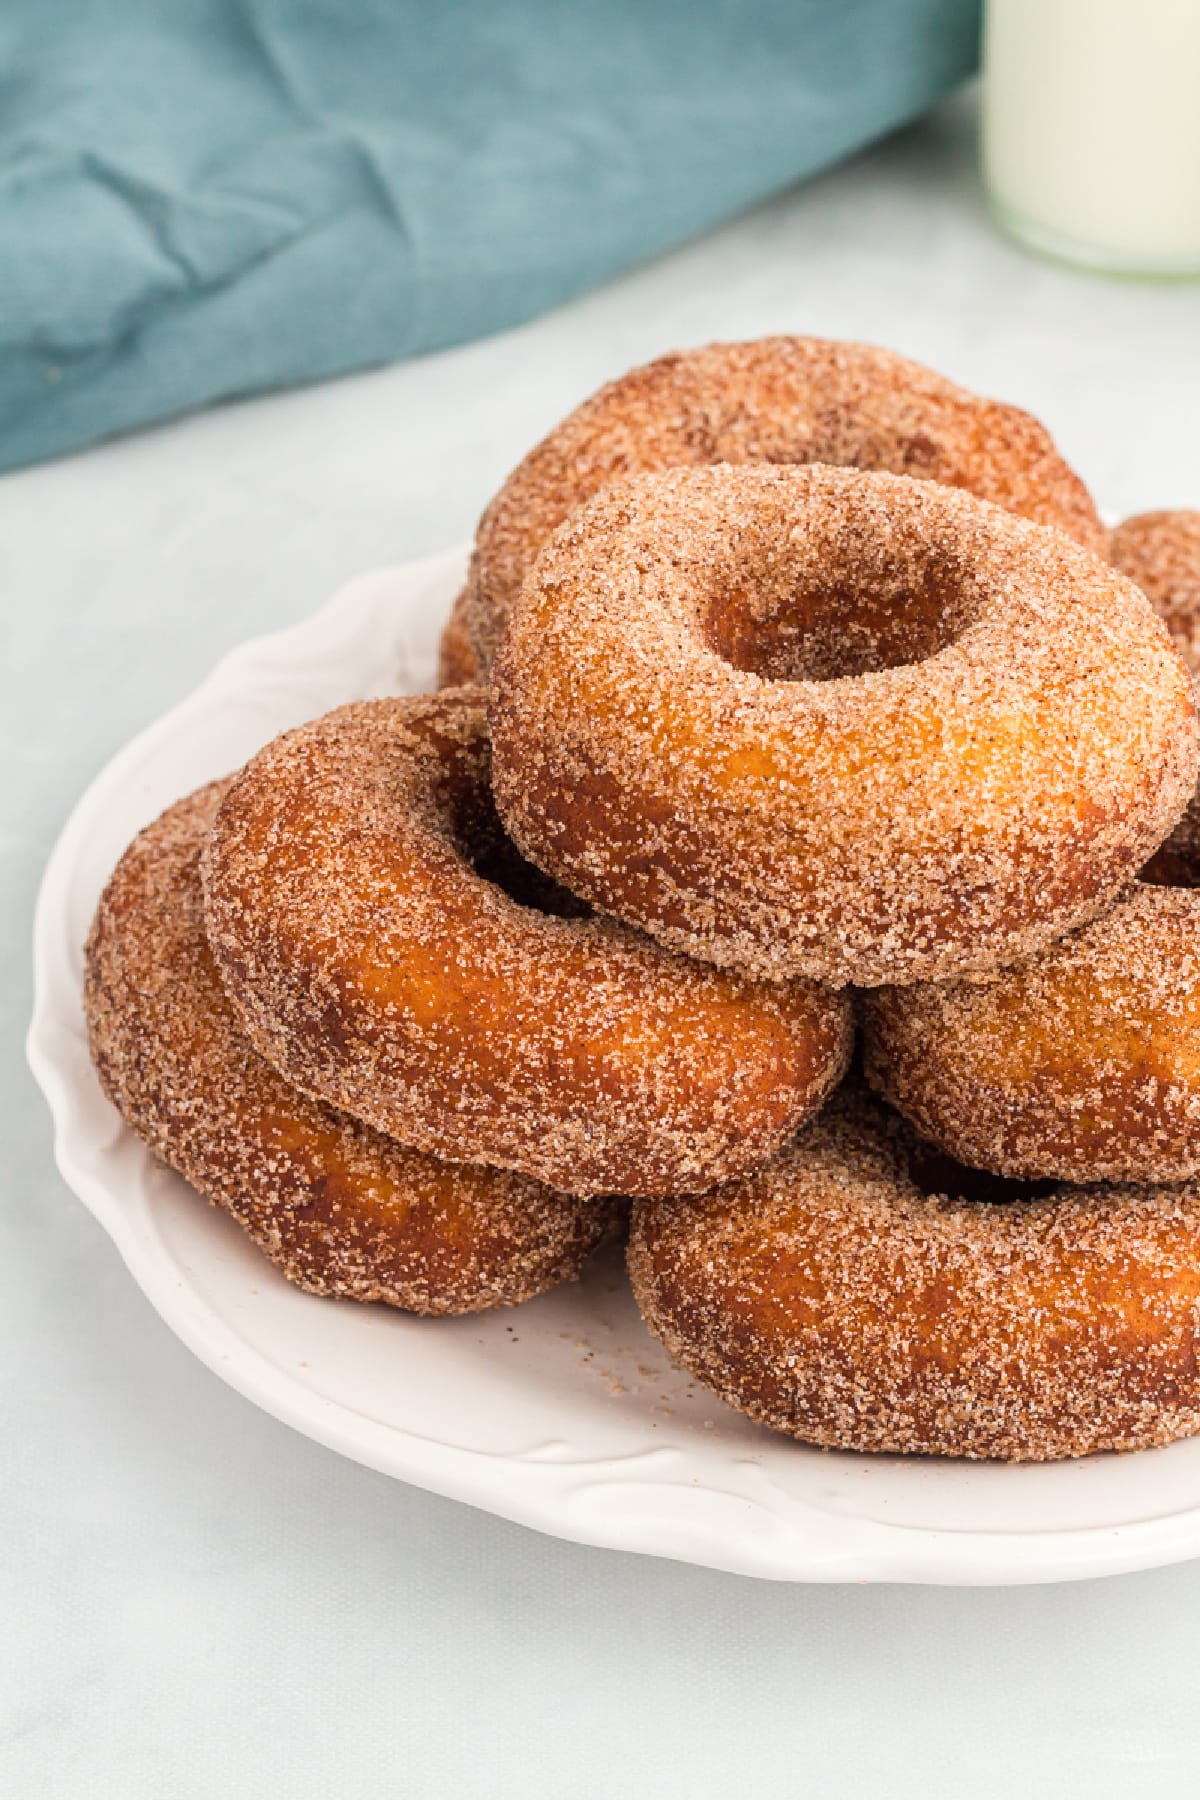
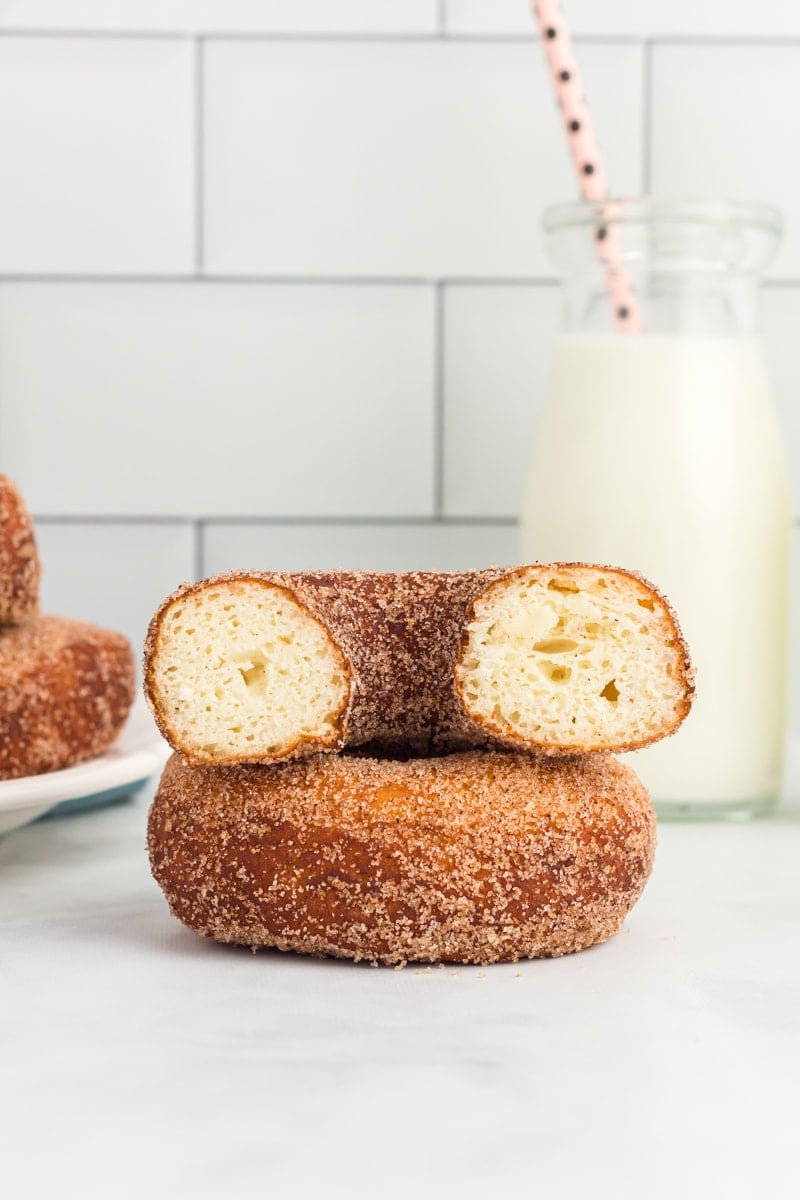
My kids can’t get enough of these gluten-free donuts. Perfect for a special breakfast treat, this easy yeasted recipe fries up light and airy, using gluten-free flour and instant yeast to create the perfectly pillowy, soft rise.
“So fluffy! Best gluten free doughnuts I’ve ever had!”
– Kelsey
Just because we follow a gluten-free diet doesn’t mean we can’t enjoy donuts for breakfast. These gluten-free yeast donuts bring the donut shop experience into my very own kitchen, so we don’t have to miss out.
This easy to follow recipe uses standard gluten-free baking ingredients and comes together in just a few simple steps. If you’ve shied away from making donuts at home, this recipe will show you how easy it can be.
This recipe is intended for frying only; it will not work as a baked donut. For a baked donut, you’ll want a cake-based donut, not a yeast donut.
Even easier to prepare are these gluten-free beignets, so if I’m going all out and want to impress a crowd, I’ll pull out this donut recipe and make the beignets, too.
Things I Learned While Testing
- Use a food scale to weigh the flour in grams. Too much flour and the dough will be crumbly, too little flour and it will be too sticky. If you’ve measured your flour correctly and the dough is still too crumbly, add a tablespoon or two of milk until it is a soft doughy consistency (a little lighter and stickier than Play-Doh).
- Adjust the amount of vegetable oil depending on the size of the pot. You’ll need at least 2 inches of oil to properly fry the donuts.
- Do not hand-knead the dough. It’s much too sticky to work with at first. Use an electric mixer with a dough hook up to the step of placing in the fridge to proof. After removing it from the fridge, the dough will be easier to handle by hand.
- Use a 3″ round cookie cutter with a Wilton 1M tip (or similar). If you do not have a donut cutter, a cookie cutter can be used to cut the hole in the middle of the donut.
- Change the shape. You can make donut sticks or make filled gluten-free donuts by not cutting out the middle and using a piping tip to fill the fried donuts with jam or custard.
- Reduce the risk of dense donuts. Make sure the oil is hot enough, or the donuts will turn into a lump of dough and not hold their shape, and give them ample time to rise.
Ingredients
- Gluten-free flour with xanthan gum: This is recommended for yeast baking. Not all gluten-free flours are created equal, so you may experience different baking results depending on the gluten-free flour blend you choose. We recommend Pillsbury or Better Batter Brand.
- Granulated sugar: Sweetens the dough and feeds the yeast to help it rise.
- Baking powder: Gives the dough an extra boost to rise sky-high.
- Instant yeast: Helps the dough rise.
- Cream of tartar: Helps the dough maintain a soft texture.
- Ground nutmeg: Adds a touch of warmth to the dough.
- Salt: Enhances the natural flavor of the dough and balances the sweetness.
- Whole milk: Hydrates and enriches the dough.
- Egg: Adds richness and moisture to the dough.
- Unsalted butter: Helps enrich the dough. Dairy-free butter can be used as an alternative.
- Vegetable oil: The perfect high smoke point neutral oil for frying. You can substitute the vegetable oil for canola oil or sunflower seed oil.
Gluten-Free Yeast Donuts

Ingredients
- 2½ cups gluten-free flour with xanthan gum, We recommend Pillsbury or Better Batter Brand
- ¼ cup granulated sugar
- 2 tsp baking powder
- 2 tsp instant yeast, also called rapid rise yeast
- ½ tsp cream of tartar
- ½ tsp ground nutmeg
- ¼ tsp salt
- ¾ cup whole milk, room temperature or lukewarm
- 1 large egg
- ¼ cup unsalted butter, melted but not hot
- vegetable oil, for frying
For Glazed Donuts
- 2 cups confectioners sugar
- ⅓ cup whole milk
For Cinnamon-Sugar Donuts
- ⅓ cup granulated sugar
- 1 tsp ground cinnamon
Instructions
- In a large bowl, combine gluten-free flour, granulated sugar, baking powder, instant yeast, cream of tartar, nutmeg and salt. Stir together until well combined.
- Add milk and egg to the flour mixture. Use an electric mixer with a dough hook and knead on low to medium speed for 5 minutes. Use a spatula to blend any dry ingredients that have settled at the bottom of the bowl. Keep kneading with the dough hook for the full 5 minutes, and the dough will start to come together and smooth out.
- Knead the butter in, using the dough hook on low-medium speed, until it is well combined (about 1 minute).
- Spray a medium bowl with non-stick cooking spray and place the dough inside. Cover the bowl with food-safe plastic wrap and put it in the fridge for at least 2 hours. This can also sit overnight in the fridge. Gluten-free flour needs this time to hydrate, so don’t skip this cooled proofing time.
- Line a large baking sheet with parchment paper. Set aside for now.
- Lightly flour your work surface, your rolling pin, and your donut cutter with gluten-free flour, then place your dough on the work surface. Roll the dough out to about ¾” thickness, then use a donut cutter to cut out the donut shapes. The size of the donut cutter I used is 3” in diameter.
- Gently place the raw donuts onto the prepared baking sheet. Space the donuts at least 2 inches from each other. Wrap the baking sheet well with food-safe plastic wrap, then place it in a warm area of your kitchen to rise for 1½ to 2 hours (until about 50% larger in size).
- Heat oil in a pot that’s deep enough to have at least 2 inches in it without spilling over the edges. Oil should be heated to a temperature between 320°F and 330°F (160–166°C). Use a candy thermometer to measure the temperature of the oil. Too hot oil will burn the outside of the donut while the middle will remain raw. Oil that isn’t hot enough will result in your donut turning into a lump of dough and not holding its shape. A candy thermometer is essential as the temperature of your oil will make or break your donuts.
- While your oil is heating up, prepare your workspace by lining a wire rack with paper towels (to soak up oil after removing the donut from the pot). You’ll also need metal tongs for turning your donuts over while frying, plus a slotted spoon for removing the donut from the oil and placing it on the paper towel to cool.
- If this is your first time deep-frying donuts, start with frying one donut at a time. This will give you a better idea of how long to keep your donut in the oil. At a temperature of 330°F (165℃), I cook the donuts for less than a minute on each side. You’re looking for a golden color, but not too brown, as that will lead to a burnt outer layer.
- Use the metal tongs to flip donuts over in the oil during frying.
- Use a slotted spoon to scoop donuts out of the oil and place on the paper towel lined wire rack.
- Let the donuts cool slightly (about 10 minutes) before adding toppings.
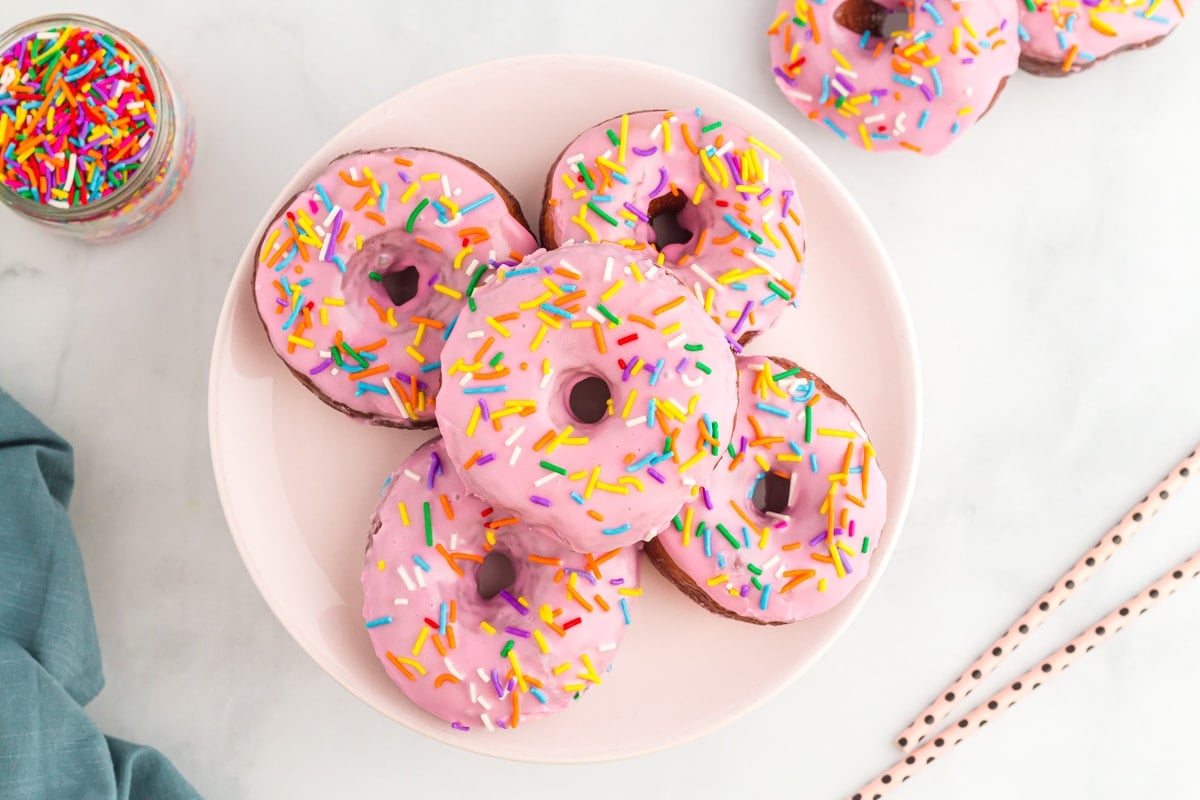
- For glazed donuts, stir the confectioner's sugar and milk together until smooth. Dip donuts as desired (either fully dipping them or just dipping the tops). Add gel food coloring if you like.
- For cinnamon-sugar donuts, stir the sugar and cinnamon together. Dip both sides of the warm donut into the mixture and gently shake off any excess. This needs to be done while the donuts are warm, or the sugar mixture won’t stick. donut.
Nutrition
Nutrition information is automatically calculated, so should only be used as an approximation.
How to Make Gluten-Free Yeast Donuts Step by Step

Gather the ingredients.

Combine the dry ingredients: Combine 2½ cups (350g) gluten-free flour, ¼ cup (50g) granulated sugar, 2 tsp (8g) baking powder, 2 tsp (6g) instant yeast, ½ tsp (1.5g) cream of tartar, ½ tsp (1g) nutmeg, and ¼ tsp (1.5g) salt in a large bowl.

Add the wet ingredients: Add ¾ cup (185ml) whole milk and 1 large egg, then use an electric mixer with a dough hook and knead on low-medium speed for 5 minutes until you get a smooth, cohesive texture.

Add the butter: Knead ¼ cup (57g) unsalted, melted butter into the mixture using the dough hook on low-medium speed, until it is well combined. This usually takes me about 1 minute.

Let rise: Place the dough in a clean bowl sprayed with non-stick spray, cover, and let it rise for 2 hours in the fridge. The dough can also sit overnight in the fridge. Meanwhile, line a large baking sheet with parchment paper and set it aside.

Shape the donuts: Lightly flour your work surface, your rolling pin, and your donut cutter, then place the dough onto the work surface. Roll the dough out to ¾” thickness and using a donut cutter, cut out the donut shapes.

Let the dough rise again: Space the cut donuts at least 2 inches apart on the prepared baking sheet. Cover with food-safe plastic wrap, then let them rise for 1½ to 2 hours (until about 50% larger in size). For this second rise, do not place the tray in direct sunlight, as too much heat will kill the yeast. Ensure the room temperature is between 75°F – 78°F (24°C to 26°C).

Get the oil ready and prepare the workspace: Heat oil in a large pot to 320°F to 330°F (160–166°C). Use a candy thermometer to measure the temperature of the oil.
Prepare your workspace by lining a wire rack with paper towels (to soak up oil after removing the donut from the pot). You’ll also need metal tongs for turning your donuts over while frying, plus a slotted spoon for removing the donuts from the oil.

Fry the donuts: At a temperature of 330°F (160°C), I cook the donuts for less than a minute on each side. You’re looking for a golden color, but not too brown, as that will lead to a burnt outer layer.

Use the metal tongs to flip donuts over in the oil during baking.

Use a slotted spoon to scoop the donut out of the hot oil and place it on the paper-towel-lined wire rack.

Cool the donuts: Let the donuts cool for about 10 minutes before coating them.
Glaze the donuts: Stir 2 cups (240g) confectioner’s sugar and ⅓ cup (80ml) milk together until smooth. Dip donuts as desired (either fully dipping them or just dipping the tops). Add gel food coloring if you’d like.
Coat the donuts: Stir ⅓ cup (65g) sugar and 1 tsp (2g) cinnamon together. Dip both sides of the warm donut into the mixture and gently shake off excess sugar. This needs to be done while the donuts are warm, or the sugar mixture won’t stick to the donut.

Serve: Now the donuts are ready to eat. Enjoy!
Serving Suggestions
I love serving these donuts for brunch on the weekends. Since the donuts are on the sweet side, I like to balance them with a hearty gluten-free breakfast casserole, along with a batch of keto granola to eat with yogurt. I’ll also set out a homemade gluten-free baguette that we can eat with butter, jam, or cheese.
Storage Instructions
If you want to get a head start on these donuts, you can prepare the dough the night before and let it proof in the fridge overnight. Bring the dough to room temperature before continuing with the rest of the instructions.
Gluten-free yeast donuts are best eaten within an hour of baking them. They start to harden after 4 to 5 hours. They can be eaten the day after but they won’t be soft and fluffy like they were within an hour of baking them. Place leftovers in a sealed food-safe container and store at room temperature.
Freeze completely cooled, unglazed, unfilled fried donuts for up to 3 months. Make sure to wrap tightly or store in an airtight container. Thaw on the kitchen counter until ready to eat.
More Gluten-Free Donut Recipes to Try
- Soft and cakey, these Gluten-Free Chocolate Cake Donuts are covered in a rich chocolate glaze.
- Gluten-Free Baked Pumpkin Donuts made with pumpkin pie spice, are dipped in a glorious maple cinnamon glaze.
- Gluten-Free Baked Donuts: These gluten-free baked donuts come together in just 25 minutes and deliver a light, moist, melt-in-your-mouth treat with subtle sweetness—perfect for making any morning feel special.


can I use avocado oil or coconut oil in place of the butter?
Hi Lea, Yes, either should work just fine. If you use coconut oil I’d suggest refined so it doesn’t add too much coconut flavor.
So fluffy! Best gluten free doughnuts I’ve ever had! I did have to add extra milk to mine.
hi can i make dairy free versions of this
Hi Valen, dairy-free butter and any kind of plant-based milk should work.
Would king Arthur GF bread flour work well in this?
Hi Goldie, we have not tested this recipe with that flour.
I just wanted to ask if your yeast donut recipe can be baked instead of fried , I have to avoid as much fat as possible.
Hi Carla, unfortunately, this recipe will not turn out well if baked. We recommend our vanilla cake donuts recipe (click here!) for baking.
Why are there 2 sets of instructions I’m confused at what one to use one refrigerates the dough and the other doesn’t
Hi Jessica, the instructions should be the same in both places. The dough should be chilled for 2 hours or up to overnight.
I do not have an electric mixer with a dough hook. How can I mix the dough without it?
Hi Linda, you can mix by hand with a wooden spoon, followed by kneading on a clean countertop.
Can I make the donuts? If so, what temperature, and for how long roughly? Thank you!
Hi Georgina, this recipe is designed to be fried, not baked!