Gluten-Free Tortellini
Published


Homemade gluten-free pasta is surprisingly easy. I thought I was going to have to leave the deliciously stuffed pasta behind, but I quickly realized I could make gluten-free tortellini at home with ingredients I already have. Tender pasta stuffed with a creamy filling and ready to top with your favorite sauces, add to soup, or freeze for later. This gluten-free tortellini recipe is easily customizable and the perfect addition to your gluten-free repertoire.
Since I’ve perfected my gluten-free pasta recipe, I’ve been wanting to have a bit more fun with the pasta dough. I already made gluten-free ravioli, so tortellini seemed like the best next step. These little stuffed pasta pillows are a bit more time-intensive, but totally worth it. The dough is soft, pliable, and surprisingly easy to work with once you get the hang of it. The filling is simple—just ricotta, Parmesan, and fresh basil—but it packs a fresh, savory punch in every bite. Whether you serve them in broth or toss them with your favorite sauce, they hold up beautifully and taste just like the real deal.
Gluten-Free Tortellini
Ingredients
Pasta
- 1½ cup gluten free all purpose flour
- 3 tbsp tapioca flour
- ½ tsp salt
- 1 egg, beaten and at room temp
- 1 tbsp olive oil
- ⅓ cup and 1 tablespoon water
Filling
- ½ cup ricotta
- ¼ cup Parmesan
- 1 tbsp fresh basil, finely chopped
- ½ tsp salt
- ⅛ tsp black pepper
Instructions
- In a medium bowl, stir together your gluten free flour, tapioca flour, and salt. Then add in the egg, oil, and water and knead everything together with your hands. The dough will be slightly sticky and tacky, but shouldn’t be impossible to work with. The flour will continue to absorb the moisture as you work with it and as it sits.
- Lightly flour a clean work surface and knead your pasta dough for 5 minutes. Try to use as little flour as possible. The pasta should be smooth and less sticky after kneading. Cover in plastic wrap and let rest for 30 minutes.
- While your pasta is resting, mix together your filling by combining the ricotta, Parmesan, basil, salt and pepper in a small bowl. Fill another small bowl with a little bit of water for later and set aside.
- Once your pasta has finished resting, divide your dough in half and wrap the half you’re not using back in the plastic wrap so it doesn’t dry out.
- Roll out your dough using a rolling pin on a very lightly floured surface until it is about ⅛ of an inch thick. You don’t want it to be too thin that it tears when folding, but if you make it too thick your dough will be chewy. Note that the more flour you use, the harder the pasta will be to work with. A moist pasta is a soft pasta and makes for easy folding, but the drier it gets, the easier it is to tear and crack.
- Use a 2¾ inch round cookie or biscuit cutter to cut as many circles as possible and carefully stack your circles and cover with a damp paper towel or linen. Re-roll any scraps and repeat the process as many times as needed. Once finished, use your other half of pasta dough set aside earlier and repeat the process.
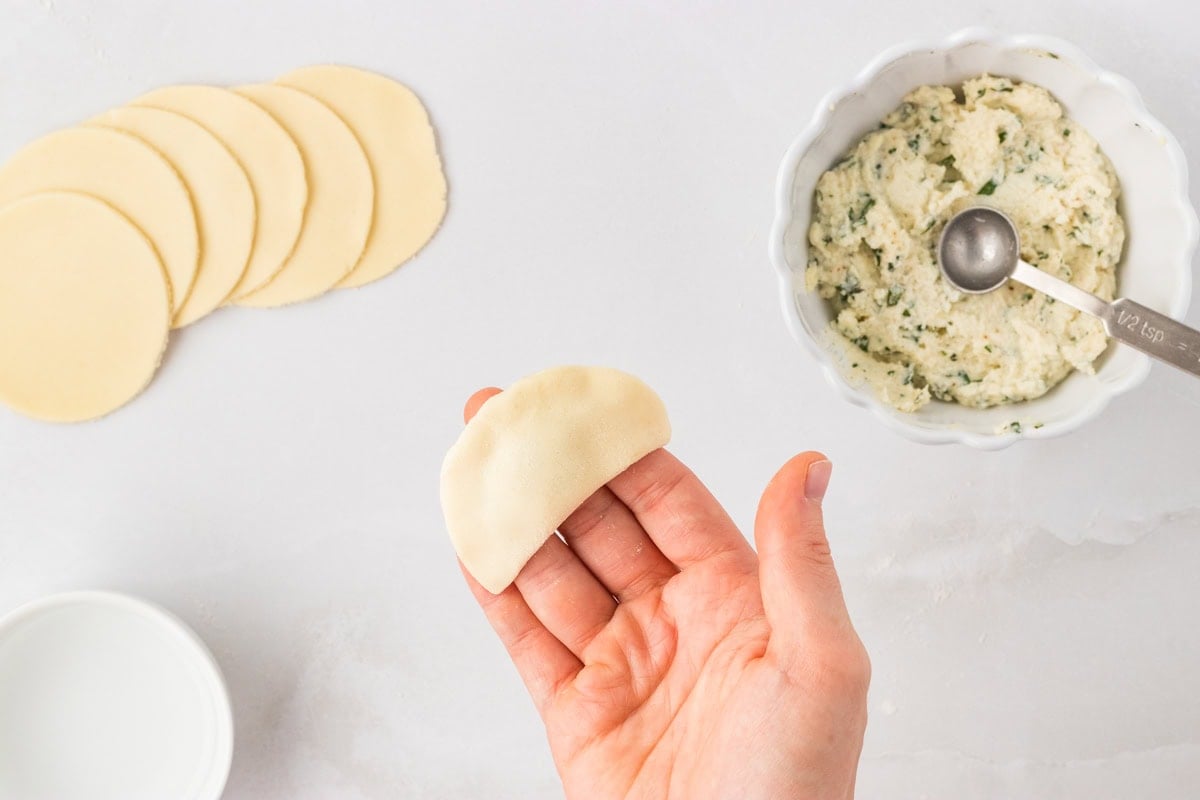
- Once you have all your pasta circles cut out, fill and fold your circles one by one. Place one of your pasta circles in the palm of your hand and use a ½ teaspoon to measure out your filling and place it in the middle of the pasta round.
- Dip your finger in the little bowl of water you set aside earlier and lightly wet the edge of your pasta. This will help glue the pasta shut.
- Carefully fold the pasta circle over itself and the filling, forming it into a half circle and pinch the middle of the edge closed with your thumb and index finger. Continue sealing the edge of the pasta all the way around, making sure to gently press any air around the filling out before sealing the edges.
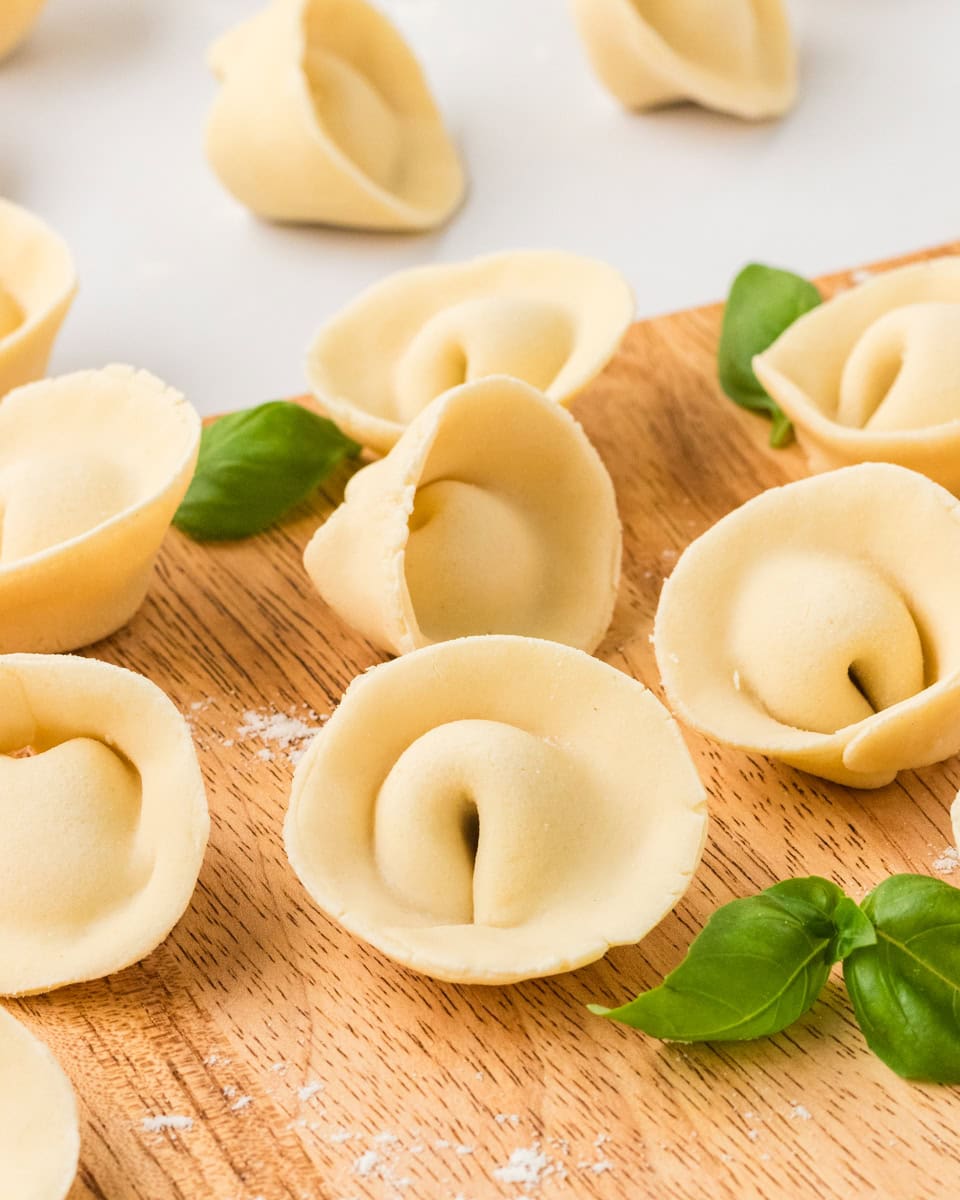
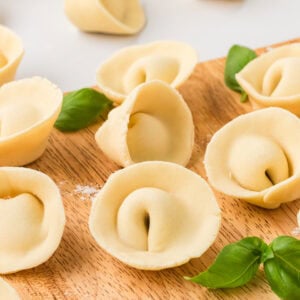
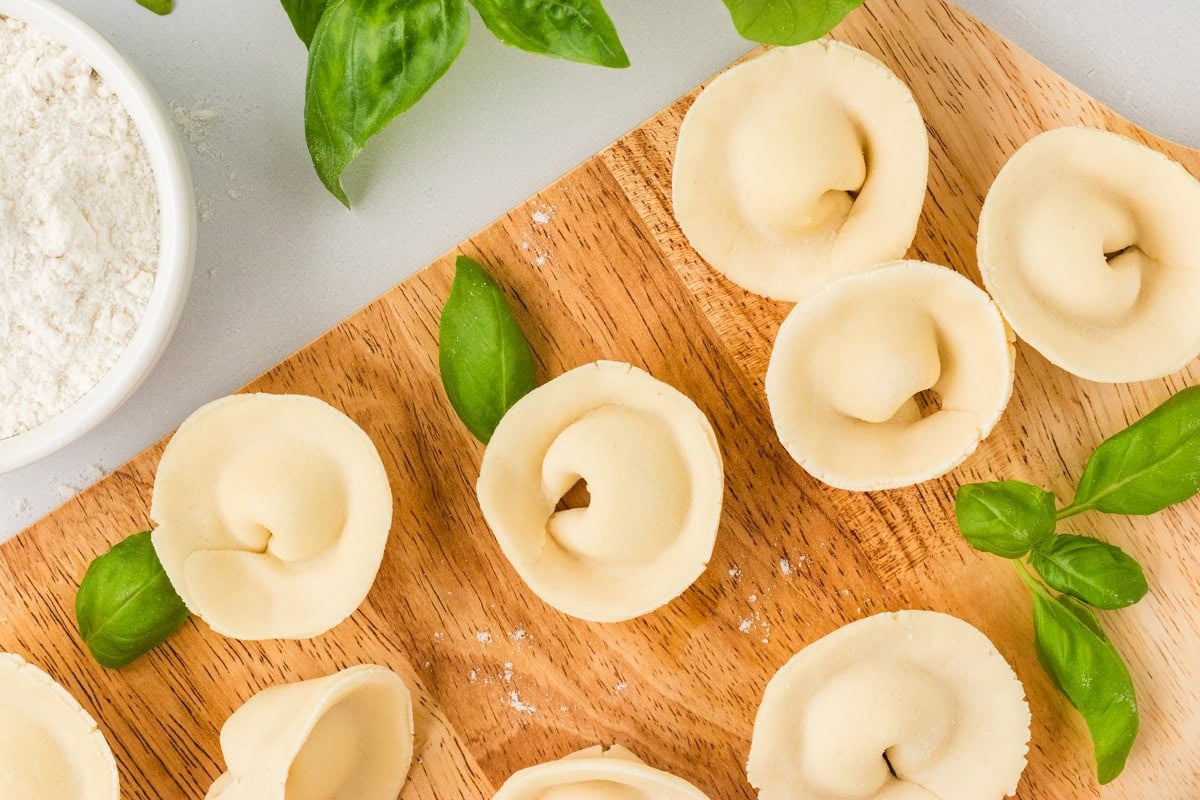
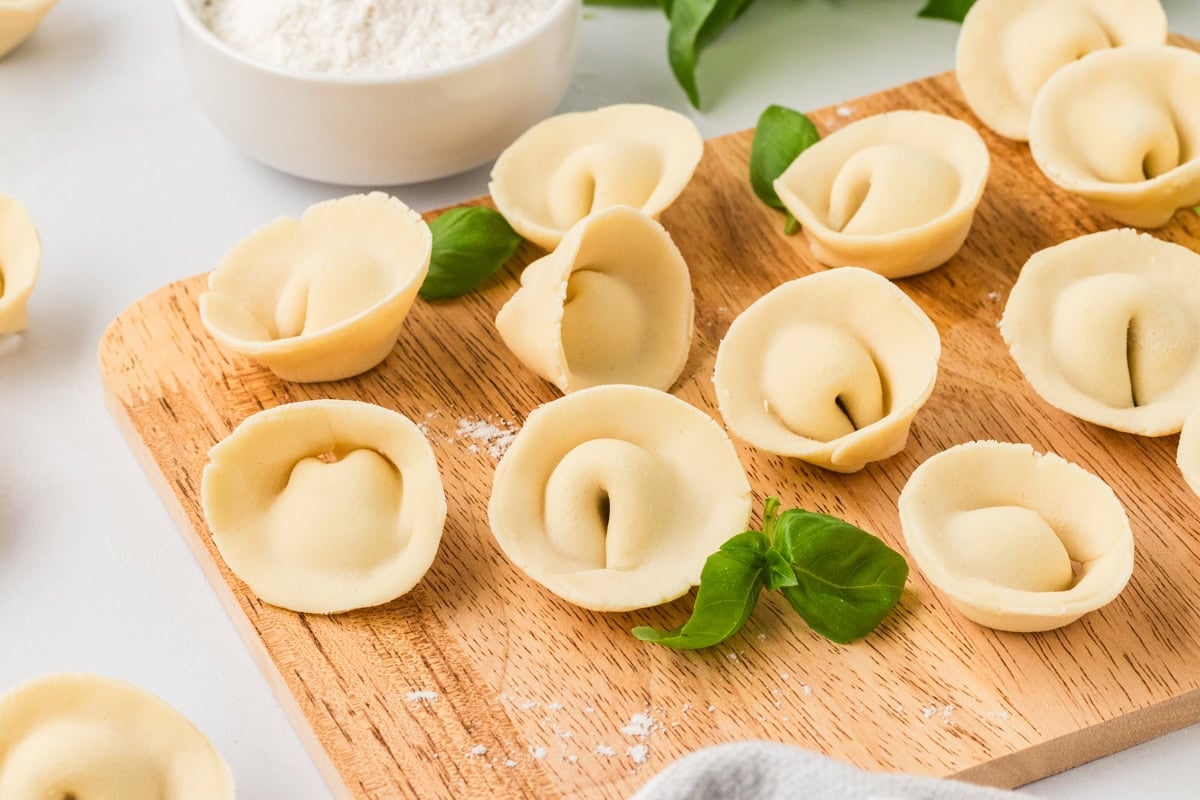
- With your thumb, make an indention in the edge of the pasta where the filling is and carefully bring the two corners of the half circle together, wetting one of the edges with your finger so that when you press them together, they stick. This will turn your pasta into a circle once again. Set aside and repeat the process for all your pasta rounds. This will take some practice to get the hang of. See photos for visuals.
- Use right away or lay on a baking tray and cover with plastic wrap and freeze. To eat, boil fresh pasta until tender, about 4-6 minutes. Frozen pasta will take a few minutes longer.
Notes
- Use fresh basil for fresher flavor.
Nutrition
Nutrition information is automatically calculated, so should only be used as an approximation.
How to Make Gluten-Free Tortellini Step by Step
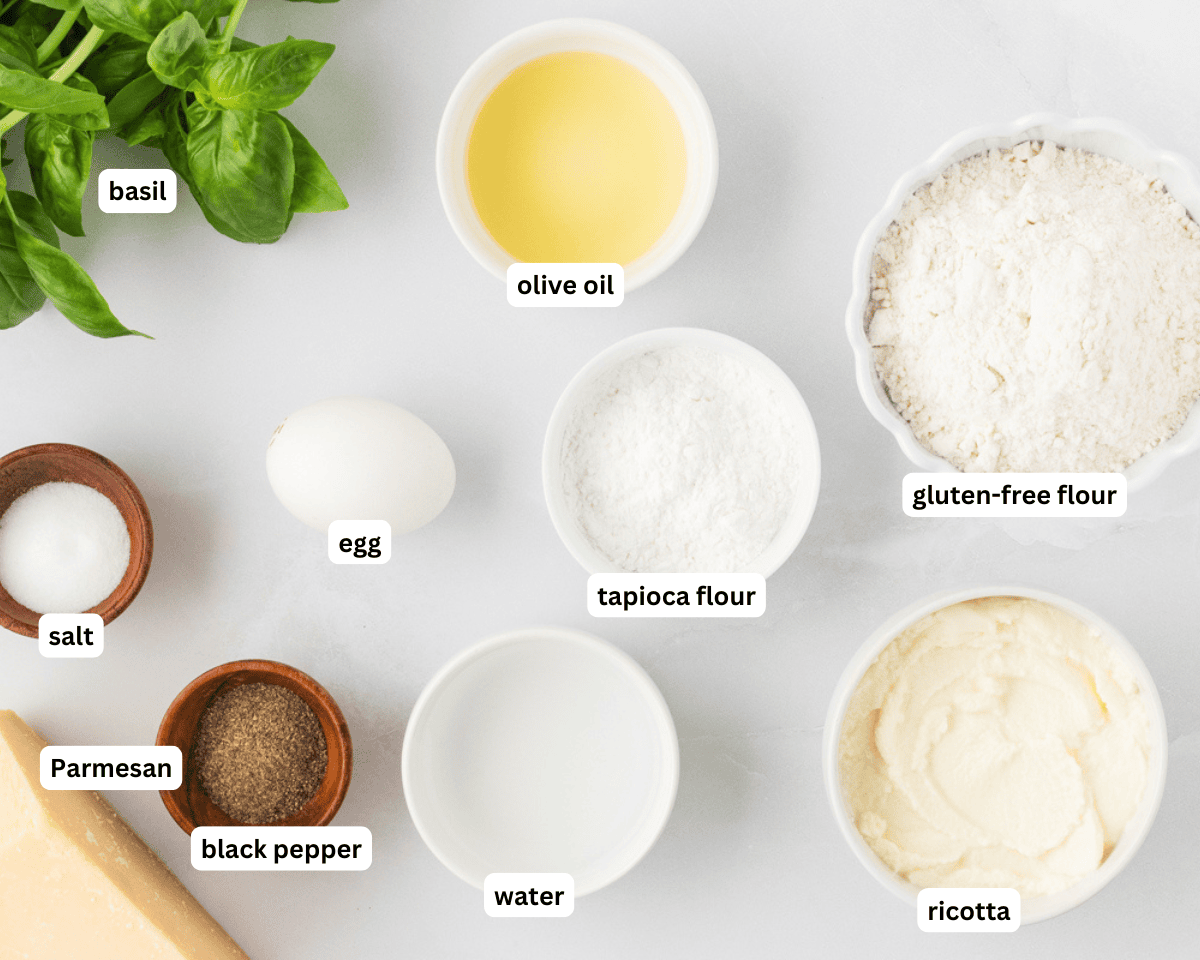
Gather all the ingredients together.
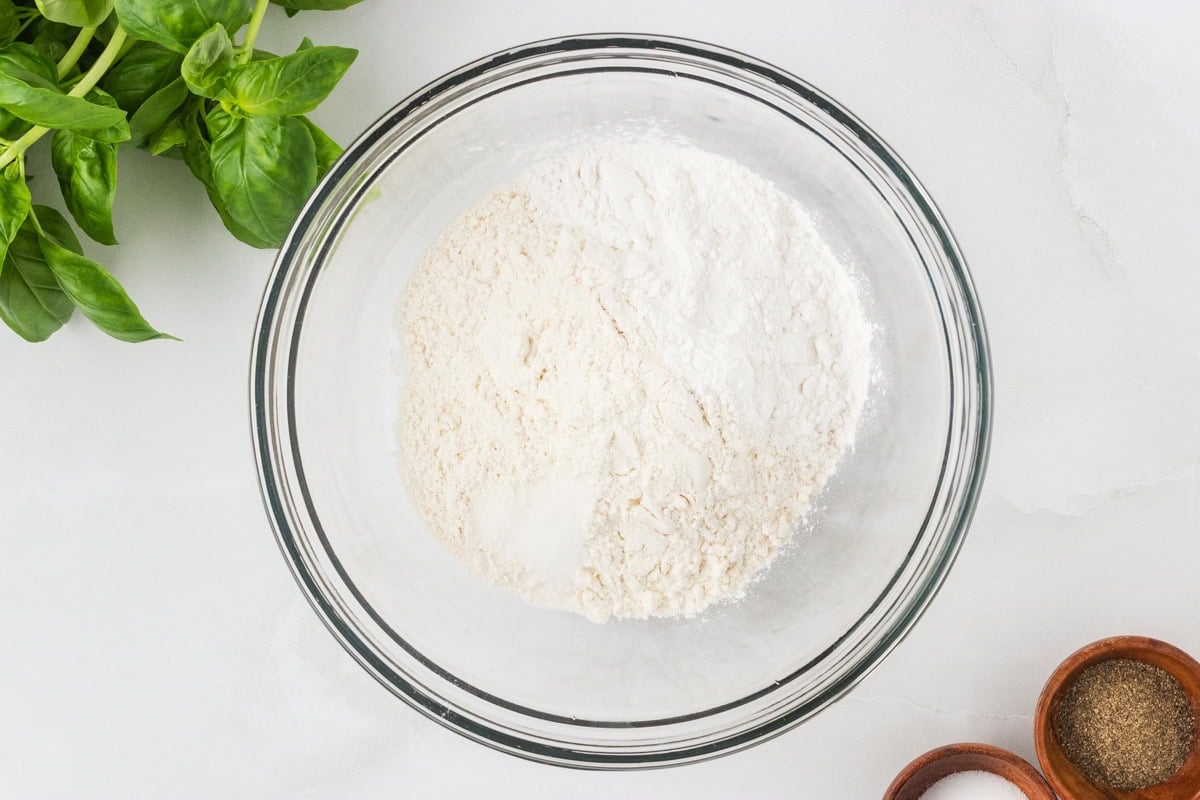
Make the pasta dough: In a medium bowl, combine 1 ½ cups gluten-free all-purpose flour, 3 tbsp tapioca flour, and ½ tsp salt.
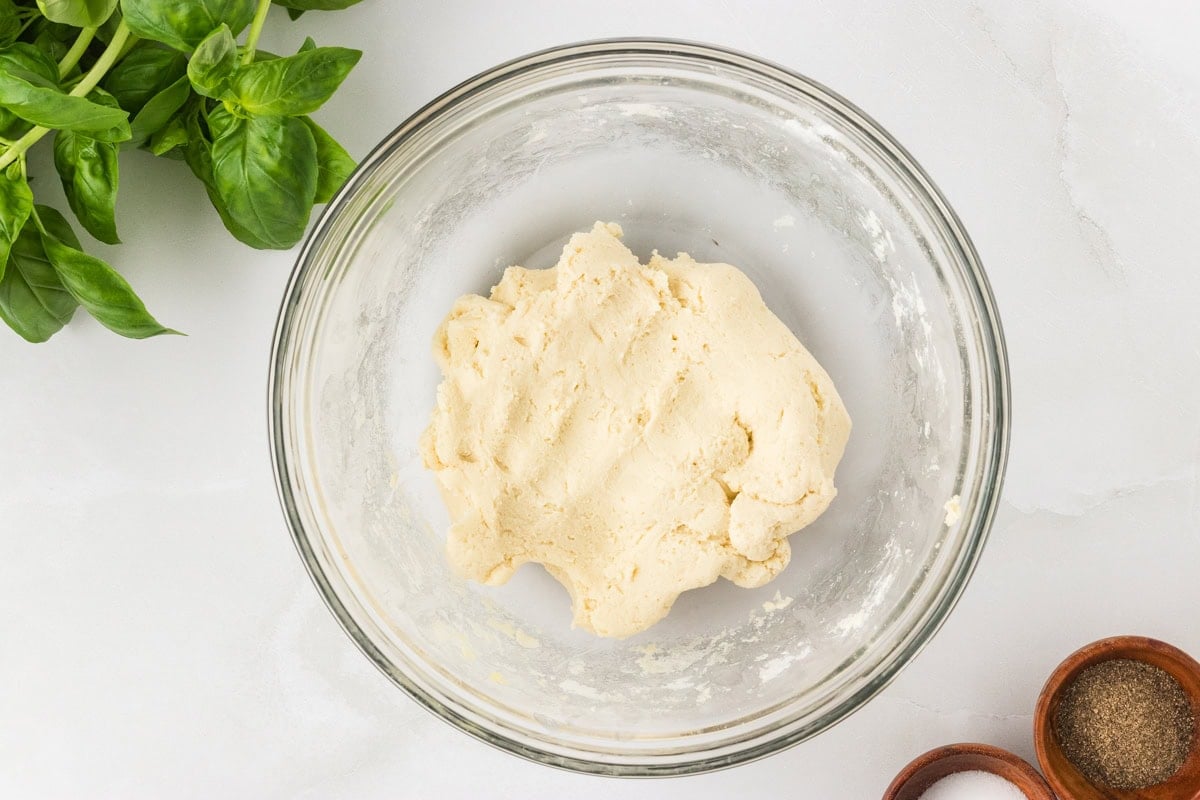
Add the wet ingredients: Add 1 beaten egg (at room temperature), 1 tbsp olive oil, and ⅓ cup plus 1 tbsp water. Mix everything together with your hands until a slightly sticky, tacky dough forms. It should be soft but workable—the flour will continue to absorb moisture as it rests.

Knead the dough: Lightly flour a clean surface and knead the dough for about 5 minutes, using as little extra flour as possible. The dough should feel smoother and less sticky after kneading.
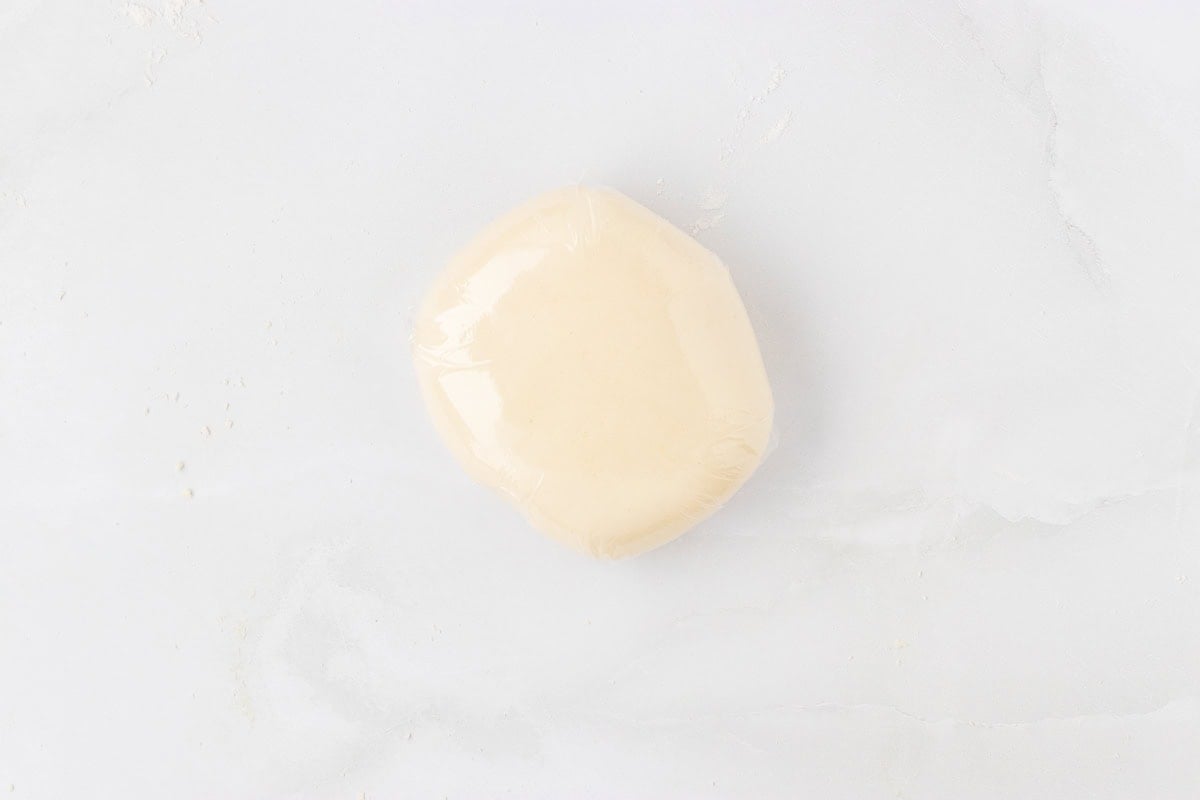
Rest the dough: Wrap it tightly in plastic wrap and let it rest at room temperature for 30 minutes.
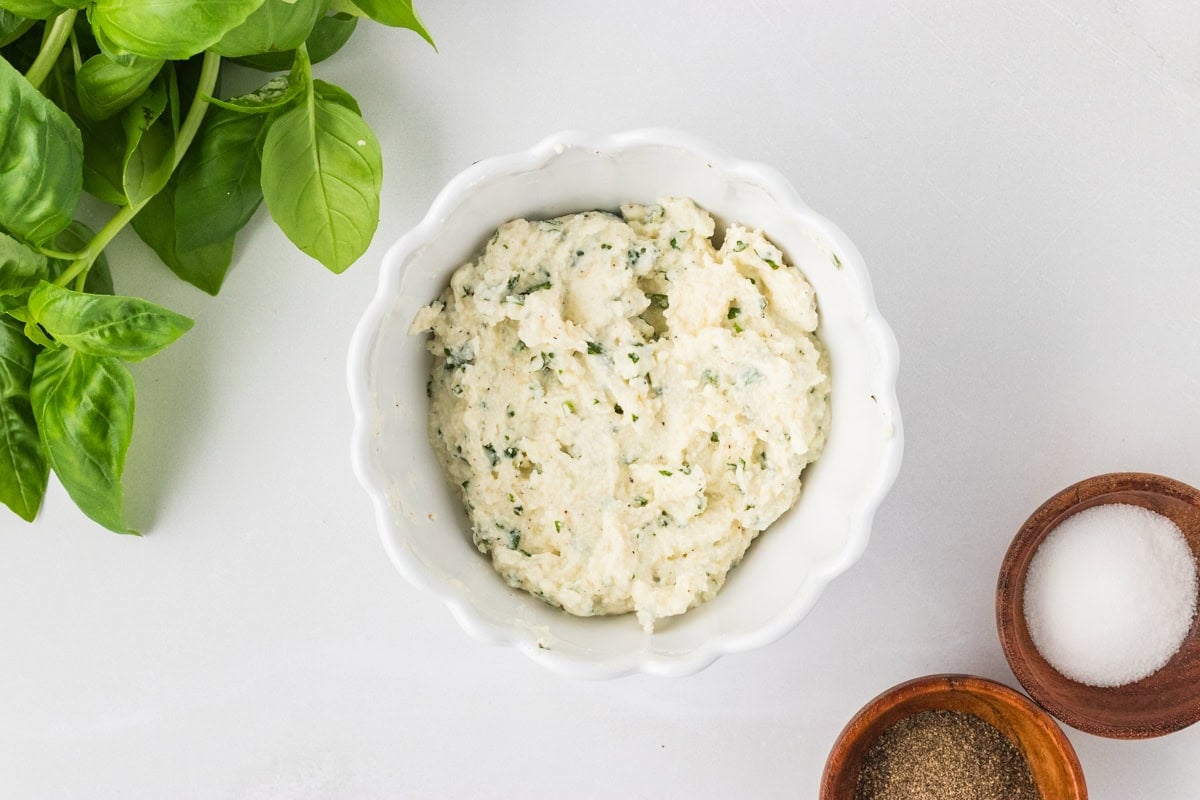
Make the filling: In a small bowl, mix together ½ cup ricotta, ¼ cup grated Parmesan, 1 tbsp finely chopped fresh basil, ½ tsp salt, and ⅛ tsp black pepper. Stir until well combined. Fill another small bowl with water and set it aside—you’ll use this to seal the pasta later.

Divide the dough: After resting, divide the dough into two equal halves. Keep one half wrapped to prevent it from drying out.
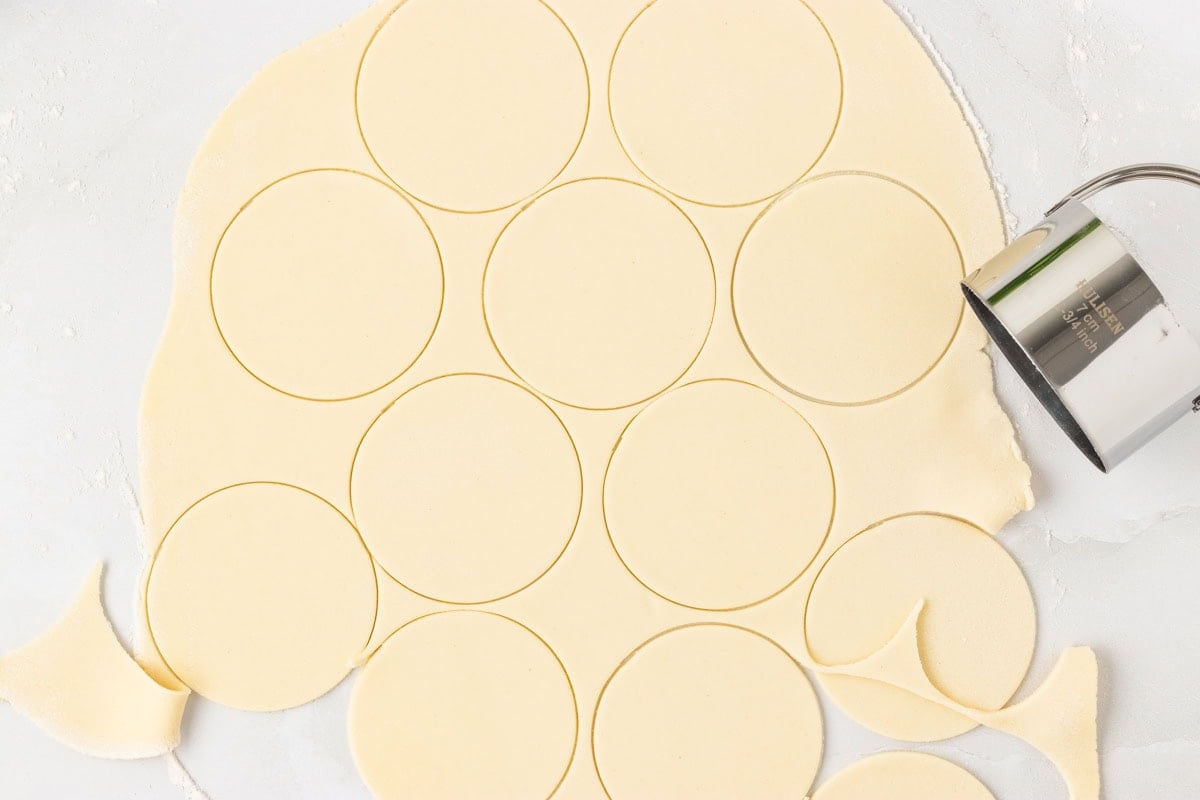
Roll and cut the dough: Roll out the other half on a very lightly floured surface until it’s about ⅛ inch thick. Be careful not to roll it too thin or it may tear; too thick and the pasta will be chewy. Use a 2 ¾ inch round cookie or biscuit cutter to cut as many circles as possible. Stack the cut rounds carefully and cover them with a damp towel or linen to keep them from drying out. Gather the scraps, reroll, and repeat until all the dough is used. Repeat the process with the second half of the dough.
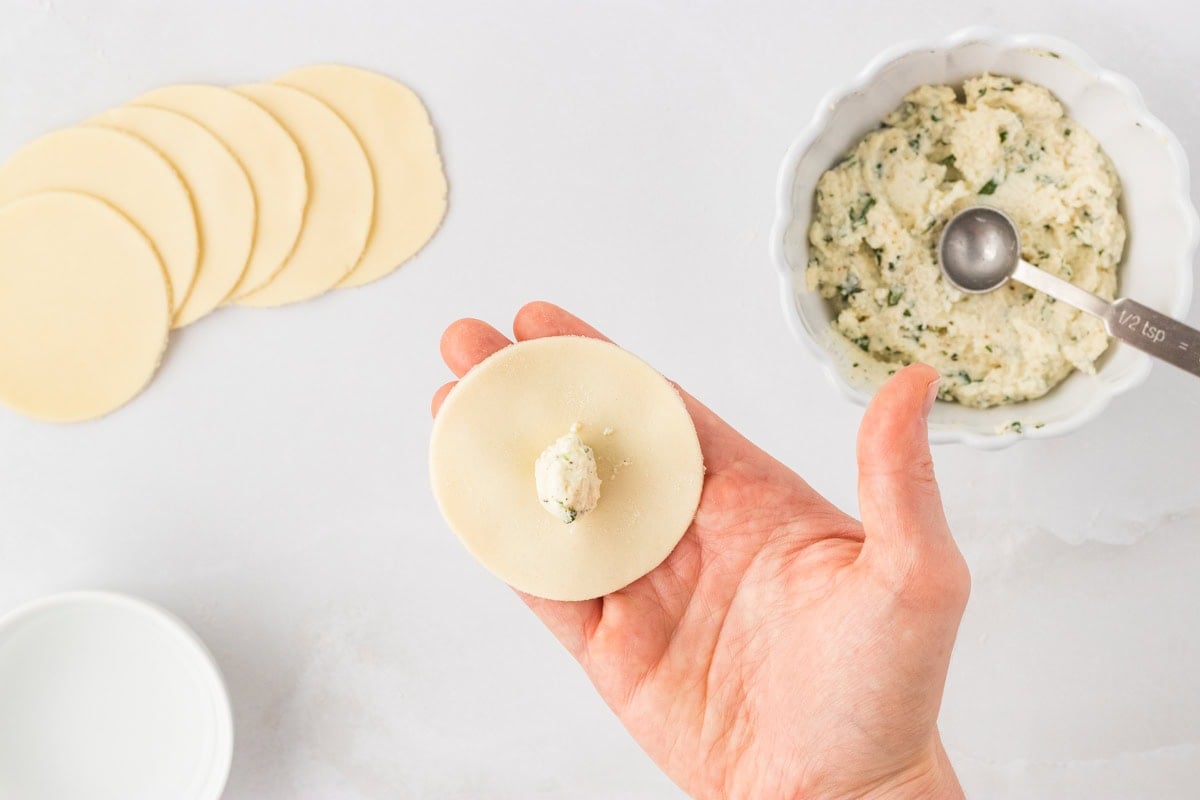
Fill the tortellini: Place one dough round in the palm of your hand. Spoon about ½ tsp of the cheese filling into the center. Dip your finger in the bowl of water and lightly wet the edge of the dough.
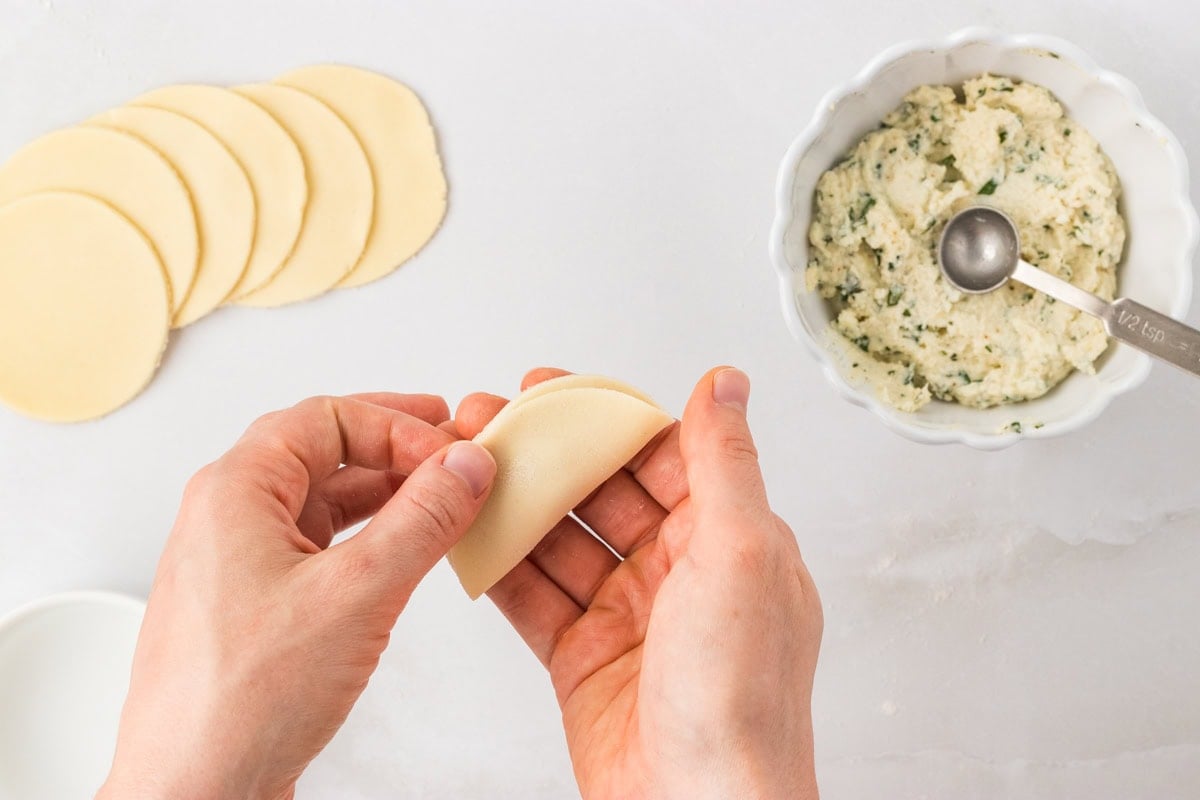
Fold the dough in half: Fold the circle in half over the filling to form a half-moon shape, and pinch the center edge closed with your thumb and index finger.
Seal the edge: Seal the rest of the edge, gently pressing out any air around the filling.
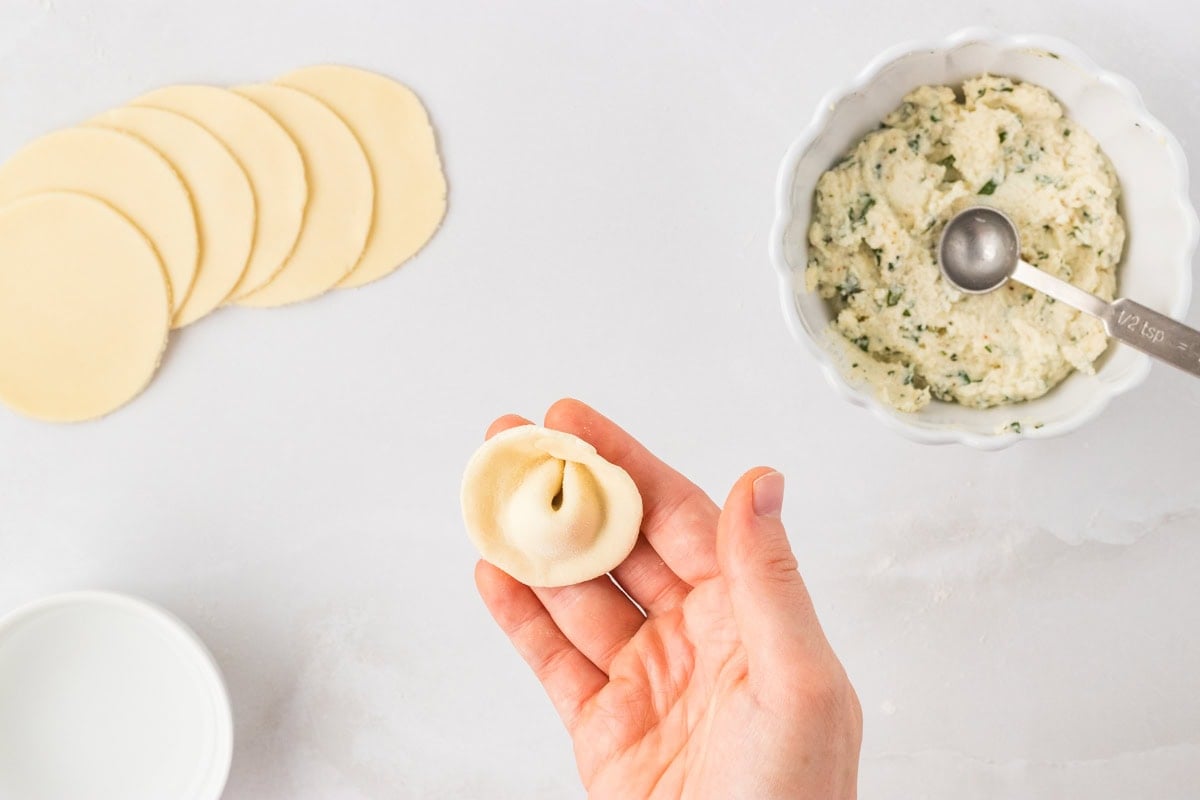
Shape into tortellini: Make a small indent in the filled edge with your thumb, then gently bring the two corners of the half-moon together. Use a bit of water on one corner to help them stick when pressed together, forming the classic tortellini shape. Set aside and repeat with the remaining rounds. It might take a few tries to get the shape right—just be patient!
Cook or freeze: You can cook the tortellini right away or freeze them. To freeze, lay them in a single layer on a baking sheet, cover with plastic wrap, and transfer to a freezer-safe container once solid. They’ll keep well for up to 3 months. To cook fresh tortellini, bring a large pot of salted water to a gentle boil and cook for 4–6 minutes, or until the pasta is tender and floats to the top. For frozen tortellini, boil straight from frozen for 7–9 minutes. Stir gently to avoid breaking the pasta.
Gluten-Free Cooking Tips
- It all comes down to moisture. With gluten-free pasta, the dough needs to be slightly tacky—not bone dry, but not so sticky that it clings to everything. Don’t rely solely on the exact water measurement; use the feel of the dough as your guide. Depending on your kitchen’s humidity or altitude, you may need to adjust slightly. I always aim for a dough that’s soft and just a bit sticky to the touch. If it feels too wet after resting, lightly flour your surface and rolling pin, but avoid adding too much, or the dough can dry out and crack as you work. When in doubt, a slightly wetter dough is easier to fix than one that’s too dry.
- Cover both the dough and the cut pasta rounds with a damp kitchen towel or paper towel as you work. This helps prevent the dough from drying out, which can lead to cracking or tearing when you’re folding and shaping the tortellini. Gluten-free dough dries out much faster than traditional pasta, so it’s important to keep it covered any time you’re not actively using it. If it starts to dry, it becomes harder to seal and more likely to break during cooking.
Serving Suggestions
When I make a batch of these gluten-free tortellini, I usually cook up a few right away because I just can’t wait. I love tossing them with a little butter and fresh basil for a super simple lunch, but they’re also amazing with my favorite gluten-free spaghetti sauce or a creamy dairy-free Alfredo if I want something richer. If I’m serving them for dinner, I’ll pair them with a big green salad, some garlicky sautéed veggies, or a slice of warm, crusty gluten-free baguette to soak up all the sauce. They’re cozy, comforting, and feel like such a treat every time.
Storage Instructions
I tested storing these in the fridge, but they dried out fast and didn’t cook up well—no matter how long I boiled them, the texture just wasn’t right. For the best results, I recommend enjoying them fresh or freezing them right away. The frozen tortellini cook beautifully and hold their shape much better. You can freeze tortellini in a freezer-safe container for up to 3 months.
For frozen tortellini, don’t thaw—just drop them straight into boiling water and cook for 7–9 minutes, or until soft and heated through. Be gentle when stirring so they don’t break apart.