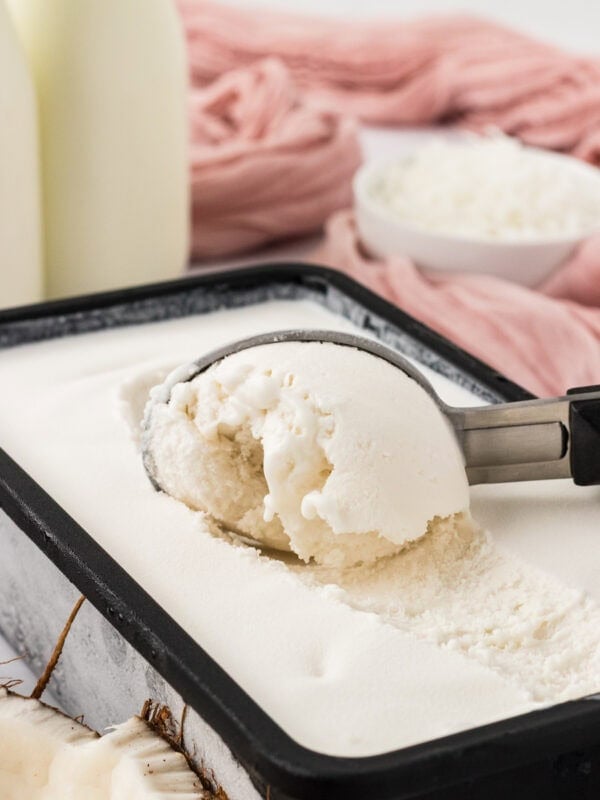
Vegan White Chocolate
Published


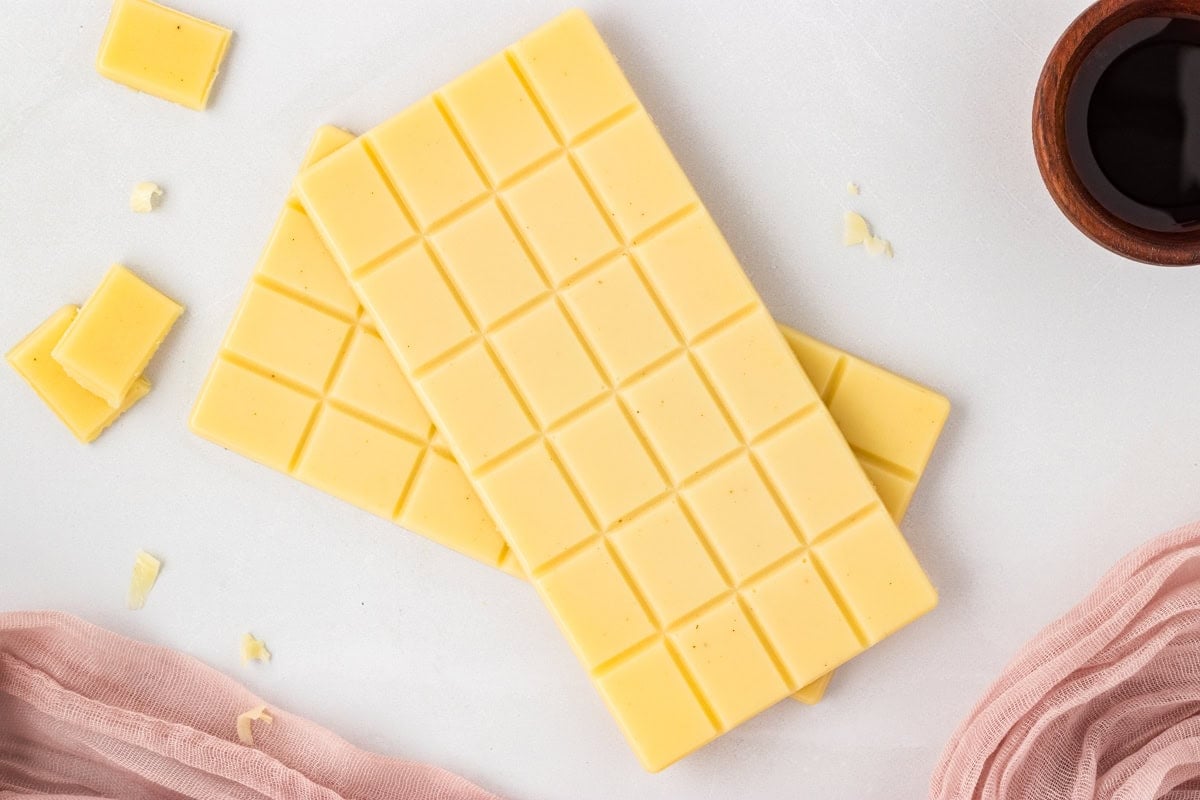
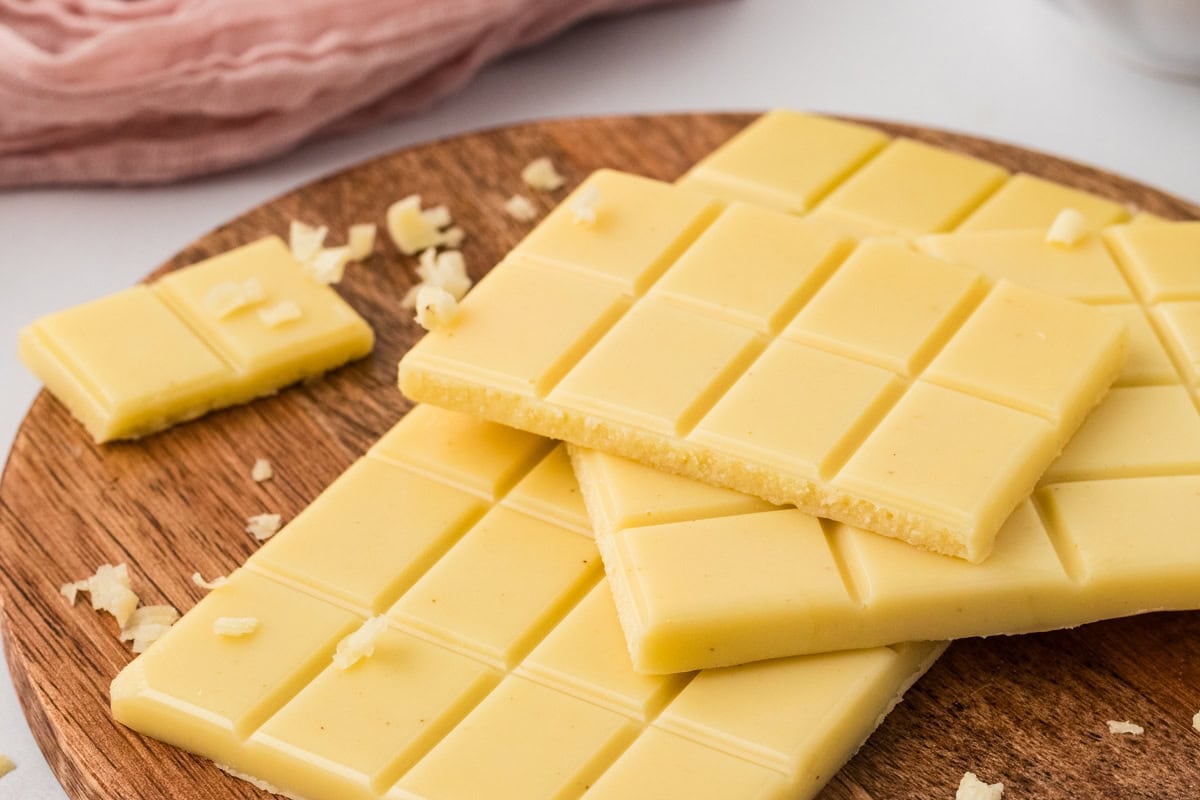
If you’ve been looking for a vegan white chocolate that rivals the store-bought kind, this dairy-free white chocolate delivers silky, buttery sweetness in just 45 minutes. Using 5 ingredients like pure cacao butter, powdered sugar, shortening, and no milk powder, it creates a smooth and creamy texture that snaps and melts beautifully. It is the kind of homemade white chocolate you will want to stash in the fridge for quick bites, gifting, or dessert boards.
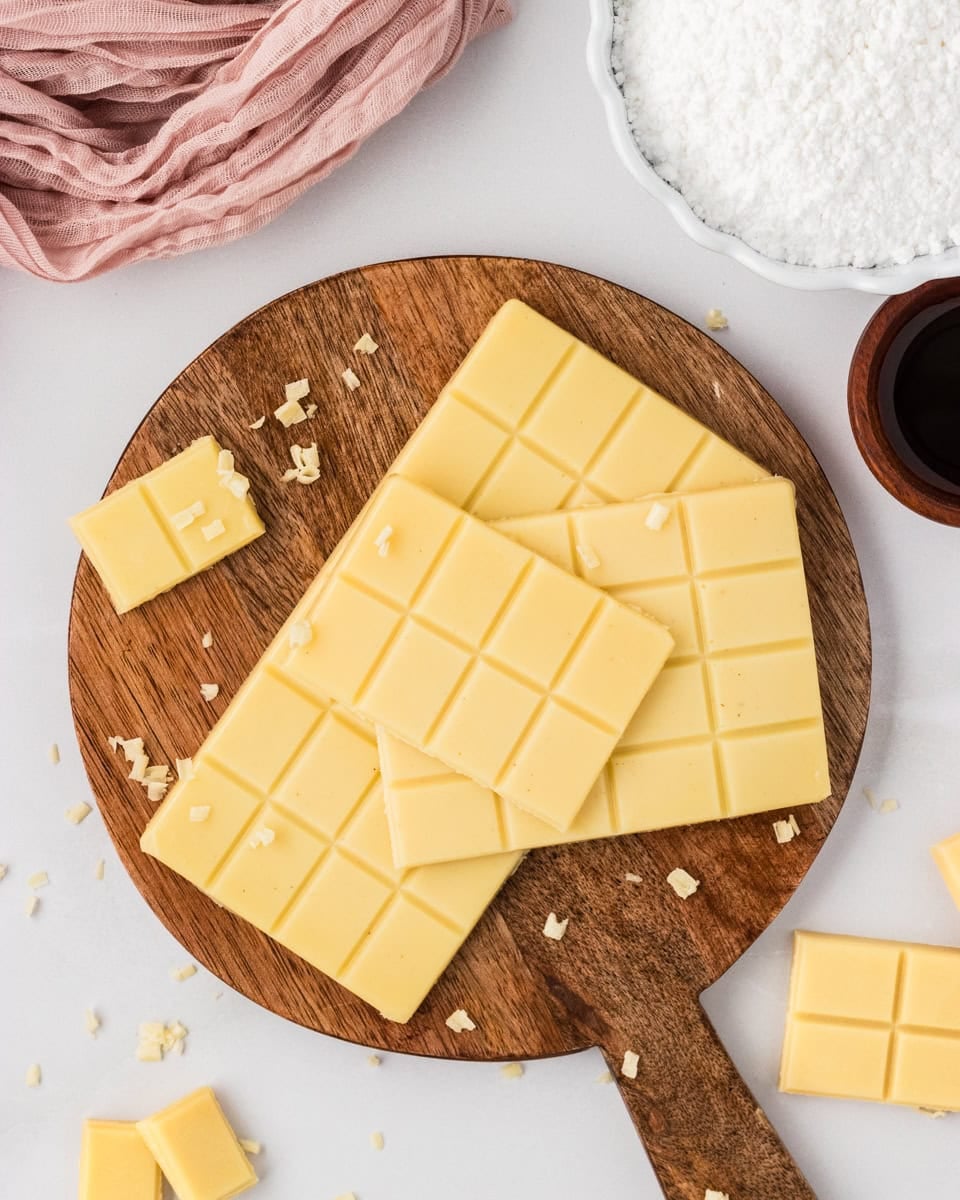
I make this vegan white chocolate often because it comes together fast and tastes rich and creamy without being overly sweet. The blend of cacao butter and vanilla gives it that classic white chocolate flavor, and you don’t need any special equipment or milk powder to get a smooth finish. Sometimes I top mine with pistachios or dried fruit. Other times, I keep it simple and enjoy it straight from the fridge. Let me know in the comments if you try it and how you like to customize yours.
Gluten-Free Baking Tips
- Cool slightly before blending. Allow the mixture to cool until warm but not hot. Blending hot chocolate can cause steam pressure to build inside the blender, which can force the lid off, lead to splattering, and make the mixture unsafe to work with. Blending while still warm helps dissolve the powdered sugar and gives you a smoother, creamier texture without the risk.
- Blend for a smooth chocolate. Blend the chocolate mixture for a smooth, creamy texture. Home kitchens do not have commercial conching machines, so blending helps break down sugar crystals and creates a silky finish.
- Give the silicone trays support. Place your silicone molds on a baking tray before filling them. This keeps everything level and makes it easy to move the chocolate to the fridge without spills or bending.
- Keep it chilled. Keep your vegan white chocolate chilled if you do not plan to temper it. Homemade versions soften quickly at room temperature, so storing them in the refrigerator helps them stay firm and snappy.
Vegan White Chocolate

Equipment
- 2 silicone molds
Ingredients
- 4 oz. raw, food grade cacao butter (110g)
- 2 tbsp vegetable shortening, 21g
- 1 cup powdered sugar, sifted (100g)
- 1 tsp vanilla extract
- pinch of salt
Instructions
- Chop your cocoa butter into smaller pieces if it came in big chunks. That way, it will melt more easily, and add it and your vegetable shortening to a heat-safe bowl.
- Place that bowl over a pot with an inch of water in the bottom, making sure the water doesn’t touch the bowl. Allow that water to simmer over medium-low heat until the cacao butter and shortening are melted, stirring occasionally.
- Once melted, add your sifted powdered sugar, vanilla, and salt and mix until thoroughly combined. This mixture will be grainy, and that is normal. Remove from the heat and let your mixture cool before blending.
- Prepare your silicone molds by placing them flat on a baking tray. That way, it’s much easier to transfer to the fridge.
- Pour your mixture into a small blender (you could also use a food processor) and blend until smooth, about a minute or two.
- Optionally, this is where you can add additional flavorings or toppings to your white chocolate. Place them directly into the blended mixture or into your molds before you pour your chocolate over.
- Pour your mixture into the silicone molds and refrigerate for 30 minutes or until hardened and set.
- Keep in the fridge until ready to enjoy!
Notes
- To add to baked goods: This chocolate melts very easily, so it may not hold up well in baked goods. If you want to try it in cookies or cakes, freeze the pieces first and fold them in right before baking.
- For extra firm texture, increase shortening slightly.
- For less sweet bars, reduce powdered sugar to ¾ cup.
Nutrition
Nutrition information is automatically calculated, so should only be used as an approximation.
How to Make Vegan White Chocolate Step by Step

Gather all the Ingredients together.

Create a double boiler: Chop 4 oz. (110g) raw cacao butter into small pieces to help it melt evenly. Add it to a heat-safe bowl along with 2 tbsp (21g) vegetable shortening. Place the bowl over a pot with about an inch of simmering water, making sure the water does not touch the bottom of the bowl.

Melt the base: Warm over medium-low heat until the cacao butter and shortening are fully melted, stirring occasionally.

Add sweetness and flavor: Once melted, whisk in 1 cup (100g) sifted powdered sugar, 1 tsp vanilla extract, and a pinch of salt. The mixture may look slightly grainy at this stage, and that is normal. Remove from heat and let cool slightly.

Blend for a smooth finish: When the mixture has cooled but is still pourable, transfer it to a small blender or food processor. Blend for 1–2 minutes until smooth and creamy.
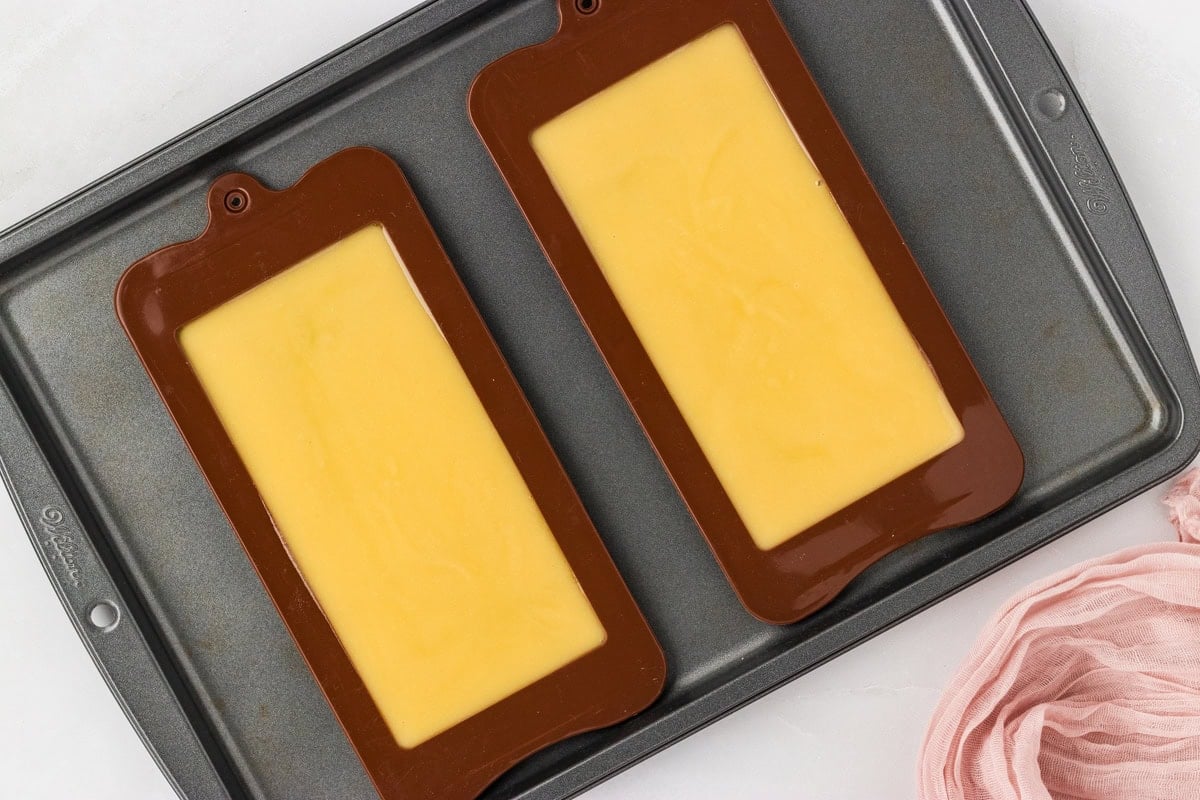
Fill the molds: Place silicone chocolate molds on a baking tray to keep them level and easy to transfer. If adding toppings or flavor variations, sprinkle them into the molds now or blend directly into the chocolate before pouring. Pour the blended chocolate into the prepared molds and refrigerate for about 30 minutes, or until fully hardened.
Store and enjoy: Keep refrigerated until ready to serve to maintain the best texture and firmness. Enjoy!
What Else to Add
- Chopped nuts: Add pistachios, pecans, or almonds for a rich, nutty bite
- Salted pretzel pieces: Add pieces for a crunchy, sweet-and-salty twist
- Freeze-dried fruits: Add freeze-dried strawberries, bananas, or blueberries.
- Citrus zest: Add a bright pop of lemon, lime, or orange zest for a fresh, zippy twist
Serving Suggestions
This vegan white chocolate is wonderful on its own, but it also works well for treats and gifting. Break it into chunks on top of almond milk ice cream, melt it into a creamy vegan white hot chocolate, or sprinkle pieces over desserts like gluten-free mini cheesecakes or crumble it on top of gluten-free lemon bars for a sweet contrast. I’ve even used it for peppermint bark during the holidays, just keep it stored in the fridge so it stays firm.
Storage Instructions
Keep your vegan white chocolate stored in the fridge in a sealed container where it will stay firm and fresh for about 3 weeks. Since it is not tempered, it softens at room temperature, so chilling is best for texture and snap. You can also freeze extra bars for up to 3 months. Just thaw them in the refrigerator to keep them smooth and creamy.


Hi, this is a great recipe and I will be using it this weekend! I cannot have regular chocolate because it makes my heart race so I wanted to try my hand at making white chocolate (I’ve bought it but it’s so expensive!) and I have cacao butter but was looking for a simple recipe.
A couple of questions: Can you make this into milk chocolate by adding powdered milk, and if so how much? Also, can this be tempered if I want to? (I have a machine)
I absolutely love using your recipes, and so does my non-gluten free family- keep them coming!
Hi Lee, we haven’t tested this recipe with any milk products since it’s a vegan recipe. I would recommend finding a recipe for tempered milk chocolate.