Gluten-Free Cannoli
Published


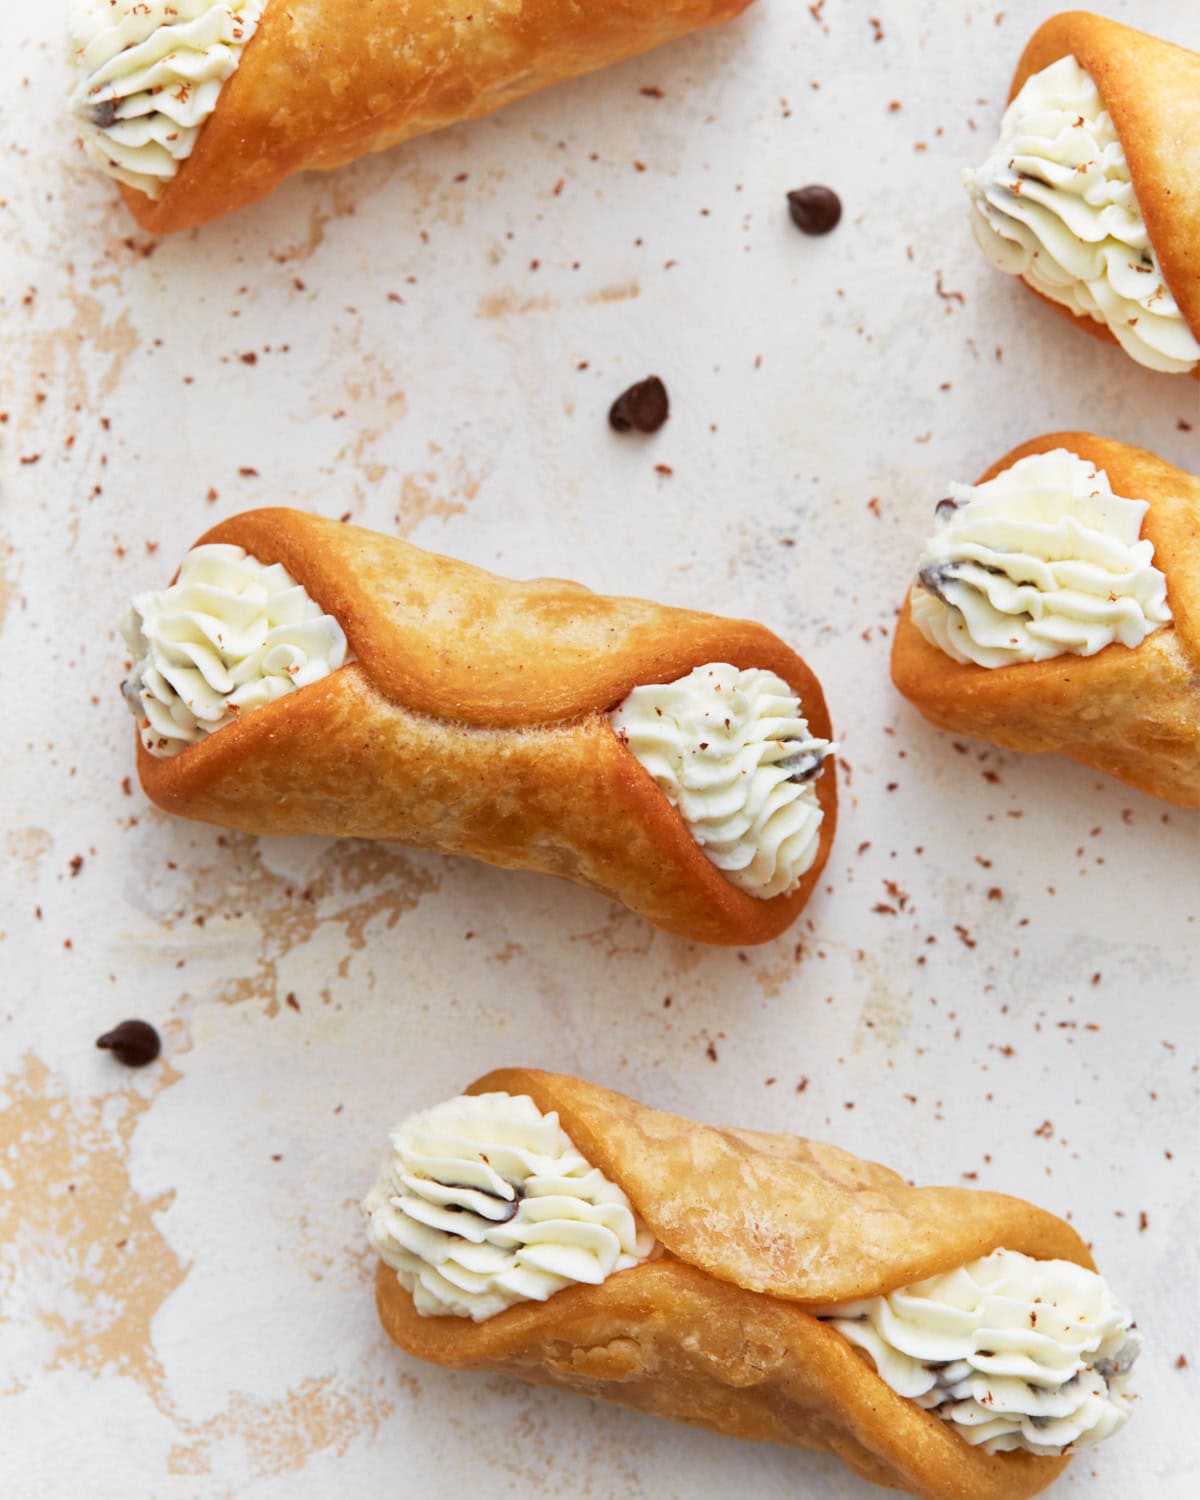
Simple gluten-free cannoli to indulge in at home. This easy-to-make cannoli dough skips the gluten without skipping out on flavor. It’s the perfect crispy shell, just waiting to be filled with a dreamy, creamy, sweet ricotta filling.
Gluten-Free Cannoli Recipe
The first time I perfected these homemade cannoli with gluten-free flour, I knew I was hooked. The crispy outer shell—made allergy-friendly with gluten-free flour—is fried perfectly and filled with a sweetened mascarpone and ricotta cheese blend.
This classic Italian dessert is so fun to make, even my kids love helping, and the gluten-free shells are something the whole family can agree on. The cream filling has a perfectly balanced sweetness that lets you enjoy every bite, especially with the added texture of the mini chocolate chips. These are some of my favorite desserts to bring to parties because I can make the perfect portions, and they’re safe for all my gluten-intolerant friends and family.
Ingredients
- Gluten-Free All-Purpose Flour Blend: Use a gluten-free flour blend for baking. I like Pillsbury Gluten-Free Flour which already includes xanthan gum.
- Xanthan Gum: To add structure to the dough. Omit if your flour already includes this.
- Sugar: To add a touch of sweetness to the shell.
- Cinnamon: Adds a subtle warm flavor to the dough.
- Salt: Salt is added to balance sweetness and to add structure.
- Egg: The egg is used to bind the ingredients together in the gluten-free dough.
- Cold Butter: Cold butter is crucial to form the flaky layers of the shell.
- Marsala Wine: Marsala wine adds flavor and tenderizes the dough. Alternatives are white vinegar or apple cider vinegar, which may change the flavor of the dough slightly.
- Frying Oil: I used vegetable oil but you can use any high smoke point oil like avocado or canola oil.
- Ricotta Cheese and Mascarpone Cheese: A mix of both cheeses adds a light creamy texture and balanced mild sweetness to the filling.
- Powdered Sugar: Adds concentrated sweetness to the creamy filling.
- Vanilla Extract: For a classic warm flavor.
- Mini Chocolate Chips: Optional garnish for added flavor and texture.

Tips and Suggestions
- Don’t overwork the dough. Mix until just combined to avoid tough shells. The gluten-free dough can be more delicate, so handle it gently.
- When rolling the dough, you want to get it as thin as possible. It should be almost see-through.
- If you don’t have a cannoli form, you can use aluminum foil rolled into small tubes or use any tubular-shaped utensil handle you have. Remember to lightly oil the forms to prevent sticking.
- Always make sure your oil is at the correct temperature (350°F) before frying, using a thermometer. Test a piece of dough before adding the shells to the oil. If the dough piece bubbles and floats to the top, the oil is ready.
- Use a wire rack or paper towels to drain fried shells immediately to keep them crisp.
- Gluten-free flour can be tricky. If your dough is too dry, add Marsala wine or water, one teaspoon at a time, until it holds together.
- Fill the shells just before serving to keep them crisp; otherwise, the filling may make them soggy.

Serving Suggestions
I love these gluten-free cannoli dipped in mini chocolate chips with an afternoon coffee. Try playing around with toppings like orange zest, crushed pistachios, powdered sugar, or dip the whole shell in chocolate!
Storage Instructions
Filled shells should be eaten within a few hours for the best texture, as the shells can become soggy.
If making ahead, keep the filling and shells separate and fill just before serving. Shells stored properly in an airtight container can last 1-3 months. Ricotta filling is good for 3-4 days in the refrigerator. Filled cannolis should be stored in the refrigerator and eaten within 1 day for the best texture.
More Gluten-Free Italian Recipes
- Gluten-Free Tiramisu
- Gluten-Free Ladyfingers
- Gluten-Free Biscotti
- Gluten-Free Focaccia
- Gluten-Free Gnocchi
Gluten-Free Cannoli

Equipment
- 8 Cannoli Forms
Ingredients
Shells
- 1 cup gluten-free all-purpose flour blend
- 1 tablespoon sugar
- 1/2 teaspoon xanthan gum, omit if not in flour blend
- 1/4 teaspoon cinnamon
- 1/4 teaspoon salt
- 1 large egg
- 2 tablespoons cold butter, cubed
- 2-3 tablespoons Marsala wine , or white vinegar
- Oil for frying
Filling
- 1 1/2 cups ricotta cheese, drained well
- 1/2 cup mascarpone cheese
- 1/2 cup powdered sugar, sifted
- 1/2 teaspoon vanilla extract
- 1/4 cup mini chocolate chips
Instructions
- In a mixing bowl, combine gluten-free flour, sugar, xanthan gum, cinnamon, and salt.
- Add the cubed butter and use a pastry cutter or your fingers to incorporate it until the mixture resembles coarse crumbs.
- Add the egg and 2 tablespoons of Marsala wine (or vinegar) and mix until a dough forms. If too dry, add a bit more wine, 1 teaspoon at a time, until dough holds together.
- Wrap the dough in plastic wrap and chill in the refrigerator for at least 1 hour.
- Once chilled, roll the dough on a floured surface to about 1/8-inch thickness. Cut into circles (about 4 inches in diameter).
- Wrap each circle around lightly greased cannoli tubes and seal the edges with a bit of beaten egg or water.
- Heat oil in a deep pan to 350°F. Carefully fry the cannoli shells in batches until golden brown, about 1-2 minutes per side. Remove and drain on paper towels. Let cool completely before removing from forms.
- While the cannoli shells are cooling, spread the ricotta on a paper towel to remove excess moisture.
- In a bowl, combine ricotta, mascarpone, powdered sugar, and vanilla extract. Mix until smooth.
- Fold in chocolate chips.
- Transfer the filling to a piping bag and pipe into the cooled shells. Dust with powdered sugar or grated chocolate if desired.
- Serve immediately for best texture, or refrigerate for up to 1 day.
Notes
- Don’t overwork the dough. Mix until just combined to avoid tough shells. The gluten-free dough can be more delicate, so handle it gently.
- When rolling the dough, you want to get it as thin as possible. It should be almost see-through.
- If you don’t have a cannoli form, you can use aluminum foil rolled into small tubes or use any tubular-shaped utensil handle you have. Remember to lightly oil the forms to prevent sticking.
- Always make sure your oil is at the correct temperature (350°F) before frying, using a thermometer. Test a piece of dough before adding the shells to the oil. If the dough piece bubbles and floats to the top, the oil is ready.
- Use a wire rack or paper towels to drain fried shells immediately to keep them crisp.
- Gluten-free flour can be tricky. If your dough is too dry, add Marsala wine or water, one teaspoon at a time, until it holds together.
- Fill the shells just before serving to keep them crisp; otherwise, the filling may make them soggy.
- Filled shells should be eaten within a few hours for the best texture, as the shells can become soggy.
- If making ahead, keep the filling and shells separate and fill just before serving. Shells stored properly in an airtight container can last 1-3 months. Ricotta filling is good for 3-4 days in the refrigerator. Filled cannoli should be stored in the refrigerator and eaten within 1 day for the best texture.
Nutrition
Nutrition information is automatically calculated, so should only be used as an approximation.
How to Make Gluten-Free Cannoli

Grab a large mixing bowl and combine 1 cup gluten-free flour, ½ tsp xanthan gum (if necessary), 1 tbsp sugar, ¼ tsp cinnamon, and ¼ tsp salt.

Using a pastry cutter, or your fingers, combine 2 tbsp cubed cold butter into the flour mixture. Mix until the mixture resembles coarse crumbs.

Add 1 large egg and 2 tbsp marsala wine and mix until the dough starts to form. If the dough seems too dry, add more marsala wine, 1 tsp at a time, until the dough holds together.

Wrap the formed dough tightly in plastic wrap and chill in the refrigerator for at least 1 hour.

After chilling, roll the dough out on a lightly floured surface. The dough should be rolled out to ⅛-inch thickness and should be slightly translucent. Cut 4-inch diameter squares out using a cookie cutter.

Lightly grease the cannoli tubes and wrap each dough circle around them. Seal the edges together with egg wash or water.

Heat the frying oil up to 350°F in a deep pan. Check the temperature with a thermometer and carefully test a piece of scrap dough before frying any shells. Add the formed shells into the frying oil carefully, in batches, and fry until golden brown (about 1-2 minutes per side).

Remove the fried shells from the oil and drain on a paper towel or drying rack. Allow the shells to cool completely.

While the shells cool, spread 1 ½ cups of ricotta on a paper towel to remove extra moisture.

Grab a large bowl and combine the 1 ½ cups ricotta, ½ cup mascarpone, ½ cup powdered sugar, and ½ tsp vanilla extract. Mix until the filling is smooth.

Carefully fold in a ¼ cup mini chocolate chips and then transfer the ricotta filling to a piping bag.

Evenly pipe the ricotta filling into each shell and dust with powdered sugar or grated chocolate, if desired. Serve filled cannoli immediately or refrigerate for up to 1 day. Enjoy!

More Gluten-Free Italian Desserts
- Almond Flour Biscotti: If you love the crisp shell of gluten-free cannoli, this almond flour biscotti has that same satisfying crunch with a slightly softer, nuttier bite that’s perfect for dipping.
- Gluten-Free Biscotti: These gluten-free biscotti have that same classic crisp texture as cannoli shells, making them a great option when you want a simple, dunkable Italian-style treat.
- Gluten-Free Shortbread Cookies: While more tender than cannoli shells, these gluten-free shortbread cookies offer a buttery, lightly sweet flavor that fits right into an Italian dessert spread.
- Gluten-Free Ladyfingers: Light and airy, these gluten-free ladyfingers are a softer contrast to cannoli but still bring that classic Italian bakery feel, especially when served with coffee or espresso.


This was the only recipe I could find with things I actually had in the house and it was perfect! I haven’t had a cannoli in years and this really satisfied my craving!