Gluten-Free Egg Rolls
Published
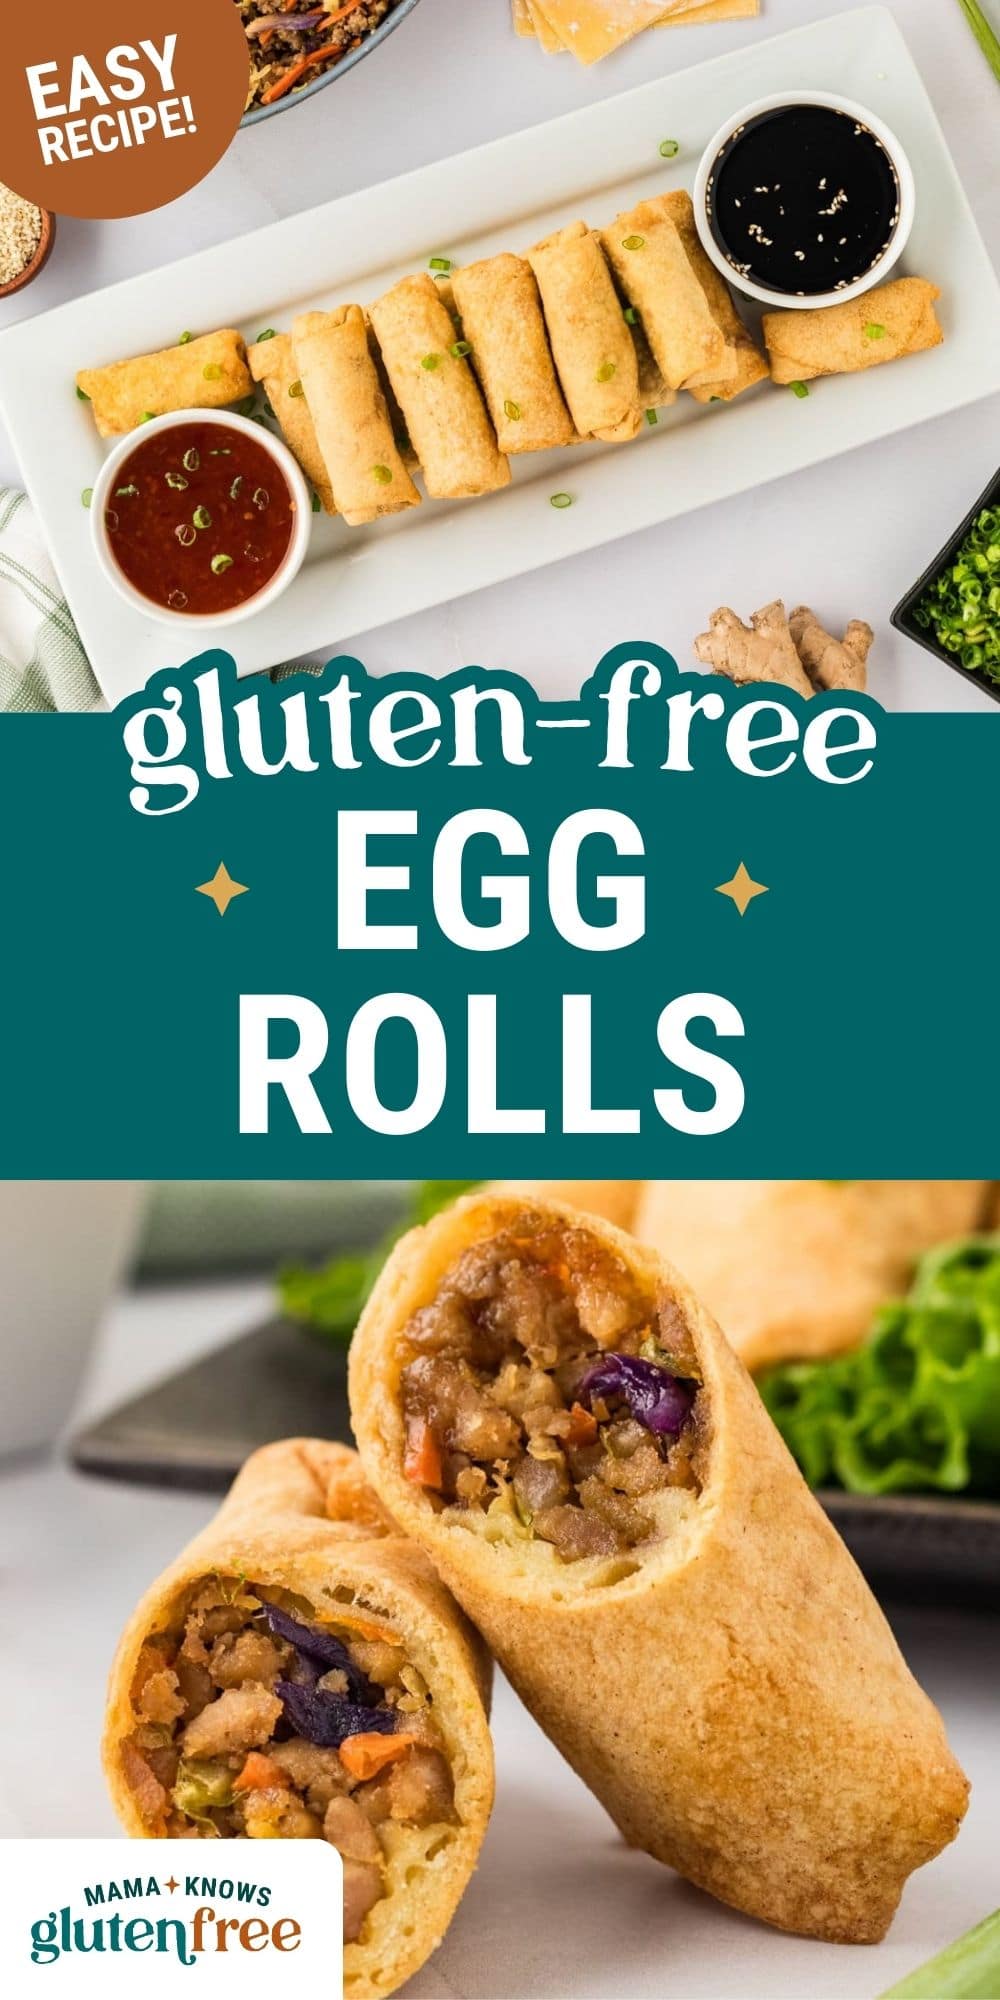

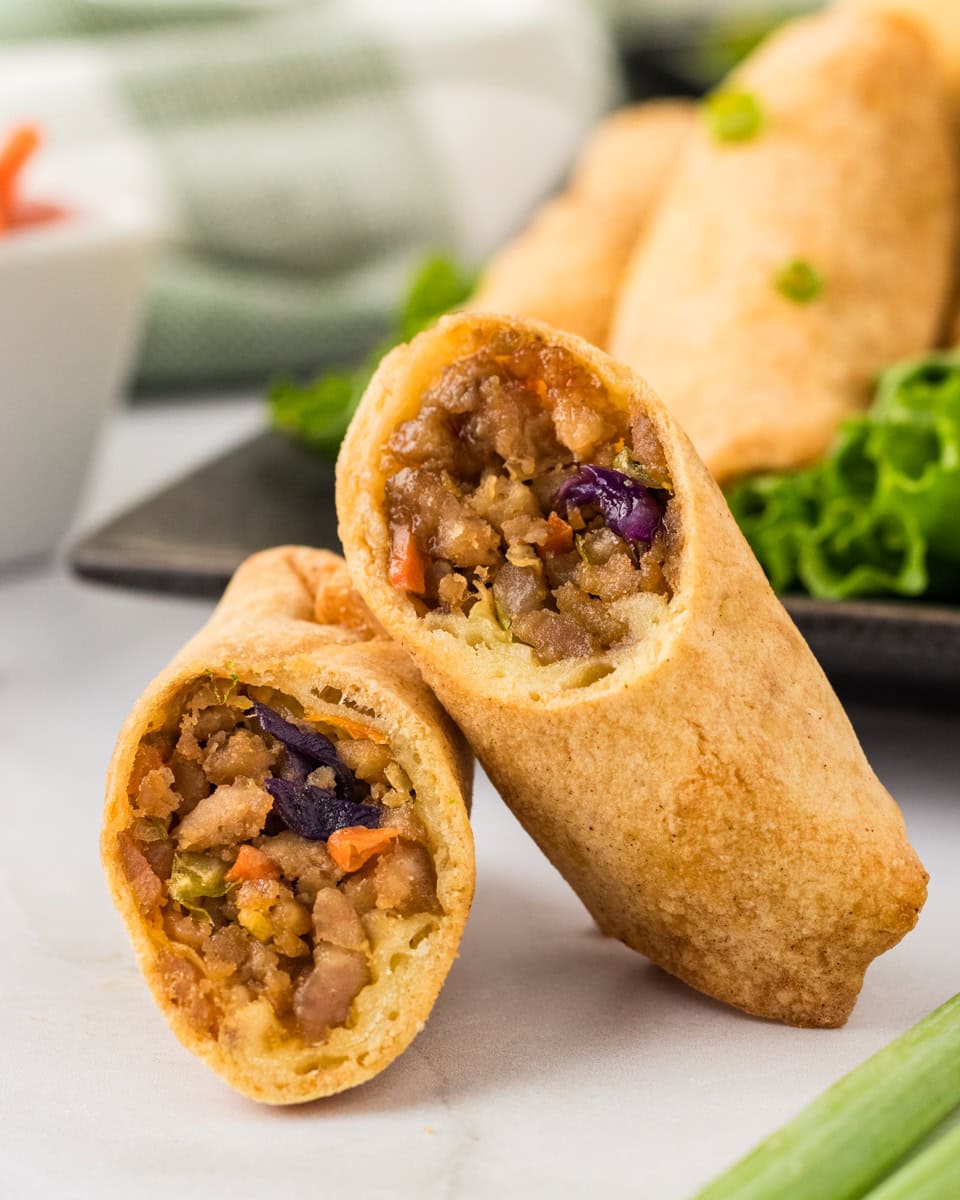
These gluten-free egg rolls are perfectly crisp and filled with a savory, ginger, and garlicky filling that’s too good to pass up. These American-Chinese appetizers are a staple in Asian cuisine and in my takeout orders, but they are even better homemade with gluten-free flour.
Gluten-Free Egg Rolls Recipe
This egg roll recipe might sound familiar as they’re inspired by my gluten-free wonton recipe. I figured I could use the same gluten-free wrapper recipe in different ways. These easy egg rolls without gluten do not disappoint!
The crispy exterior offers the perfect crunch with a slightly sweet, savory inside. You can’t go wrong serving this egg roll recipe; your guests will be impressed, and your gluten-free friends will keep asking for more.
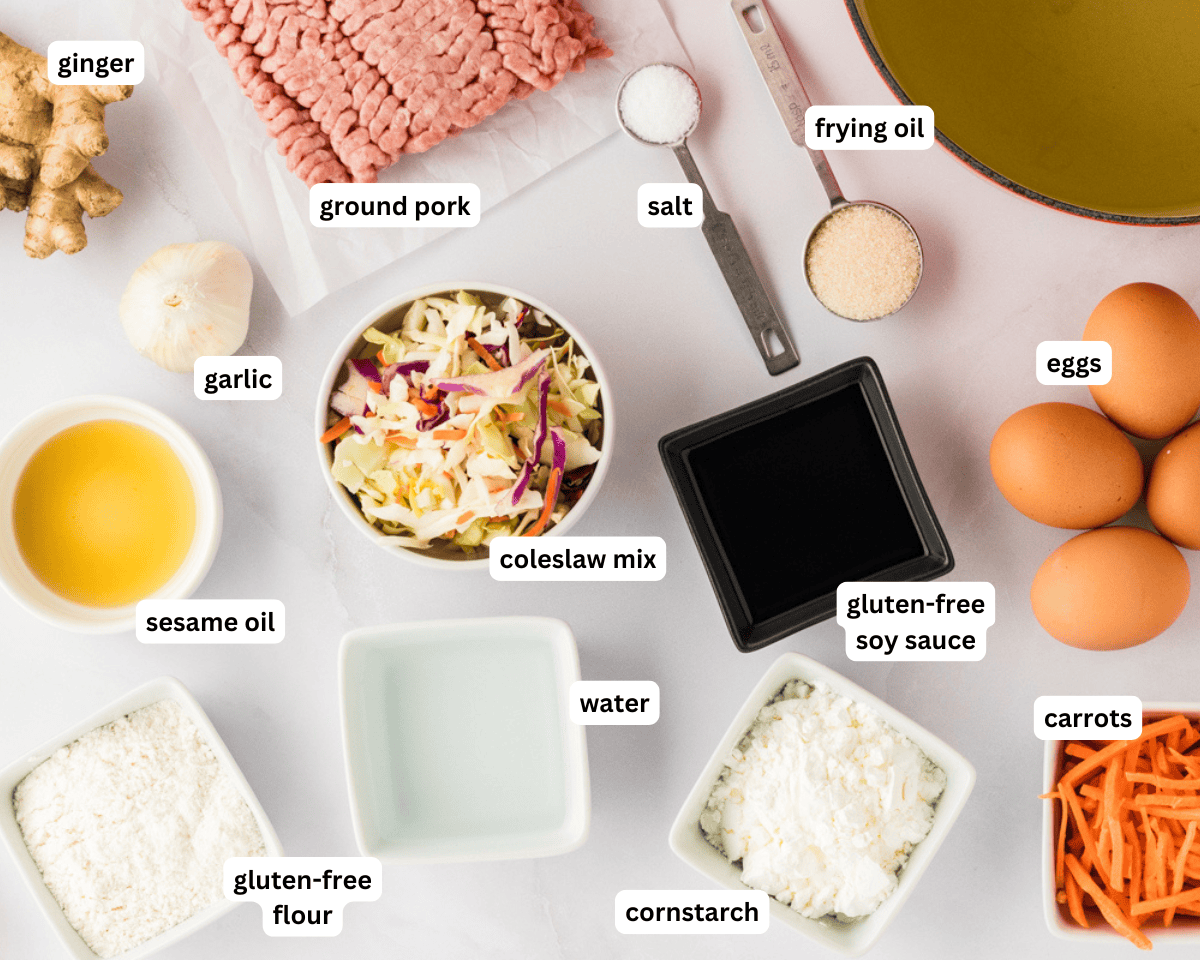
Ingredients
- Gluten-Free Soy Sauce: Make sure to check that your soy sauce is certified gluten-free. A good gluten-free alternative is coconut aminos.
- Sesame Oil: Adds a rich, nutty aroma and depth to the filling. You can also use toasted sesame oil.
- Sugar: Balances savory ingredients with a hint of sweetness, creating a well-rounded taste.
- Salt:
- Cornstarch: A gluten-free ingredient that helps bind the filling and improves the texture of the wrapper dough.
- Ground Pork: Substitute for your favorite ground meat just note that pork has more fat, so you’ll need to add oil.
- Ginger: Adds a warm, slightly spicy flavor that complements the other seasonings.
- Garlic: Brings a savory depth and bold aroma that enhances the overall umami flavor in each bite.
- Coleslaw Mix: I just grab a bag from the salad section. You can use a broccoli slaw or a blend of green and purple cabbage.
- Carrots: Brings a natural sweetness and extra crunch, creating a more balanced filling.
- Green Onion: use the stalk and the bulb
- Gluten-Free All-Purpose Flour: I used Pillsbury Gluten-Free All-Purpose Flour. You may use your favorite gluten-free flour just be aware the moisture content, texture, and flavor may vary.
- Eggs: Eggs are used in the dough to bind the dry ingredients and give the dough flexibility.
- Water: Warm water helps soften the dough and allow the flour to absorb quicker.
- Frying Oil: Any high temp oil, vegetable, peanut, canola, or even avocado oil.
Tips and Suggestions
- You can certainly make the meat filling ahead of time and store it in the fridge until you are ready to use it; just let it come to room temperature before filling your egg rolls. I would not, however, recommend making the wrappers ahead of time, as they dry out too easily.
- Drain any excess moisture from the filling to avoid soggy egg rolls. This helps keep the rolls crisp during frying.
- Keep the oil at a steady 350-375°F (175-190°C). Too low, and the rolls will be greasy; too high, and they may burn. Use a thermometer for precision.
- After frying, place egg rolls on a wire rack instead of paper towels to keep them crisp on all sides.
What’s the difference between spring rolls and egg rolls?
The difference is mostly in the wrapper! A spring roll wrapper is usually made with rice and is very thin, making for an extremely crisp and delicate exterior when fried. An egg roll wrapper is made with flour and, usually, eggs. The spring roll’s appearance is also smooth, while the egg roll is often recognized by its blistered and bumpy exterior. Spring rolls aren’t always fried, either. Sometimes, they are served cold and fresh with a soft rice paper wrapper, whereas egg rolls are always fried.
Serving Suggestions
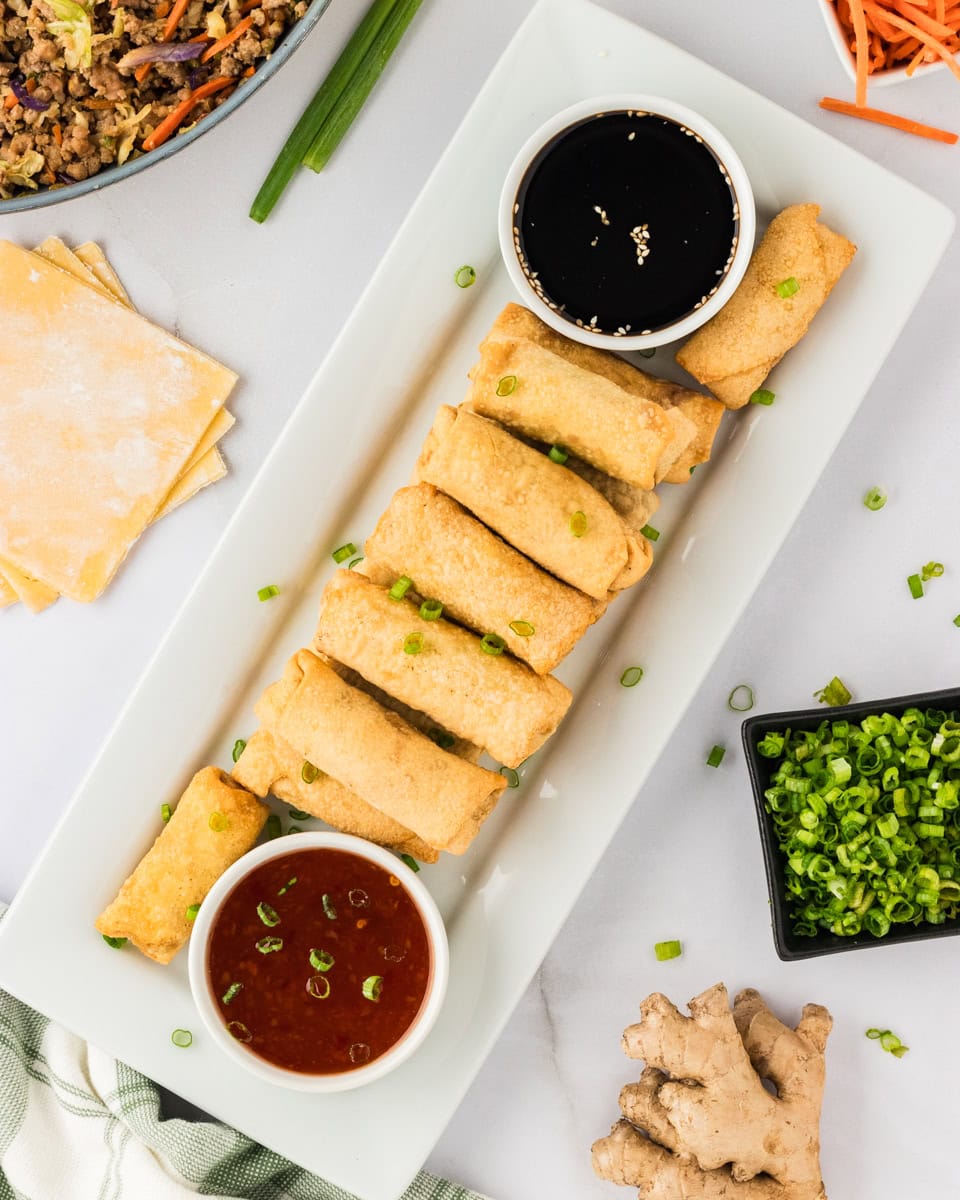
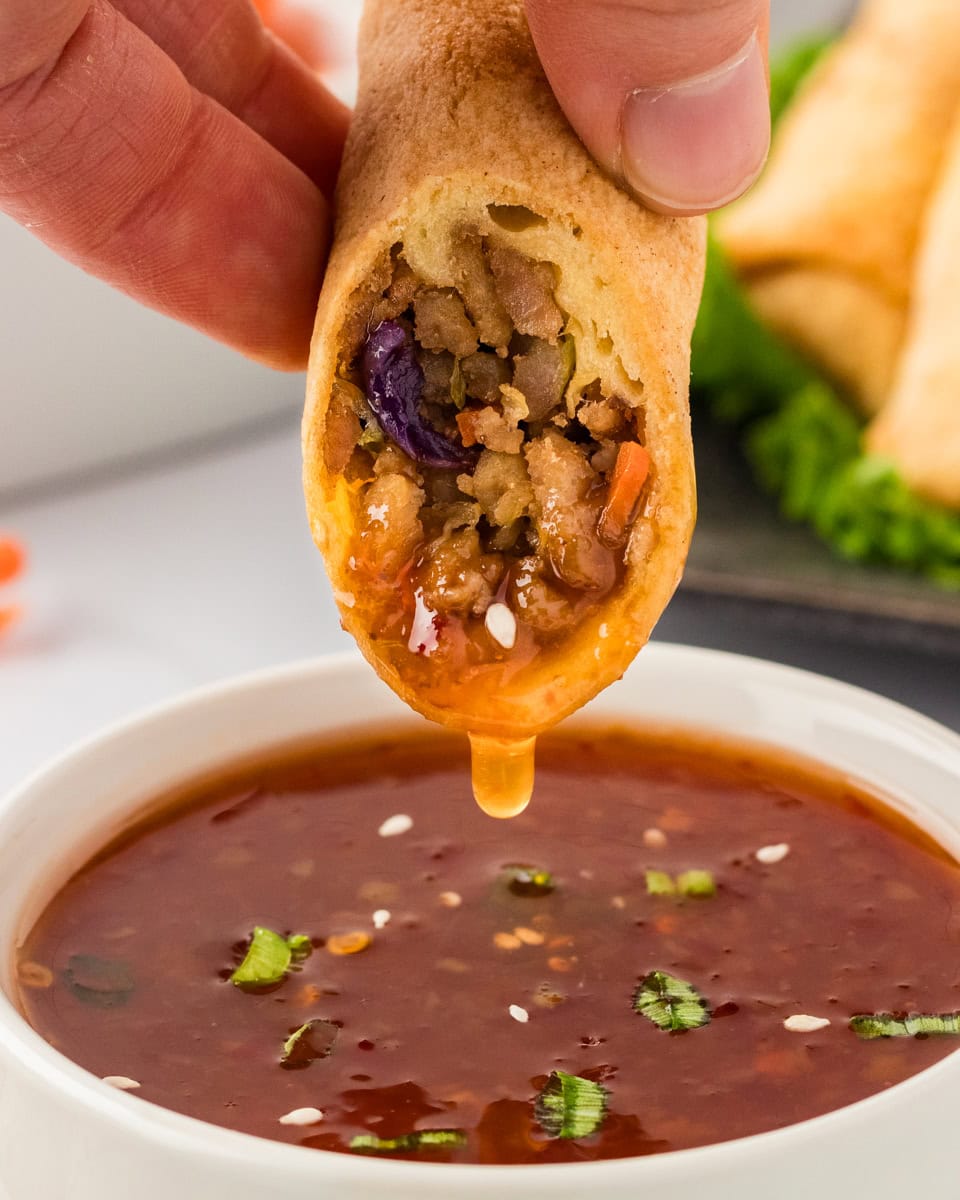
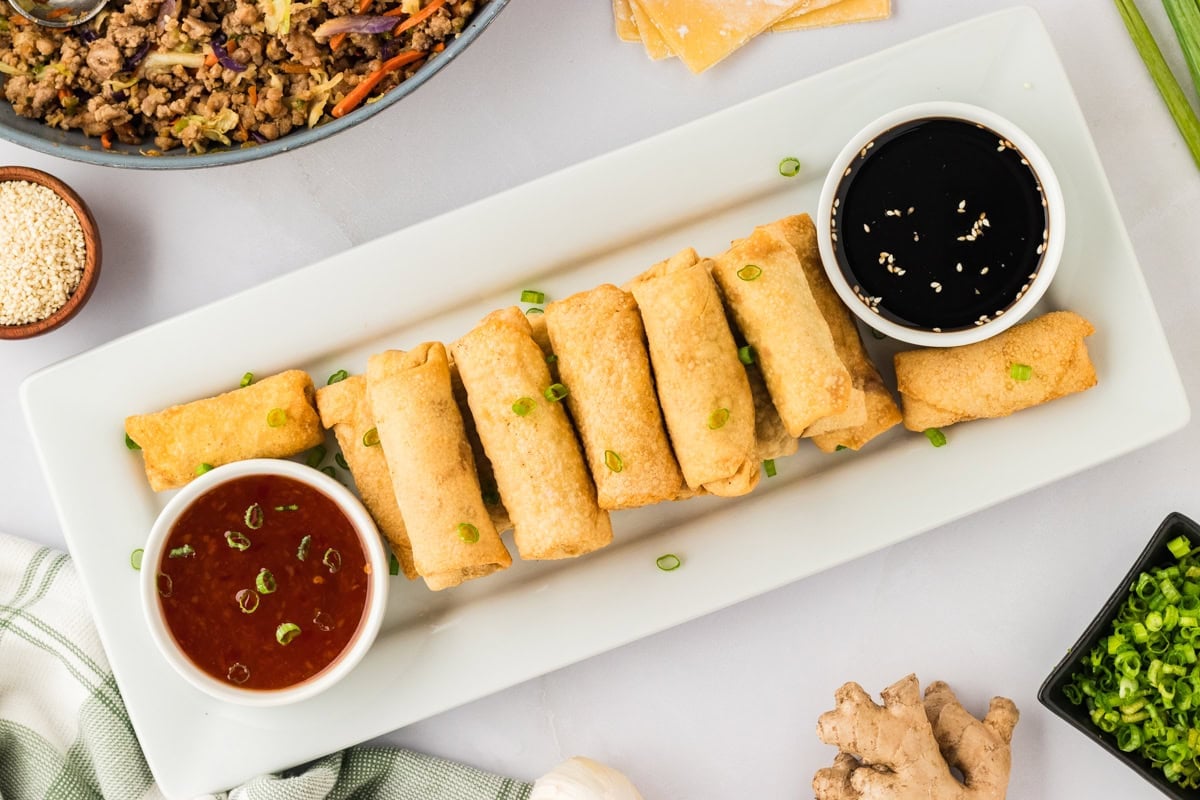
My favorite combination is gluten-free egg rolls dipped in a spicy, sweet chili sauce, but they’re also delicious dipped in homemade teriyaki or gluten-free soy sauce. If I’m making a few appetizers, I’ll serve them alongside gluten-free fried rice and Asian sticky wings.
Storage Instructions
Store in the fridge for up to 5 days and reheat by baking or air frying them at 350°F for 6-8 minutes.
More Asian-Inspired Recipes
Gluten-Free Egg Rolls

Equipment
- 1 large skillet
- 1 large pot
- 1 Thermometer
- 1 Rolling Pin
- 1 Baking Rack
- 1 Skimmer or tongs
- Mixing Bowls
Ingredients
For the Filling
- 2 tablespoons gluten free soy sauce
- 2 teaspoons sesame oil
- 1 tablespoon sugar
- 2 teaspoons cornstarch
- 1 teaspoon salt
- 1 pound ground pork
- 1 tablespoon fresh ginger, minced
- 4 cloves of garlic, minced
- 2 cups coleslaw mix
- ½ cup shredded carrots
- 2 large green onions
For the Wrapper
- 1 ¾ cup pillsbury gluten-free all-purpose flour
- ¼ cup cornstarch, plus more for rolling
- ¼ teaspoon salt
- 3 eggs, 150 grams plus 1 egg for the egg wash
- ⅛ cup and 2 tablespoons of warm water, divided
- Frying oil
Instructions
- In a small bowl, combine your soy sauce, sesame oil, sugar, cornstarch, and salt and give it whisk. Set it aside for later.
- To a large pan, add in your ground pork on medium heat and brown it until completely cooked, breaking it up as you go. Add your garlic and ginger and cook for an additional minute until aromatic.
- Add in your green onions, carrots, coleslaw mix, and sauce and allow it to cook, stirring frequently for 2-3 minutes, just until the veggies begin to soften. If you cook them for too long, you’ll lose all of the beautiful color.
- Remove from the heat and let cool down to room temp while you make your wrappers.
- To make your wrappers, begin by cracking and whisking an egg in a small bowl and set it aside for later.
- Combine in a medium bowl your gluten free flour, cornstarch, and salt. Give that a mix then add in your eggs and ⅛ cup of your water, reserving the last 2 tablespoons of water to add as you need it. You will likely need the last 2 tablespoons, but better to add more later than too much in the beginning!
- Begin mixing with your hands, kneading in the bowl until the dough comes together. It will look shaggy before it starts to come together as a dough. You should be able to compress the shaggy dough in your fist and have it hold together. If it does not, add a bit more of your water.
- On a clean surface, remove your dough from the bowl and begin kneading. The dough should be slightly sticky and tacky, but should not stick to your hands or surface while kneading. If it’s too dry, add a bit more of your water. As you knead it, it will become smoother.
- Keep kneading until the dough is smooth, about 3 minutes, then wrap tightly in plastic wrap and let sit and rest for 30 minutes.
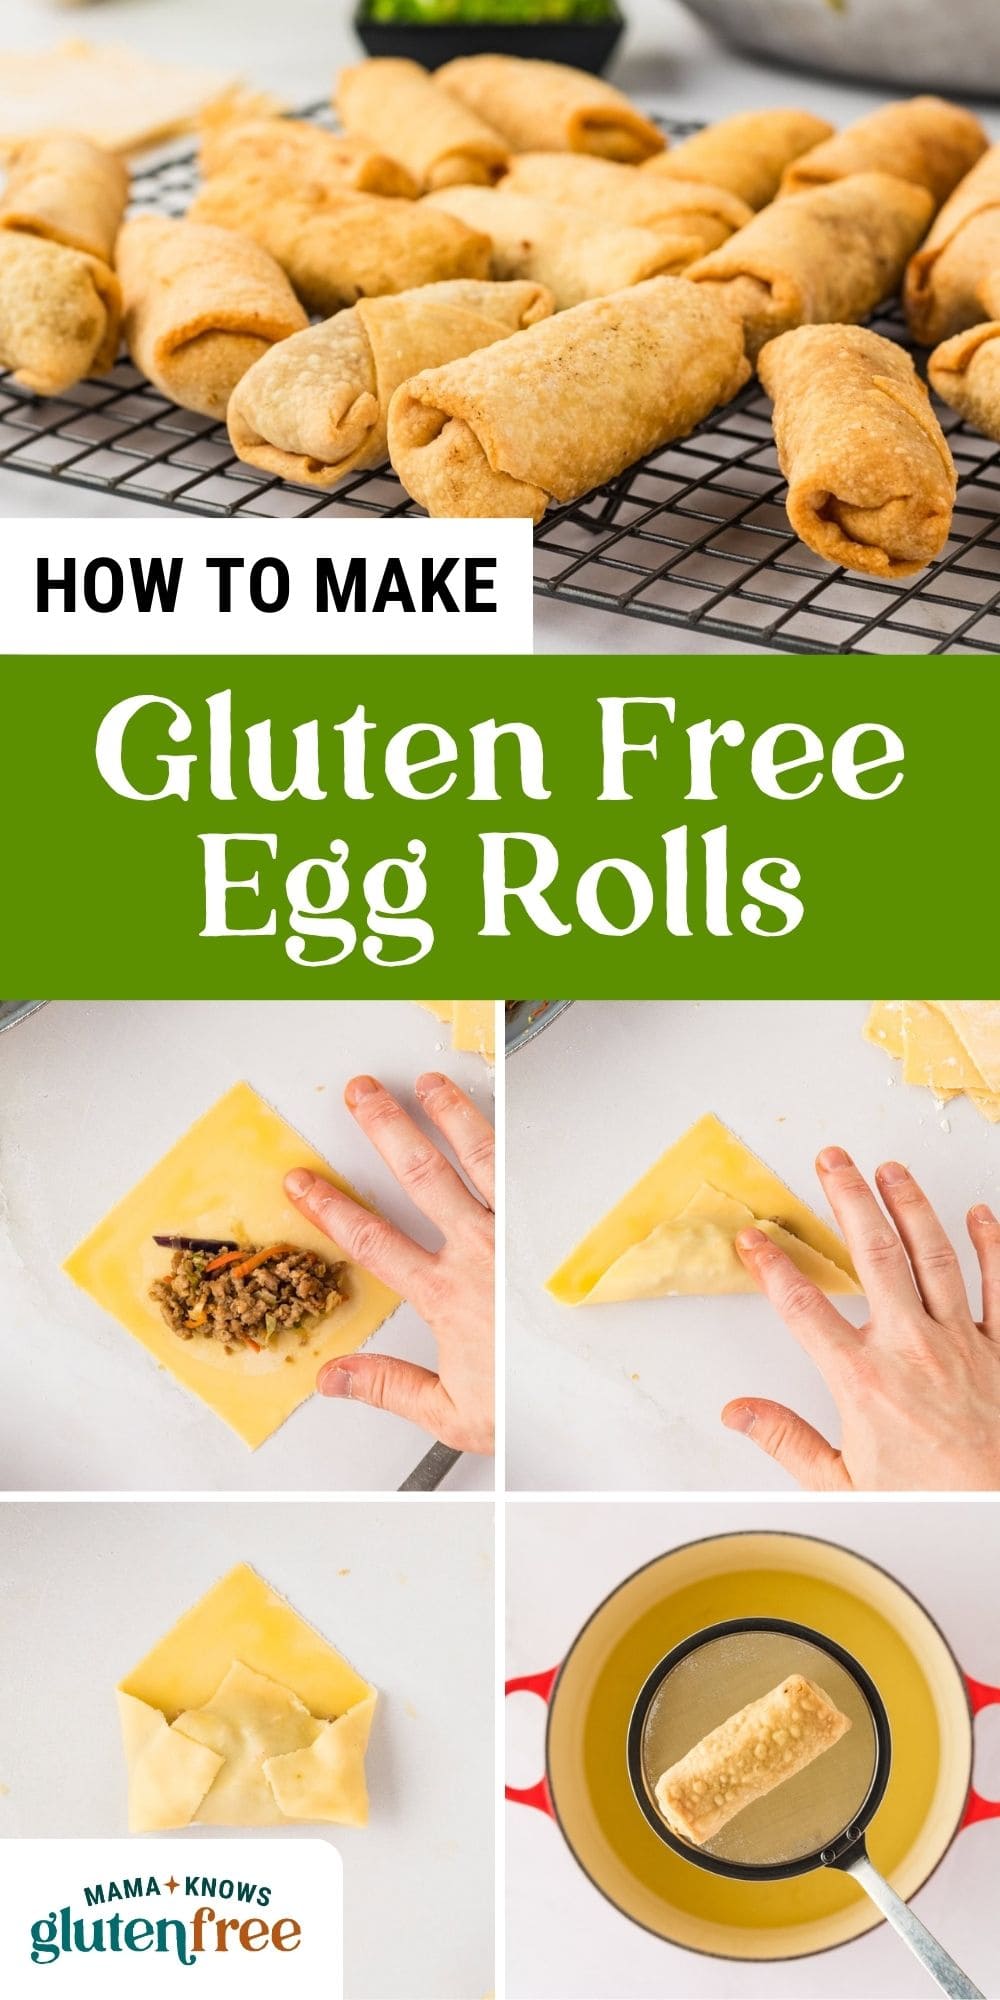
- After 30 minutes, remove your dough from the plastic and divide into 2 pieces. While working with one of the pieces, leave the other wrapped so as to keep it from drying out.
- Lightly dust your surface with cornstarch and use a rolling pin to roll the dough flat and as rectangular as possible, adding more cornstarch as needed and turning and flipping as you go in order to keep it from sticking.The dough will have a tendency to tear given that it’s gluten free, so do this carefully. If at any time the dough seems sticky, add more cornstarch to your surface, rolling pin, or directly onto the surface of the dough.
- Roll the dough out thinly but not so thinly that you can see through it. Cut the dough into as many 4 inch squares as you can. These don’t have to be perfect squares since we will re-roll them. Lightly dust your squares with more cornstarch to keep them from sticking, stack them, cover them with a damp paper towel, and set them aside.
- Apply more cornstarch to your working surface area and work with one square at a time, placing it onto your work surface and rolling it flat until it’s about 5-6 inches. You should be able to see your hand through the dough. Make sure you don’t roll it so thin that you can’t work with it without it ripping. This might take some practice.
- Trim the edges of your square until the sides are uniform and turn it diagonally, so one of the corners is pointed towards you. Take a tablespoon of your meat mixture and place it just slightly lower than the center of the wrapper and shape it into a log.
- Using some of your egg wash, wet the exposed wrapper then carefully use your hands to peel up the corner closest to you and wrap it over the meat filling. Wet the wrapper that you just folded up, then use the two corners to the sides and fold those inward before rolling the entire thing closed, being careful not to pull too tight and rip the dough. Repeat this process until all of your egg rolls are wrapped and ready. Until you’re ready to fry, keep your rolled egg rolls under a damp paper towel to keep them from drying out.
- To a medium or large pot, heat to 350°F (175°C) enough frying oil to submerge the egg rolls. Once hot, drop in your egg rolls away from you and allow them to fry for 5-6 minutes, flipping often to evenly cook, until they are lightly brown. Be careful not to overcrowd your pot as that can lead to the oil temperature dropping too suddenly and the egg rolls not cooking evenly.
- Remove done egg rolls onto a baking rack to drain and cool before serving with your favorite dipping sauces.
Notes
- You can certainly make the meat filling ahead of time and store it in the fridge until you are ready to use it; just let it come to room temperature before filling your egg rolls. I would not, however, recommend making the wrappers ahead of time, as they dry out too easily.
- Drain any excess moisture from the filling to avoid soggy egg rolls. This helps keep the rolls crisp during frying.
- Keep the oil at a steady 350-375°F (175-190°C). Too low, and the rolls will be greasy; too high, and they may burn. Use a thermometer for precision.
- After frying, place egg rolls on a wire rack instead of paper towels to keep them crisp on all sides.
- Store in the fridge for up to 5 days and reheat by baking or air frying them at 350°F for 6-8 minutes.
Nutrition
Nutrition information is automatically calculated, so should only be used as an approximation.
How to make Gluten-Free Egg Rolls Step-by-Step
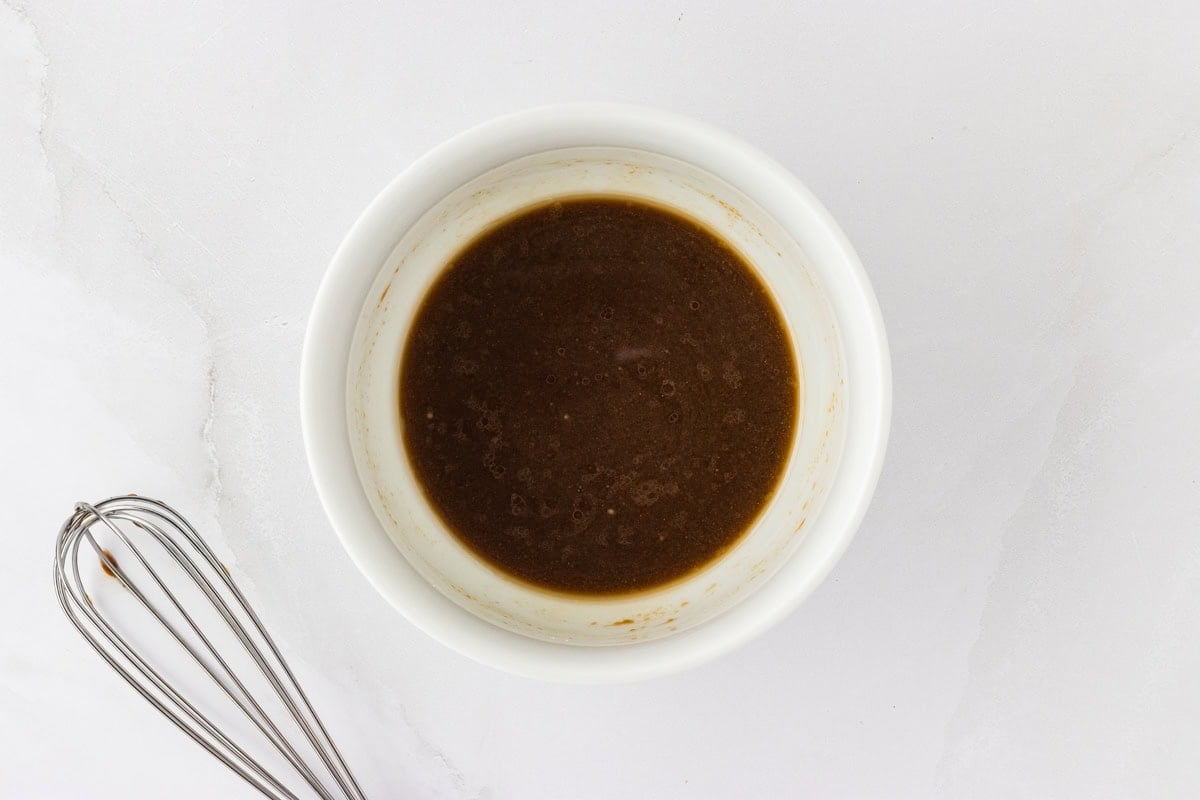
Grab a small bowl and combine 2 tbsp soy sauce, 2 tsp sesame oil, 1 tbsp sugar, 2 tsp cornstarch, and 1 tsp salt. Whisk to combine and set aside.
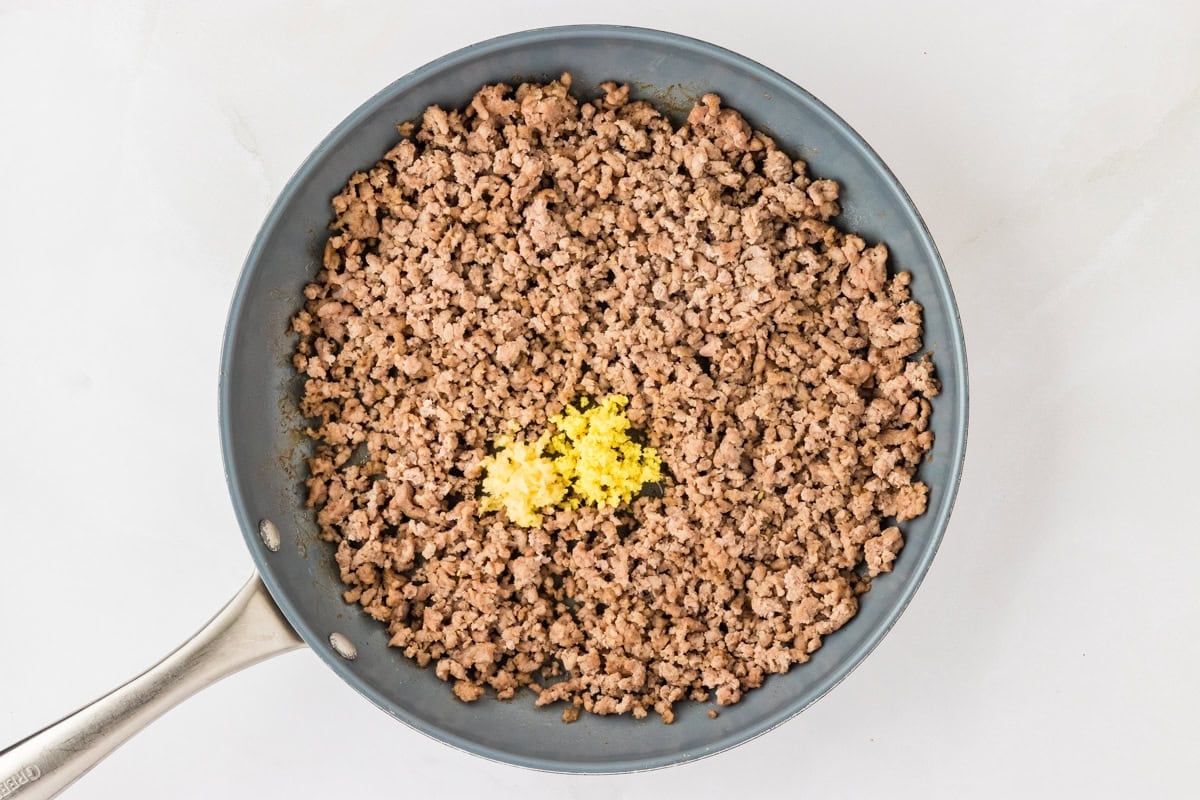
In a large pan, brown 1 lb ground pork on medium heat until fully cooked. Add in 1 tbsp fresh ginger and 4 cloves of minced garlic. Cook until fragrant.
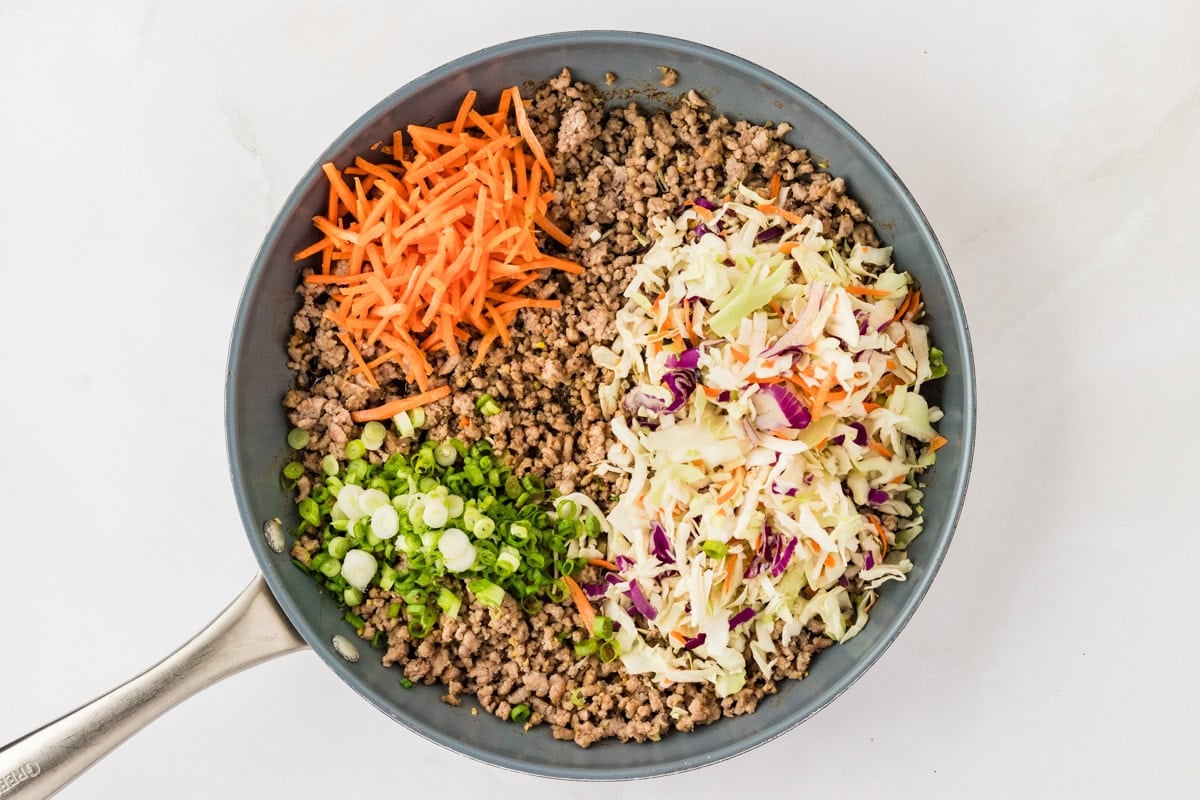
Add 2 whole green onions, ½ shredded carrots, 2 cups coleslaw mix, and the soy sauce mixture. Cook for 2-3 minutes, stirring frequently, and allow the veggies to soften a bit.
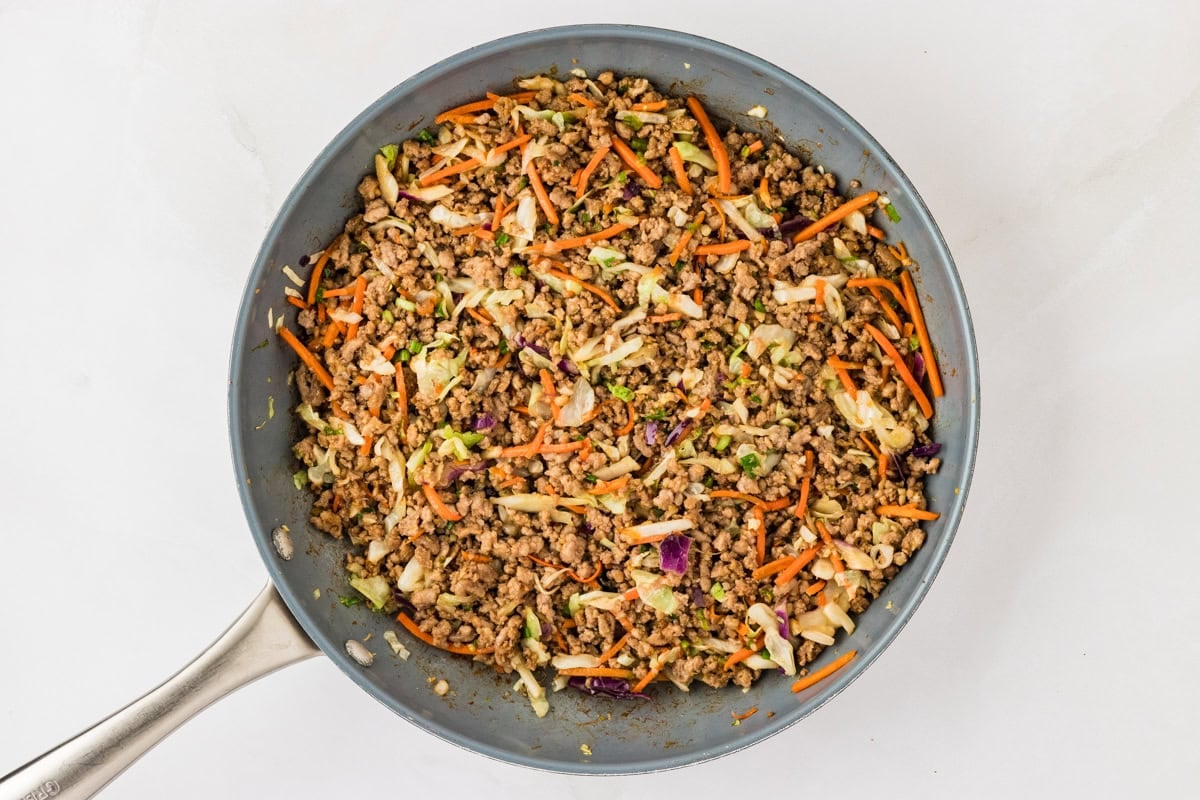
Remove the filling from the heat and allow it to cool to room temperature while you make the egg roll wrappers.
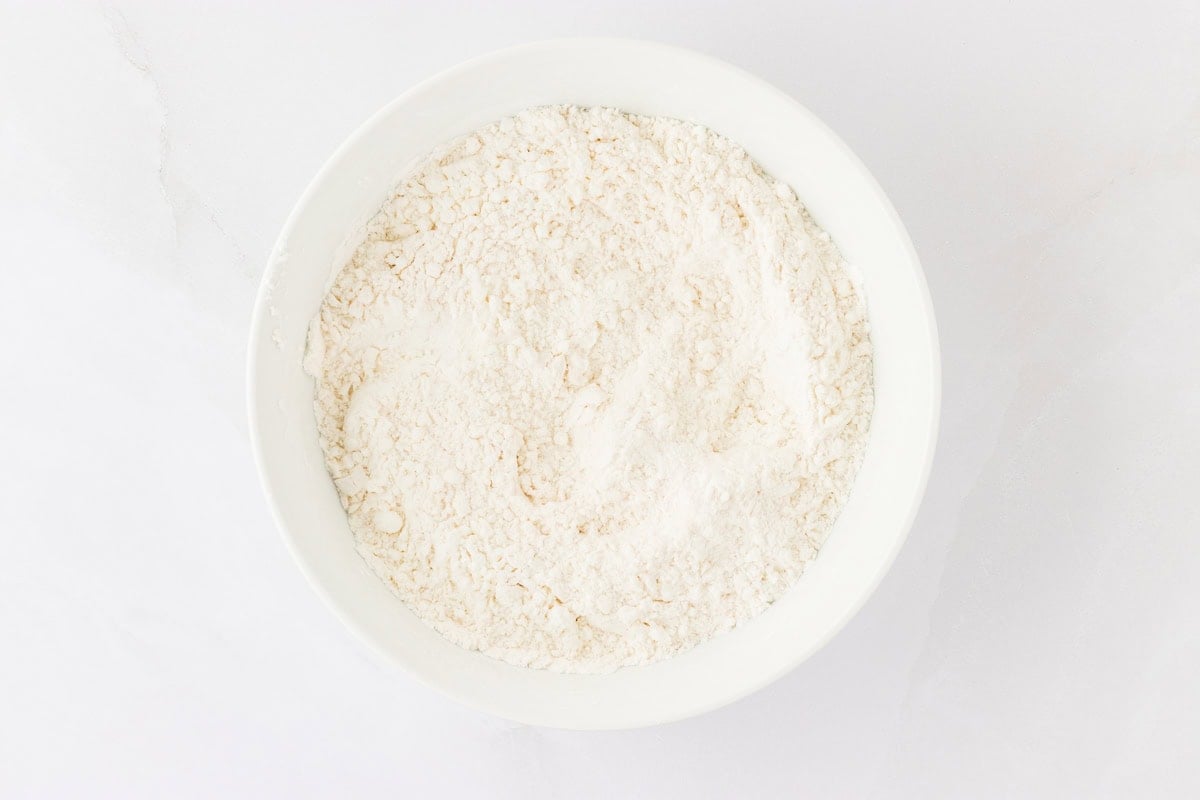
To make the gluten-free wrappers, whisk 1 egg in a bowl and set it aside. In a larger bowl, combine 1 ¾ cups gluten-free flour, ¼ cup cornstarch, and ¼ tsp salt. Mix until fully combined.

Add in 3 eggs and ⅛ cup of the warm water, saving 2 tbsp in case you need it later.
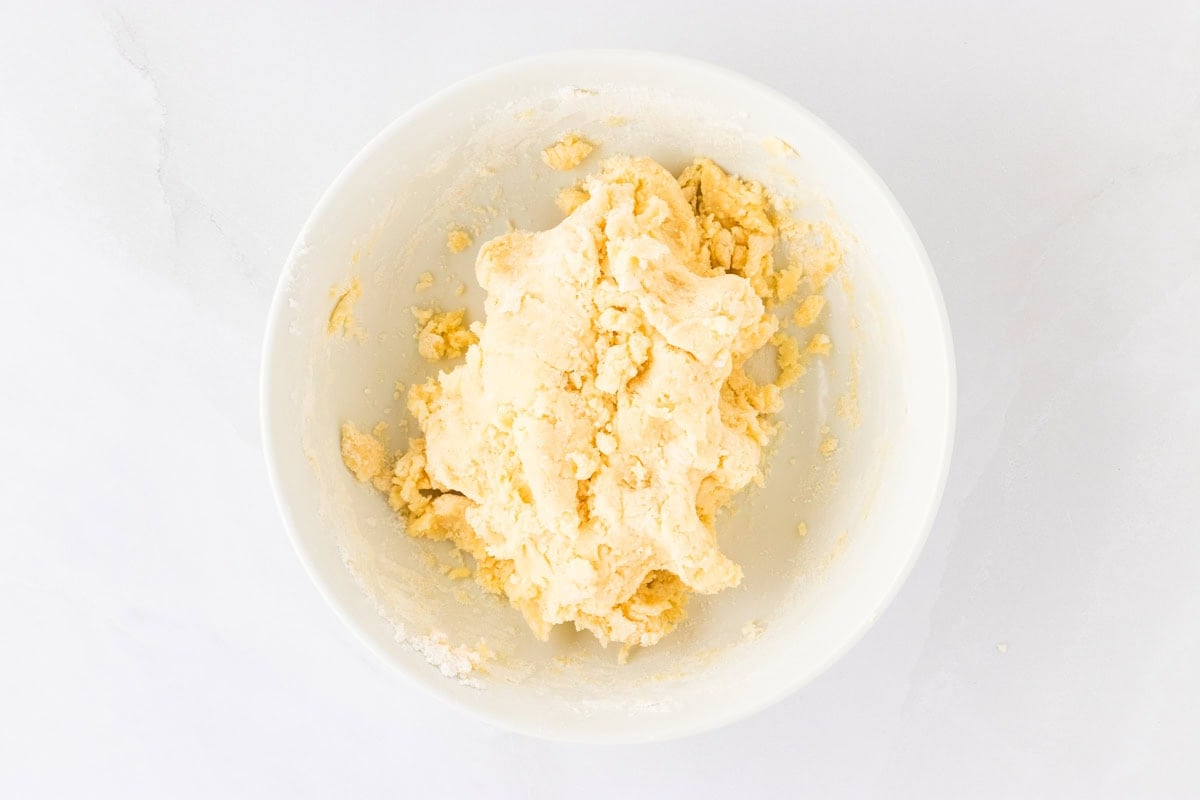
Mix the ingredients with your hands, kneading until the dough comes together. If the dough doesn’t hold together, add in 1 more tbsp of water.
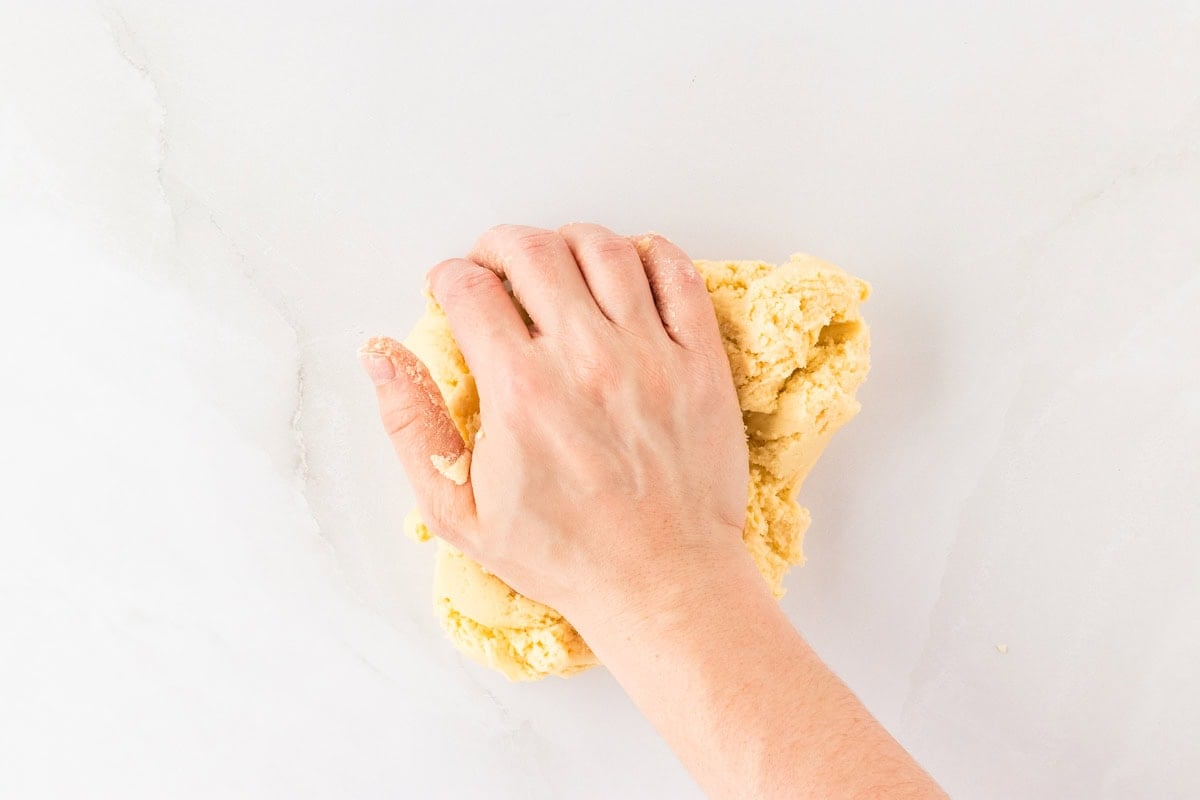
Remove the dough onto a clean surface and knead outside the bowl. The dough should be sticky and tacky but it should not stick to your hands or your surface. If it feels to dry, add a bit more water.
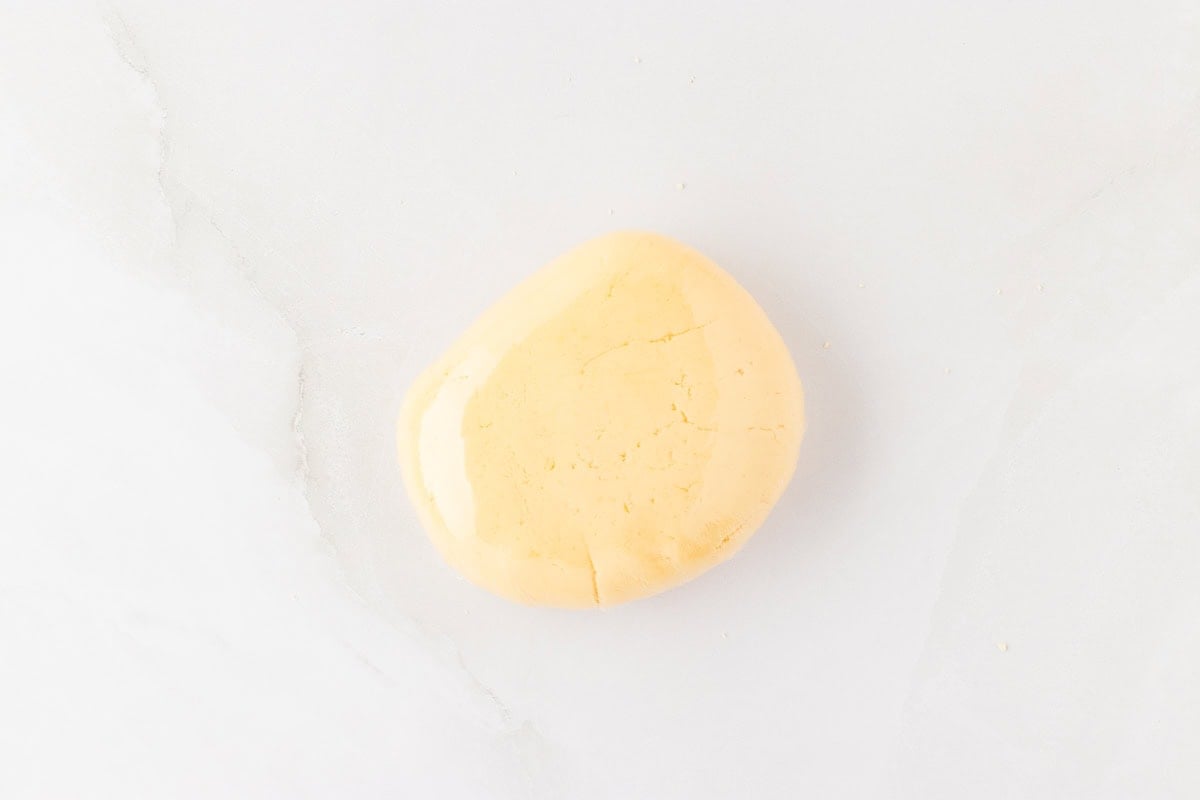
Keep kneading until the dough is smooth. This usually takes about 3 minutes. Once smooth, wrap the dough tightly in plastic wrap and let the dough rest for 30 minutes.
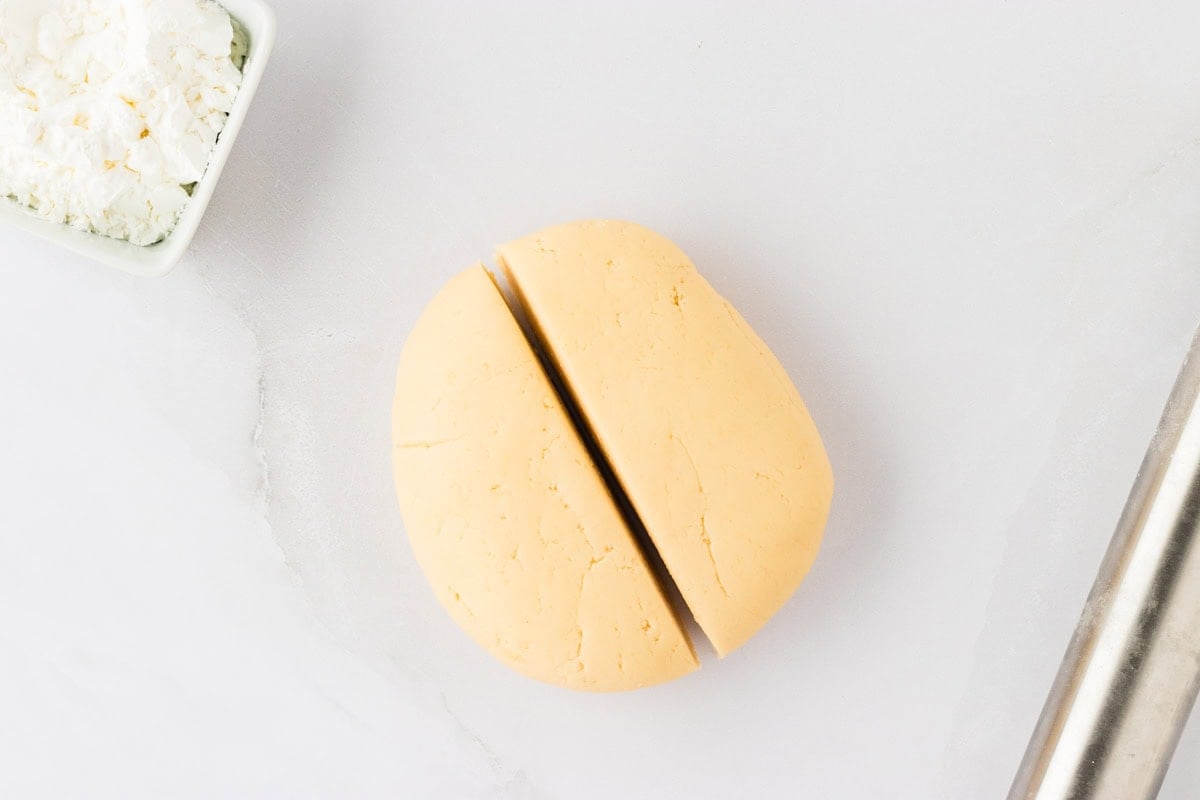
Once the dough is fully rested, remove from the plastic wrap and divide into 2 even pieces. Wrap up the side you’re not working with in the plastic wrap to keep it from drying out.

Lightly dust your clean work surface and rolling pin with cornstarch. Roll the dough out flat and as rectangular as possible. Add more cornstarch as needed or if the dough becomes too sticky. Turn and flip the dough to keep it from sticking to the pin and surface. Be careful, as gluten-free dough is more prone to tearing.
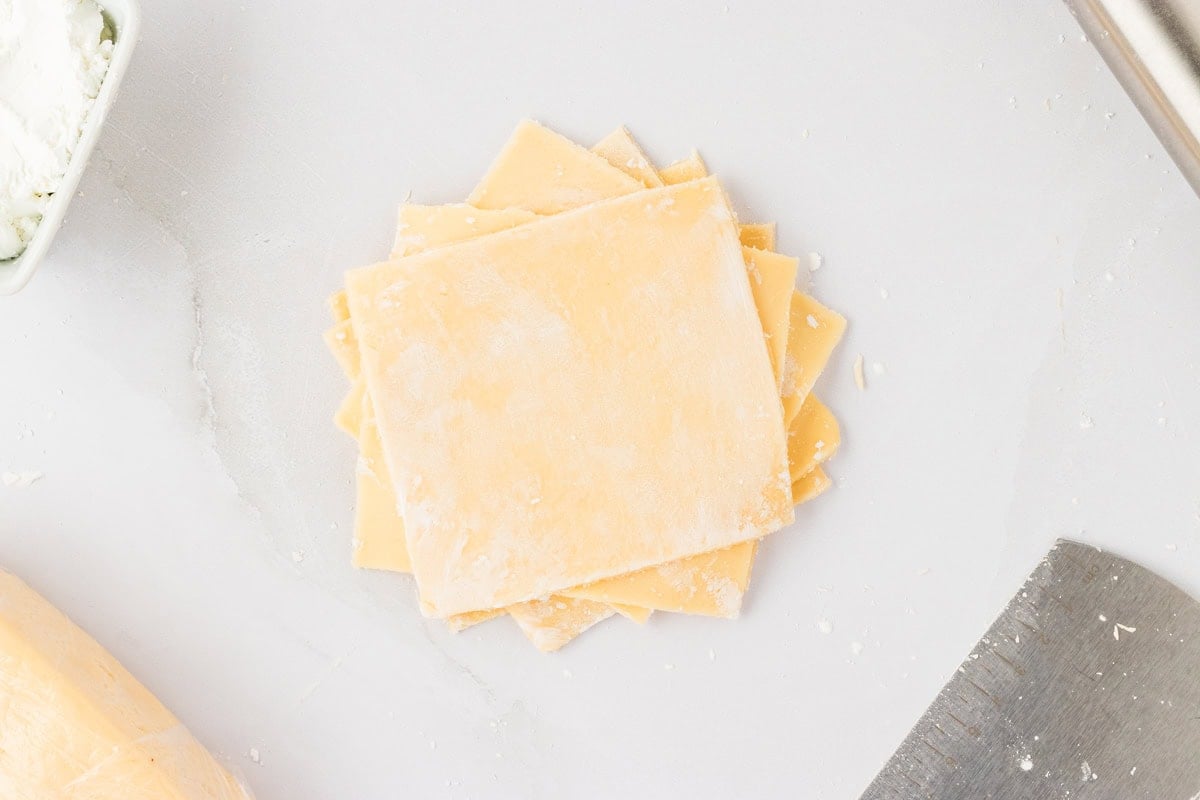
Roll the dough out thinly but thick enough that you cannot see through it. Cut the dough into roughly 4-inch squares. I got about 22 squares out of the dough. They do not need to be perfect. Dust the squares with more cornstarch to keep them from sticking, stack them, and cover them with a damp towel.
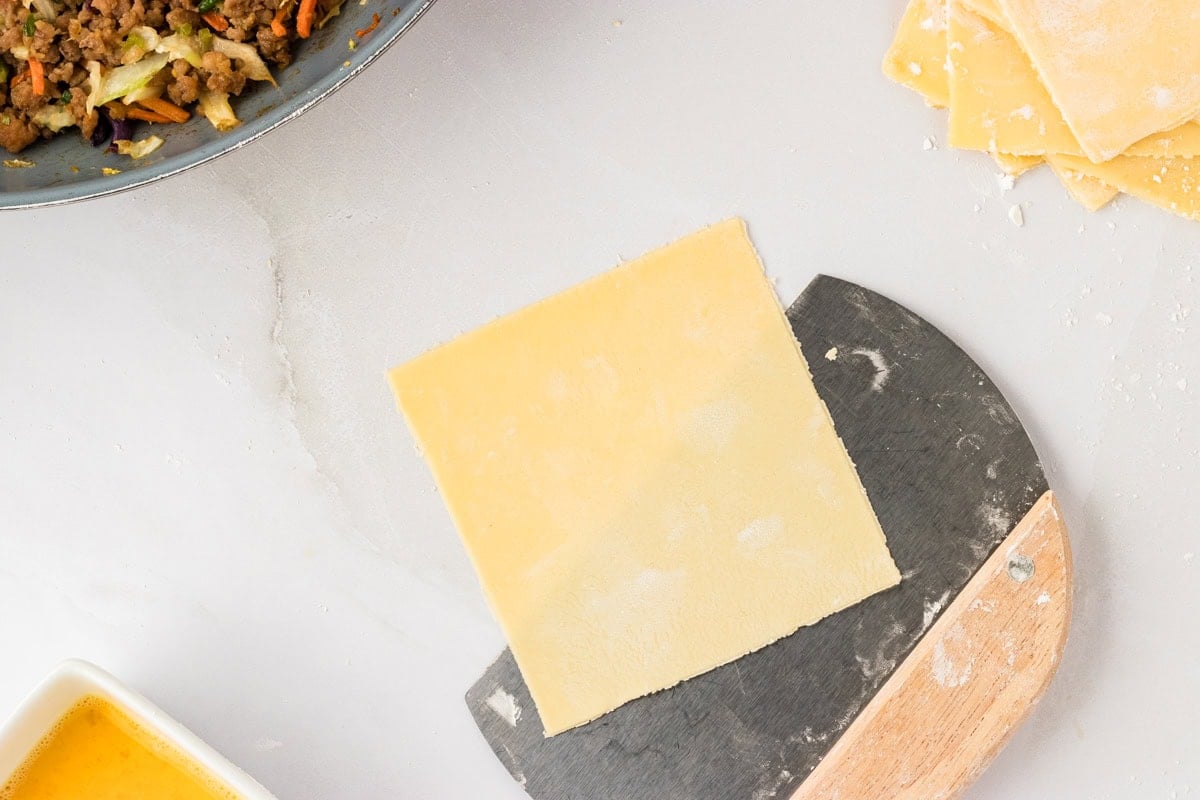
Add more cornstarch to your work surface and roll out one square at a time. Roll each square out until it’s flat and about 5-6 inches. At this point, you should be able to see through the dough. This can be tricky; You want to roll the dough out thin enough so it’s opaque but not too thin where it breaks. This might take you a few tries.

Trim the edges of your squares so they’re as uniform as possible and turn the dough square diagonally so a corner is facing you.
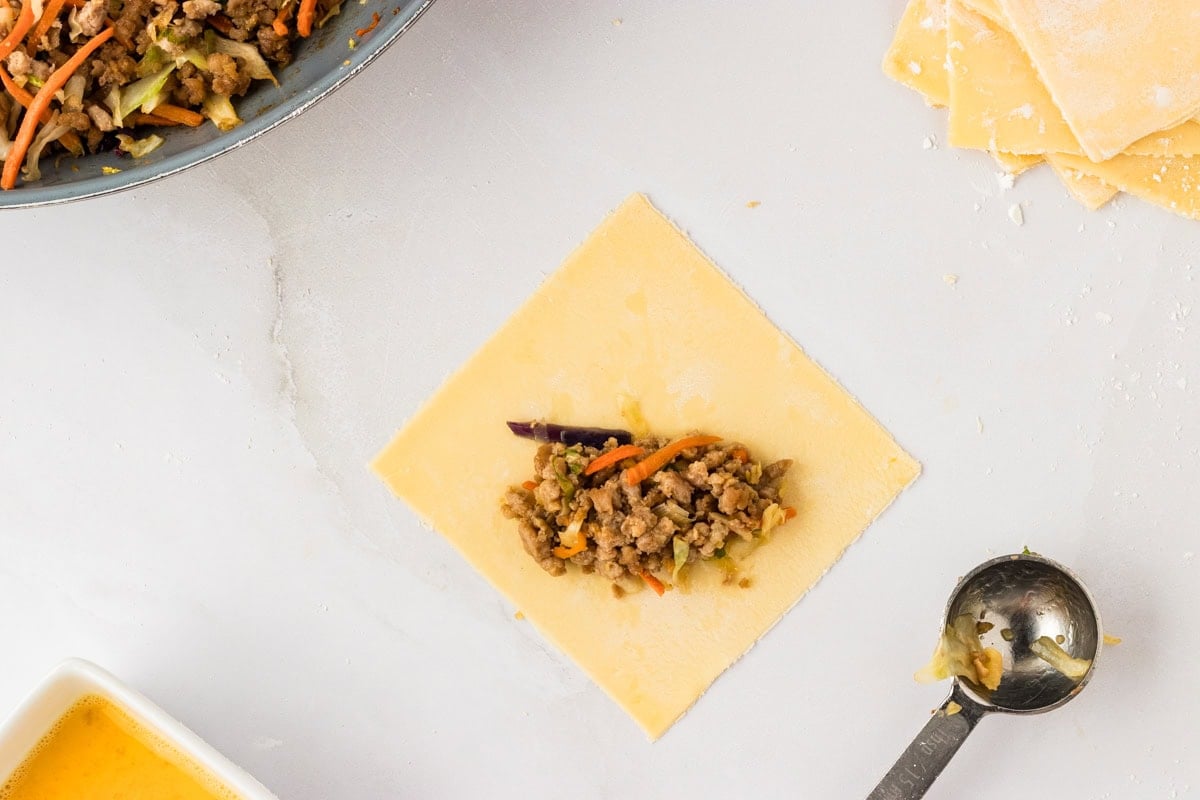
Add 1 tbsp of filling mixture diagonally across and slightly lower than center on a dough square and shape it into a log shape.

Grab your egg wash and place it on the exposed corners of the wrapper.
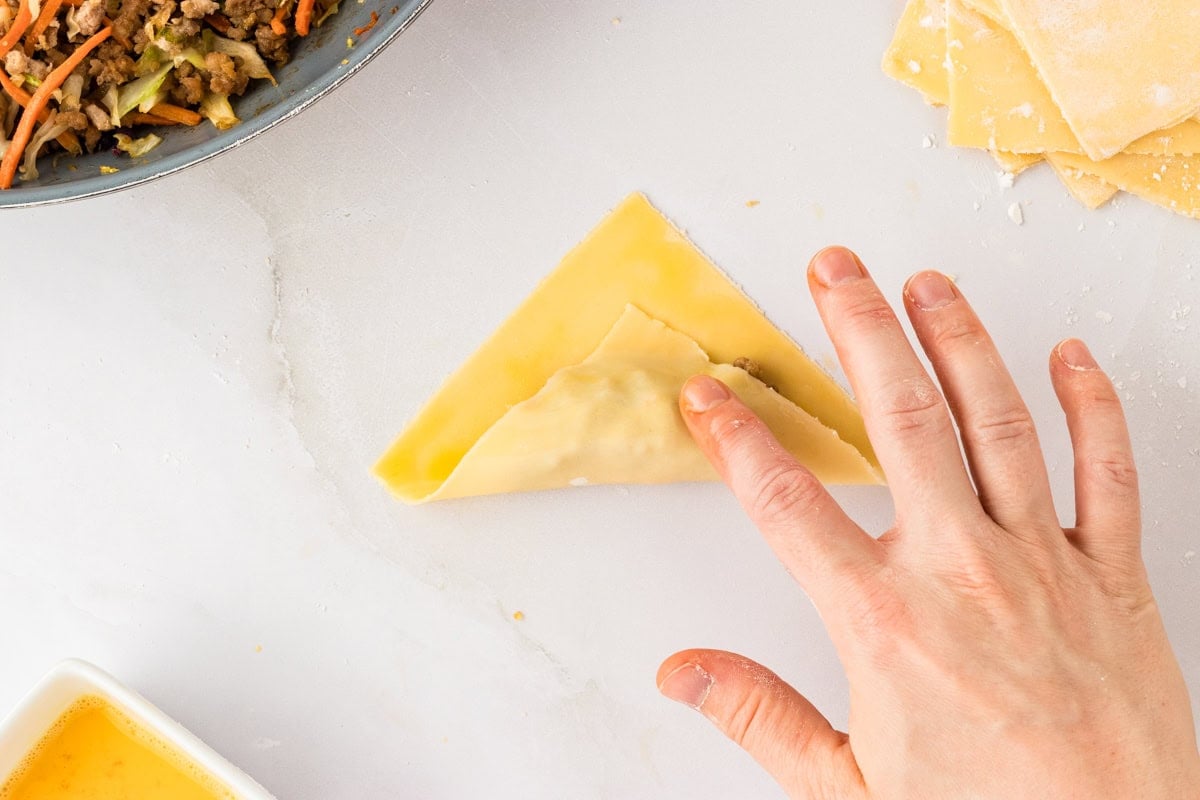
Carefully fold the corner facing you over the filling log.
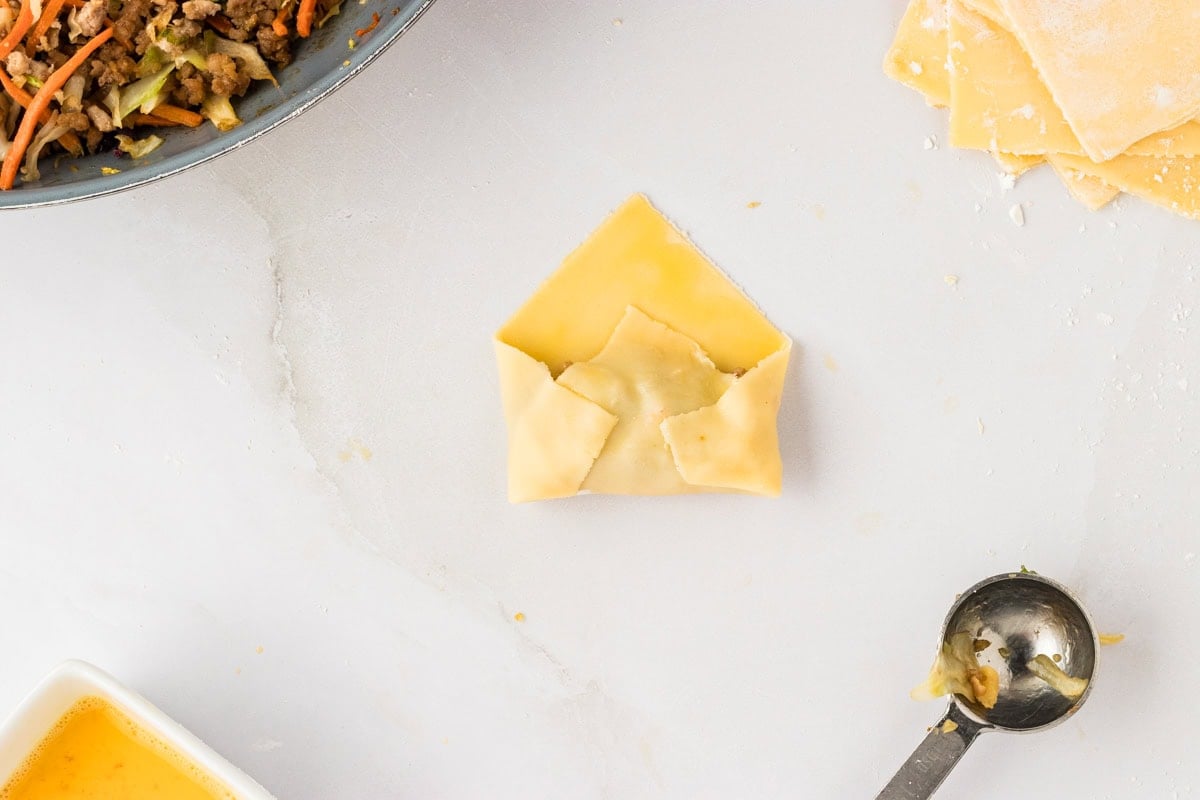
Then, fold the two smaller sides in.
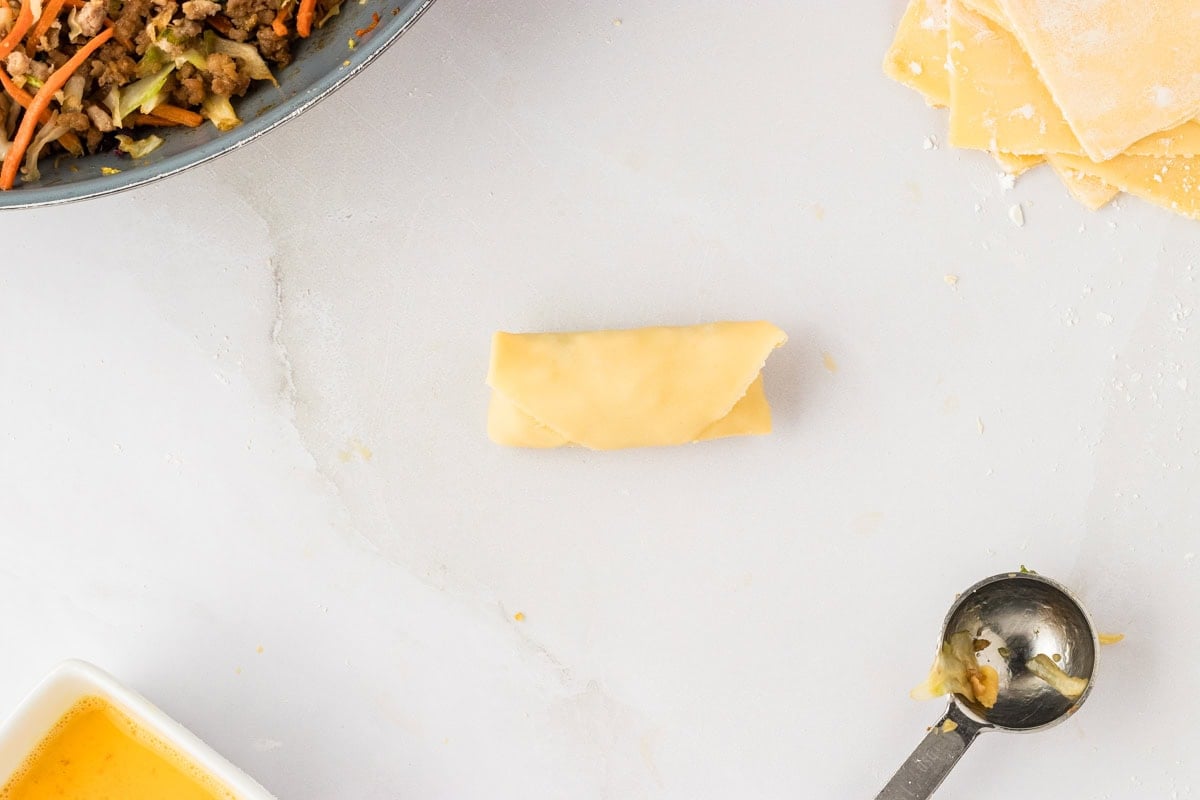
Roll over to close the egg roll. Repeat these steps with each wrapper until your filling is finished. To prevent your rolled egg rolls from drying out, keep them under a damp towel.
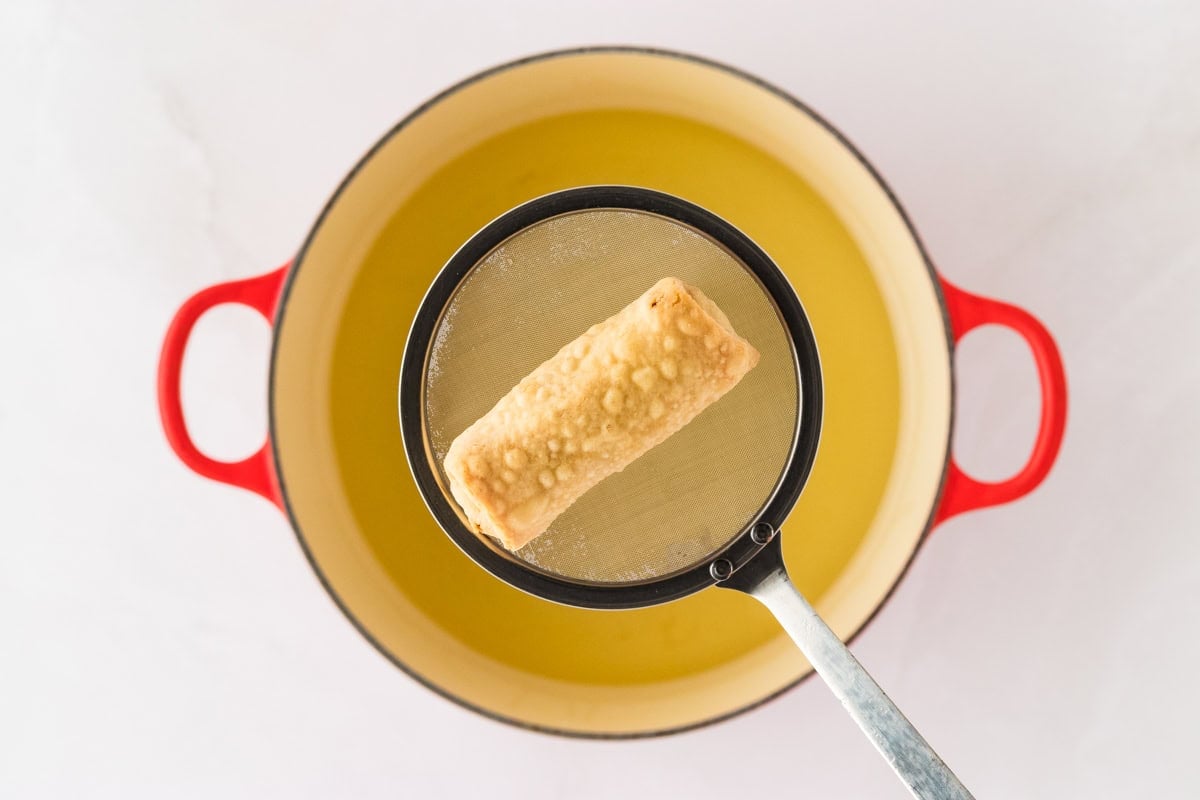
Heat the frying oil in a large pot to 350°F. Make sure there’s enough oil to fully submerge the egg rolls. Once the oil is hot, drop in the egg rolls and fry them for 5-6 minutes. Flip them so they brown evenly. Cook in batches so you don’t overcrowd the pot.

Remove the rolls and place on a baking rack to drain and to cools. Serve warm with your favorite dipping sauces. Enjoy!


Thank you for this, you explained everything so well and loved that i could read everything without ads popping up like crazy , looking forward to trying these in the new year