Gluten-Free Pierogi
Published


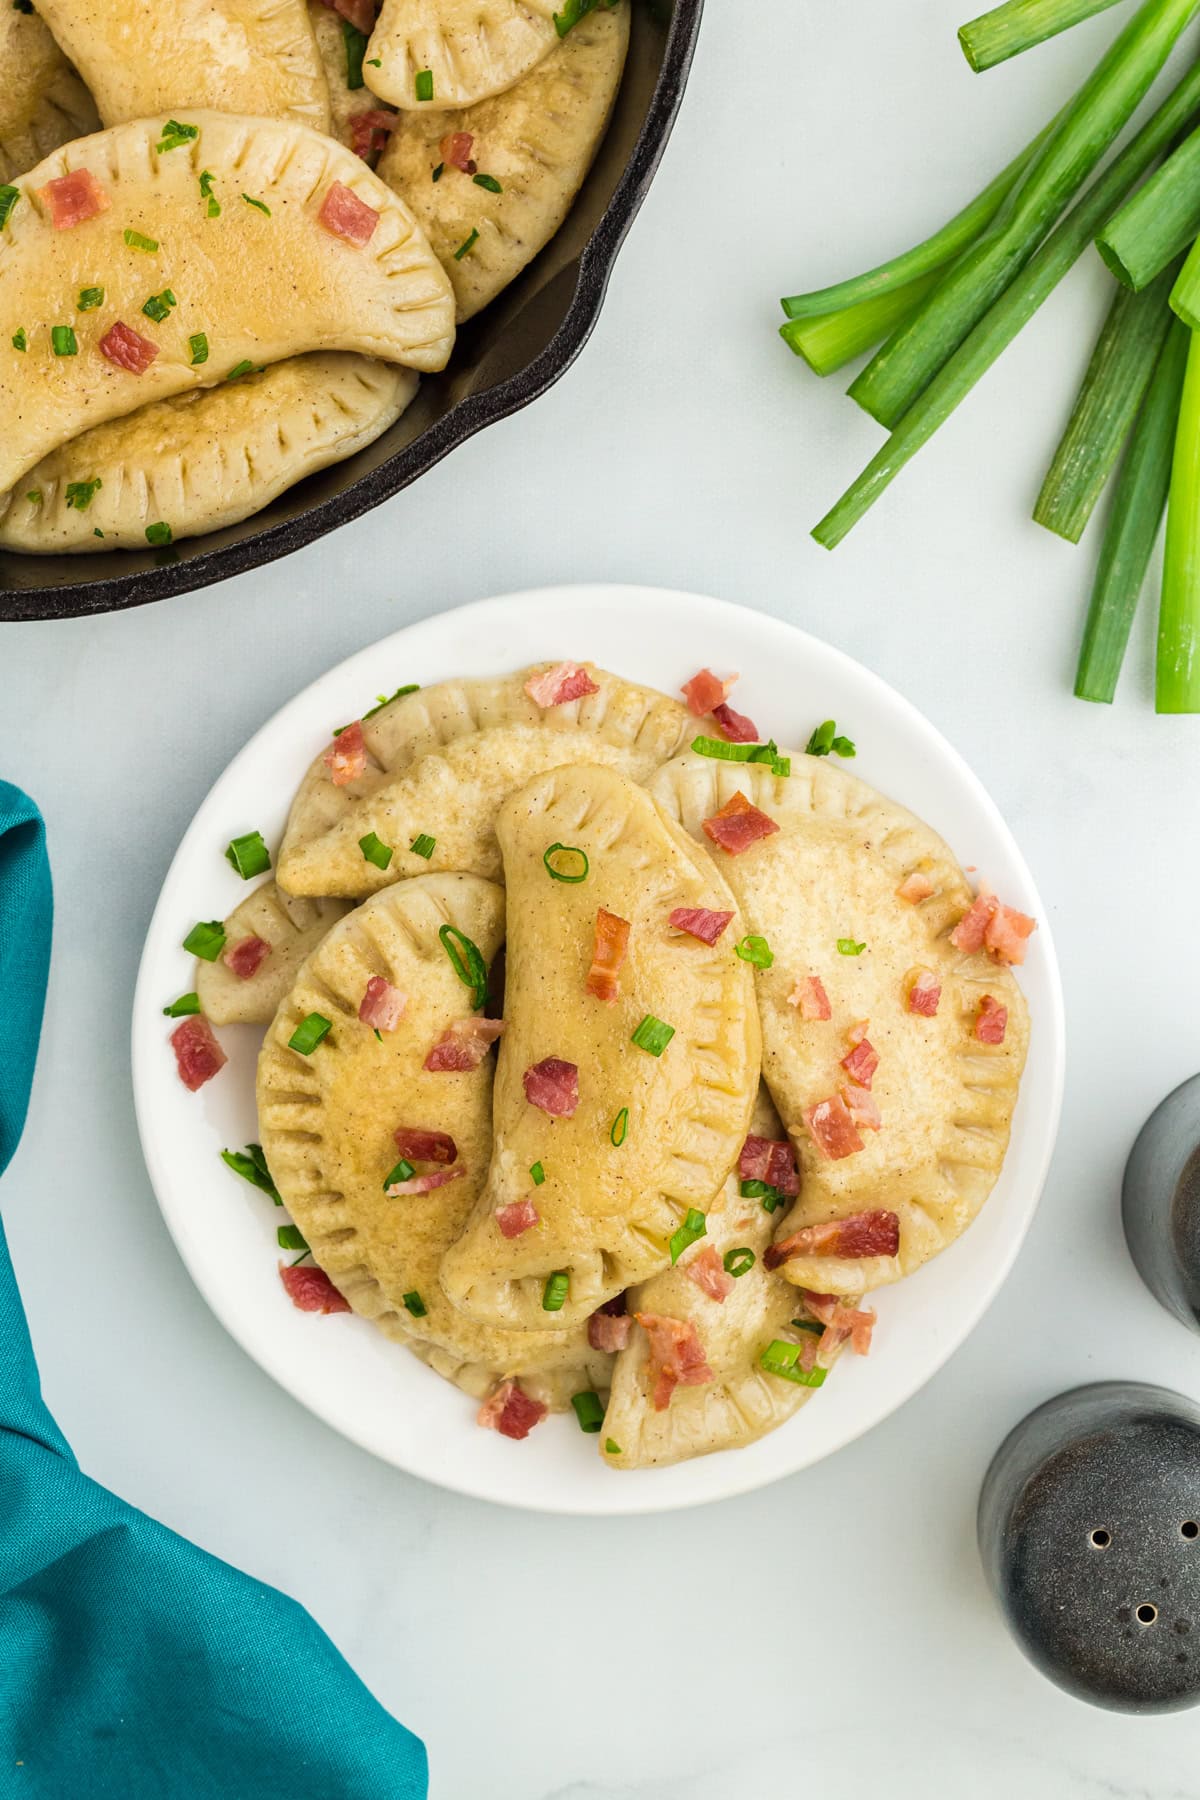
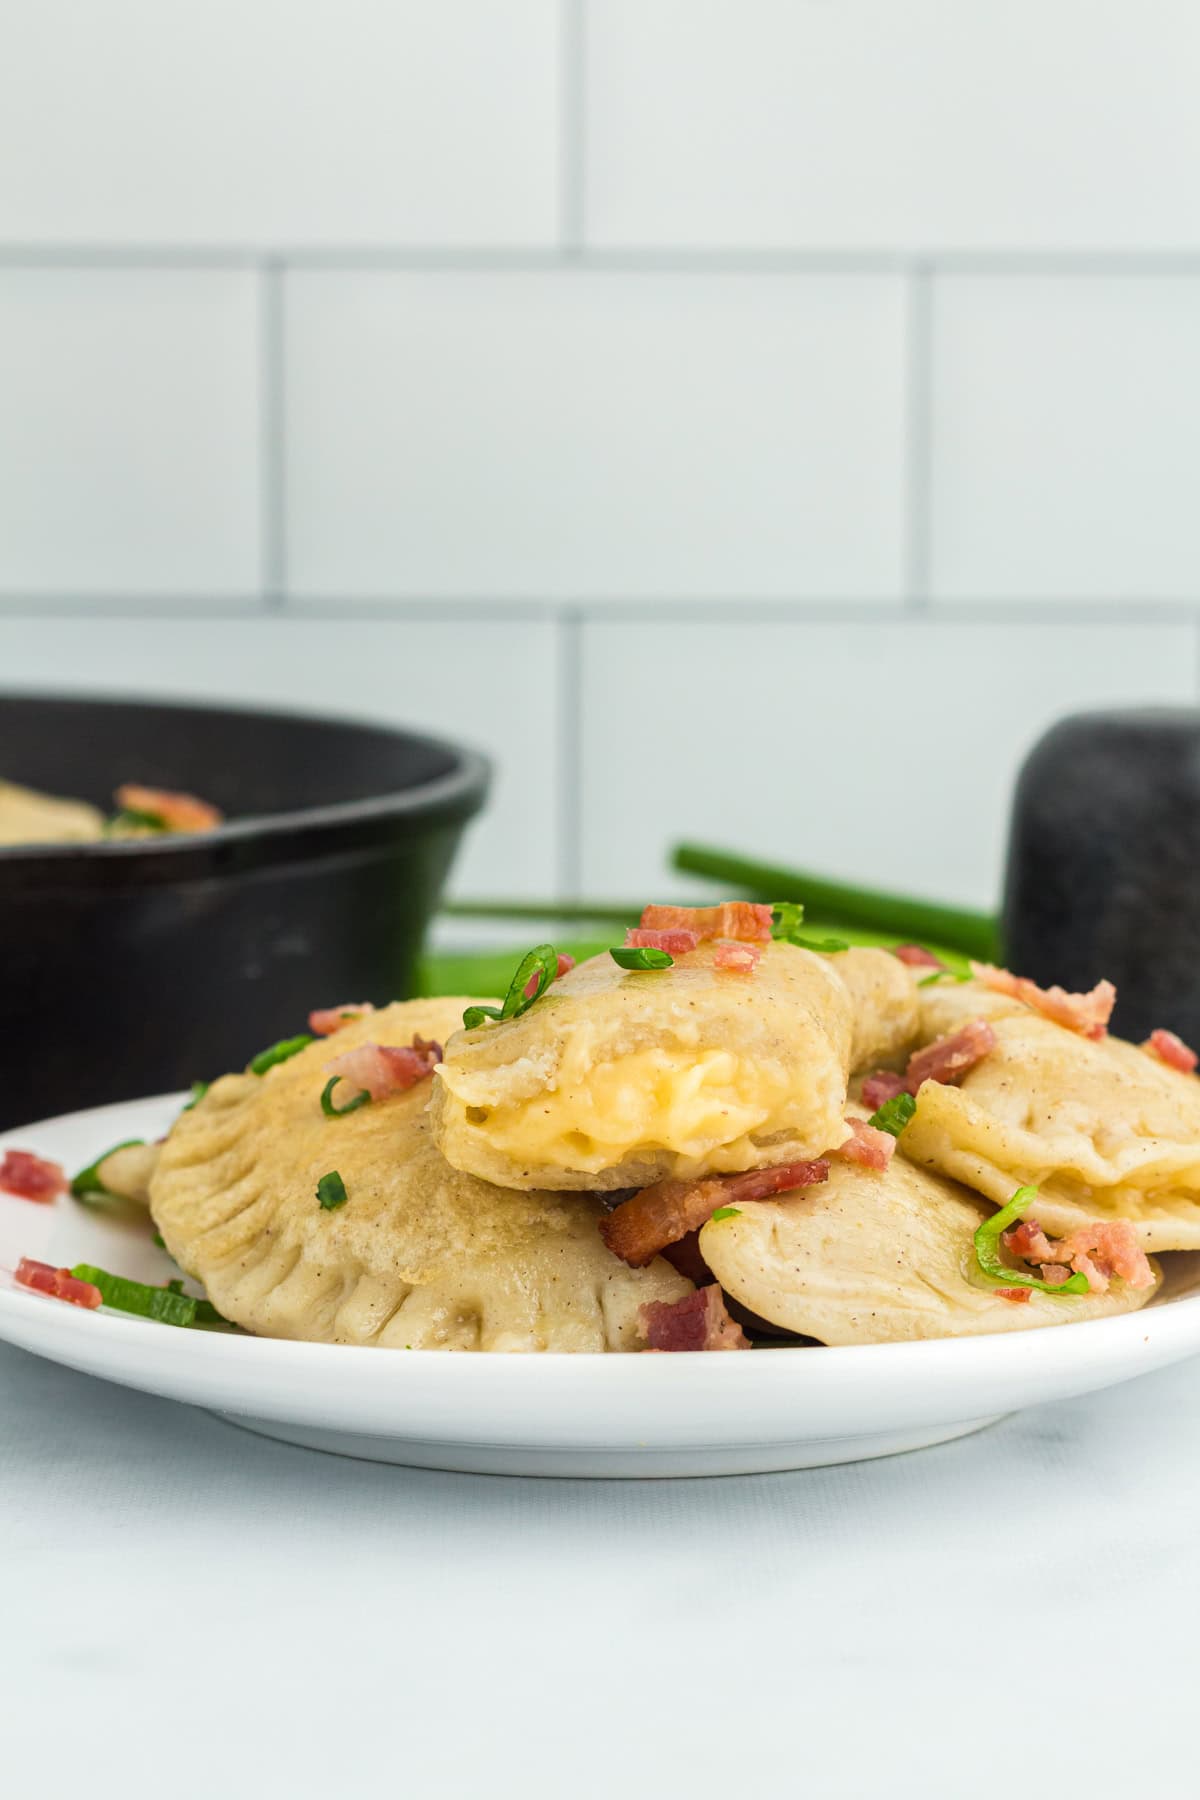
These gluten-free pierogi are a labor of love, no doubt about it, but so worth every minute spent in the kitchen. Making these dumplings from scratch is more of a weekend adventure for me. I love gathering friends and family together to have a fun cooking session. The result? A plate of tender, golden dough filled with a rich, buttery mix of creamy potatoes, savory onions, and gooey dairy-free cheese.
Gluten-Free Pierogi Recipe
My favorite part is the simple dough, and this gluten and diary-free dumpling dough is made with just 4 ingredients: gluten-free flour, eggs, water, and salt. Polish dumplings have a beautiful way of balancing textures and flavors. Each bite brings a satisfying contrast—the softness of the dough with the crispiness from pan-frying and the melt-in-your-mouth filling.
I like to boil the dumplings first to create a tender dough and then finish in the pan for a crispy exterior. The balance is the perfect base for all that rich, dairy-free, cheesy goodness in the center.
Ingredients
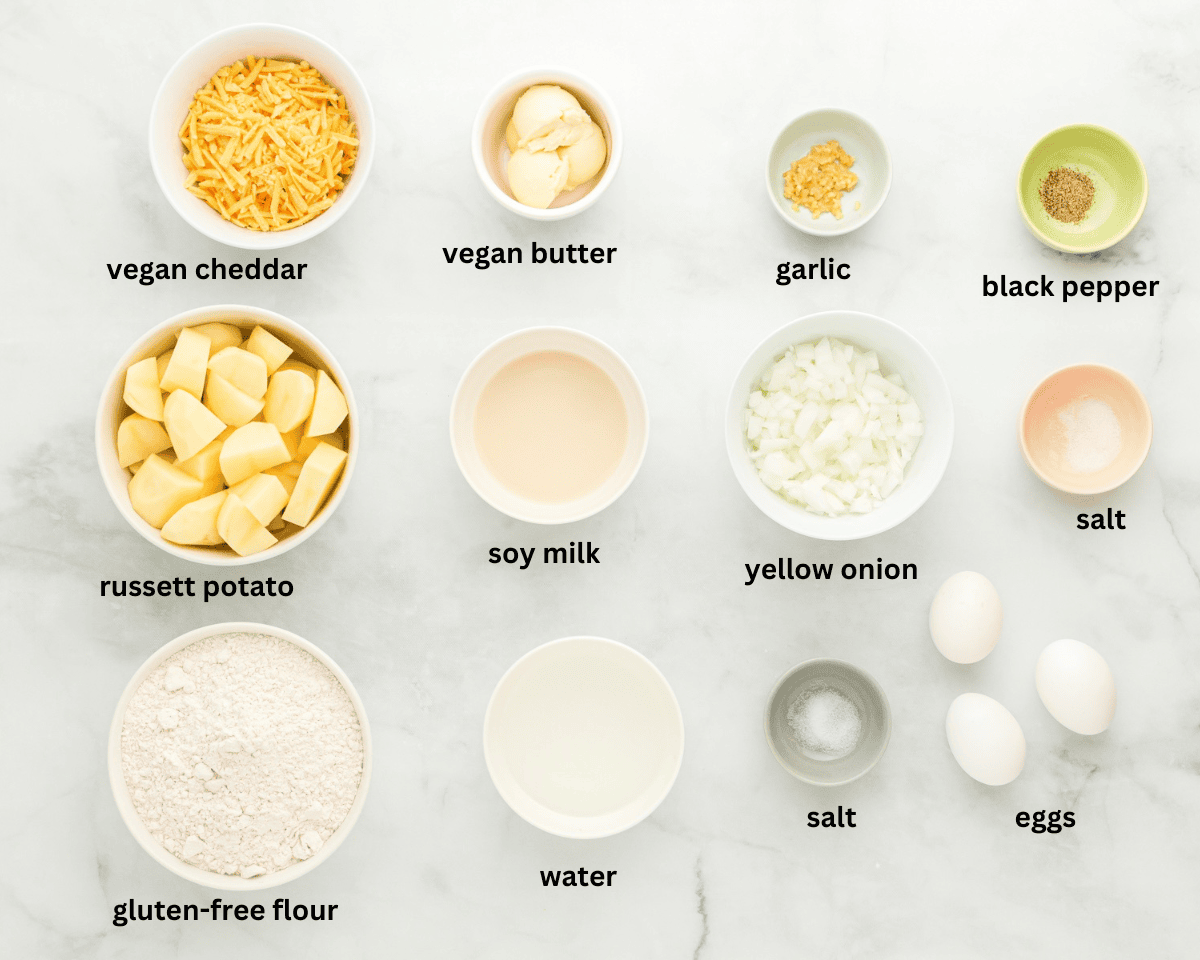
Dough:
- Gluten-Free, Dairy-Free Flour: For the best results, I used Bob’s Red Mill Gluten-Free 1 to 1 Baking Flour. If you’re using a different type of gluten-free flour, be sure to check that it is also dairy-free.
- Eggs: We use eggs to structure the dough.
- Water: Water is used to hydrate the dough, which makes it pliable.
- Salt: Salt balances and enhances the dough’s flavor.
Filling:
- Russet Potatoes: Traditional filling that makes them creamy and hearty.
- Yellow Onion: Adds a savory, sweet flavor and texture to the filling.
- Vegan Butter: I used my homemade vegan butter to sautee the onion and garlic for a buttery finish.
- Garlic: Garlic adds a pungent, savory flavor to the filling.
- Vegan Cheddar Cheese: I use Violife cheddar shreds, which add a rich, creamy texture to the diary-free fillings.
- Soy Milk: Soy milk helps melt the vegan cheese and adds an extra layer of creaminess. You can try your favorite dairy-free milk.
Tips and Suggestions
- Always check your ingredients for those with allergies to ensure they are gluten-free and dairy-free. Don’t forget to read the cross-contamination warnings on packages as well.
- If you switch to a different type of flour, you may need to adjust the water to get the Polish dumpling dough just right. When mixing with a dough hook, aim for a thick, play-dough-like consistency—firm enough to hold together without being wet or sticky. If the dough is sticky, it has too much water; if it’s crumbly, add more water until it comes together smoothly.
- I rolled the dough out to ⅙” thickness and used a 3” round cookie cutter. This will yield around 30 dumplings. If the dough is any thicker, they will be too doughy.
- Use water on your fingertip to seal any cracks that appear when sealing the edges. If you feel the dough has dried out too much, knead additional water into it before rolling it out again.
- Don’t overstuff the dough I like to use an actual teaspoon measuring spoon to get the perfect amount of filling in.
Serving Suggestions
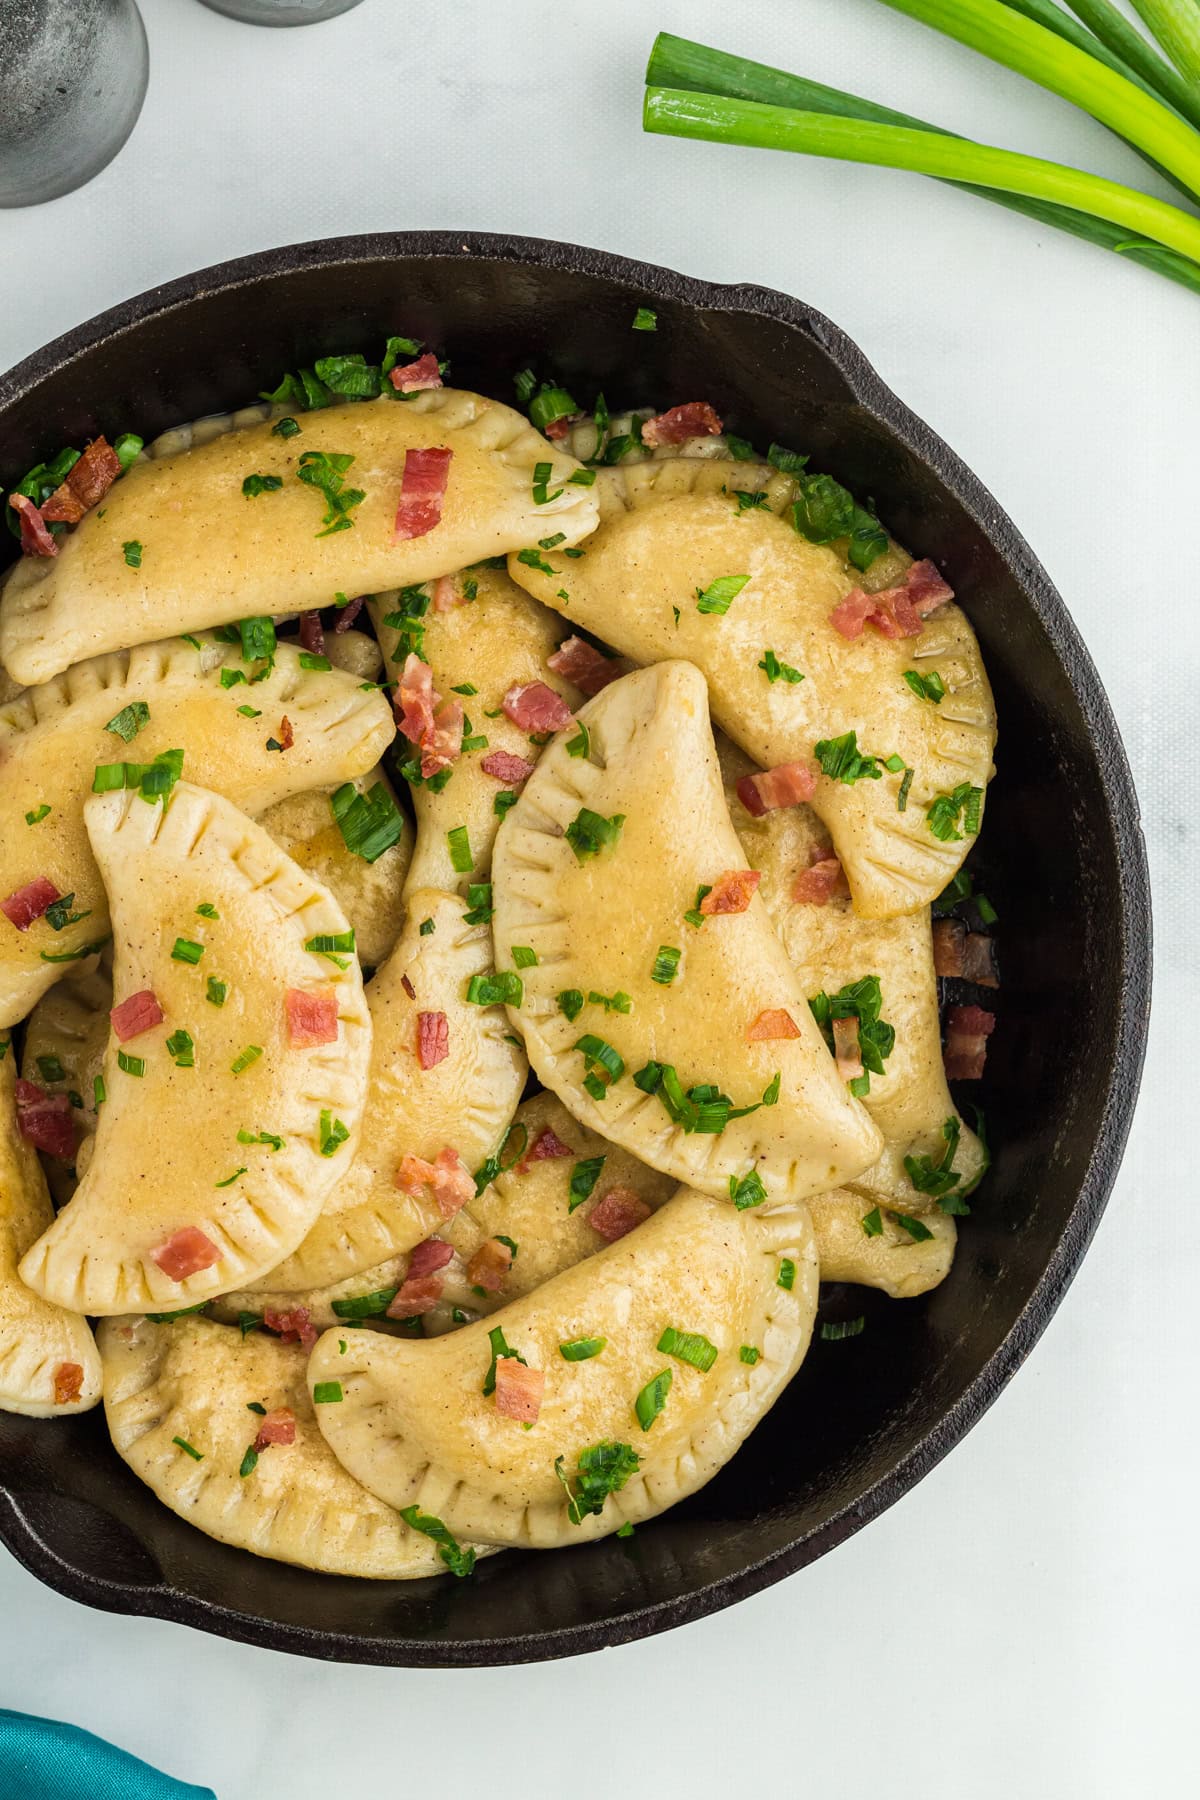
I love topping my gluten-free pierogi with some salty bacon and scallions and dipping them into a dairy-free sour cream or vegan yogurt. Sometimes, I even serve them with my dairy-free tzatziki. Caramelized onions and a sprinkle of fresh herbs are also delicious toppings. I’ll usually have them on the table alongside roasted vegetables and a green salad.
Storage Instructions
These Polish dumplings can be stored in the refrigerator for 3-4 days. Reheat them in a pan with some vegan butter to re-crisp the dough.
To freeze raw, place them in a single layer on parchment paper and freeze until solid. Then, transfer to a sealed container, layering parchment paper between them to prevent sticking, and store for up to 3 months.
If freezing after cooking, let them cool completely, transfer to a sealed container with parchment paper between layers, and freeze for up to 3 months.
More Gluten-Free Finger Food
- Gluten-Free Chicken and Dumplings
- Gluten-Free Wonton Wrappers
- Gluten-Free Mozzarella Sticks
- Gluten-Free Onion Rings
- Gluten-Free Buffalo Chicken Bites
Gluten-Free Pierogi

Equipment
- 1 large pot
- 1 large skillet
Ingredients
Dough
- 3 cups gluten free and dairy free flour, approximately 445 grams depending on the type and brand of flour you use
- 3 large eggs, room temperature
- ½ cup water, room temperature
- ¼ teaspoon salt
Filling
- ¾ pound potatoes, peeled and cut into 2” cubes (I prefer russet potatoes for this recipe)
- ¾ cup diced yellow onion
- 4 tablespoons vegan butter, divided
- ½ teaspoon minced garlic
- 1 cup vegan cheddar cheese, shredded
- ¼ teaspoon salt
- ¼ teaspoon black pepper
- 2 tablespoons soy milk
Instructions
Dough
- In a medium bowl, combine all dough ingredients (flour, eggs, water, and salt) and mix on low speed with a dough hook attachment until the dough starts to come together. The dough should be a thick play dough type consistency. If the dough is too crumbly, add a touch more water. If the dough is too wet and sticky to handle, add a dash more flour to get it to the right consistency.
- Sprinkle your work surface or a silicone baking mat lightly with extra flour, and place the dough onto that floured surface. Knead the dough gently with your hands until smooth. Do not use too much flour on your work surface; you don’t want to knead too much extra flour into the dough, which will leave you with dry, crumbly dough.
- Flatten the dough into a disc shape, cover the dough well with food-safe plastic wrap and place the dough into the fridge for 30 minutes.
Filling
- Add the onions, garlic and 1 tablespoon of butter to a small frying pan and sauté over medium heat until the onions are softened and just starting to turn clear. Remove that pan from the stovetop and set aside for now.
- Place the potatoes in a medium-sized pot and add enough water so that they are covered.
- Place that pot on the stovetop and bring the water to a boil over high heat. Cook potatoes until they have softened (when you can easily pierce them with a fork).
- Drain the water from the pot and place the strained potatoes back into that pot.
- Add the shredded cheese, 1 tablespoon of butter, salt, and pepper to the hot potatoes and mash well until the cheese has melted and the potatoes are thoroughly mashed (no large chunks remaining).
- Add the soy milk to the potatoes and mash together until smooth. If you have troubles mashing it smooth enough with a potato masher, you can use electric beaters to blend this mixture together.
- Stir the cooked onion mixture into the potato mixture until well combined.
Assembling
- Line a large baking sheet with parchment paper and set aside.
- Lightly flour your work surface or silicone baking mat.
- Remove the chilled dough from the fridge and place on the lightly floured surface. Separate the dough into two equal sized pieces.
- Roll the first half of the dough out between 1/8” to 1/6” inches.
- Use a 3” to 4” round cookie cutter to cut out circles in the dough. Place the extra dough to the side for now.
- Place the filling and a small bowl of water near your work surface.
- Using a small spoon, place about 1 teaspoon of filling into the middle of a dough circle.
- Working with one at a time, use your finger to lightly place water around the edge of the dough circle then close the dough circle over the filling. Use your fingers to pinch the dough circle (now a semi circle filled pocket) closed. The wet rim around the outside of the dough will help the two sides stick together and close the edges together.
- Use a fork to seal the edges together. Press down gently so the fork only goes about halfway through the dough.
- If the filling is leaking out the side, you’ve added too much filling.
- Place them onto the prepared baking sheet.
- Repeat these steps with the remaining dough and filling until you’ve run out of dough.
Cooking
- Bring an extra large pot of water to a boil.
- Once the water has come to a full rolling boil, gently add about 4 to 5 dumplings to the boiling water. You don’t want them touching so only add as many as you can without the pierogi touching each other.
- After about 30 to 60 seconds, they will start floating. Once they’ve started floating, set a timer for 5 minutes. You want them to float in the boiling water for 5 minutes.
- After 5 minutes, remove them from the boiling water with a slotted spoon and set aside. I usually line a second baking sheet with parchment paper for this step. If you accidentally scoop water out as well, lightly dab the pierogi with a dry paper towel to remove the excess moisture.
- Repeat these steps until all of the pierogi have been boiled.
- Add the remaining 2 tablespoons of vegan butter to a large frying pan and melt over low-medium heat.
- Add a few of the dumplings to the frying pan (again, you don’t want them touching or they’ll stick together) and heat on both sides until lightly crispy/browned.
- Repeat the steps with the remaining pierogi until all have been crisped in the frying pan. Add additional vegan butter to the frying pan as needed.
Notes
- Always check your ingredients for those with allergies to ensure they are gluten- and dairy-free. Don’t forget to read the cross-contamination warnings on packages as well.
- If you switch to a different type of flour, you may need to adjust the water to get the dough just right. When mixing with a dough hook, aim for a thick, play-dough-like consistency—firm enough to hold together without being wet or sticky. If the dough is sticky, it has too much water; if it’s crumbly, add more water until it comes together smoothly.
- I rolled the dough out to ⅙” thickness and used a 3” round cookie cutter. This will yield around 30 dumplings. If the dough is any thicker, they will be too doughy.
- Use water on your fingertip to seal any cracks that appear when sealing the edges. If you feel the dough has dried out too much, knead additional water into it before rolling it out again.
- Don’t overstuff the dough. I like to use an actual tsp measuring spoon to get the perfect amount of filling in.
- Pierogi can be stored in the refrigerator for 3-4 days. Reheat them in a pan with some vegan butter to re-crisp the dough.
- To freeze raw, place them in a single layer on parchment paper and freeze until solid. Then, transfer to a sealed container, layering parchment paper between them to prevent sticking, and store for up to 3 months.
- If freezing after cooking, let them cool completely, transfer to a sealed container with parchment paper between layers, and freeze for up to 3 months.
Nutrition
Nutrition information is automatically calculated, so should only be used as an approximation.
How to make Gluten-Free Pierogi Step-by-Step

Dough
In a medium mixing bowl, add 2 cups of flour, 1 large egg, ½ cup of water, and ½ teaspoon of salt. Using a mixer with a dough hook attachment on low speed, blend the ingredients until a dough begins to form. The dough should be thick and similar in texture to play dough. If it’s too dry or crumbly, add a bit more water. If it’s too sticky, sprinkle in a little extra flour until you reach the desired consistency.

Dust your work surface or a silicone baking mat lightly with flour and place the dough on it. Knead the dough gently by hand until it’s smooth, taking care not to add too much extra flour to avoid making it dry or crumbly.

Flatten the dough into a round disc, wrap it tightly in plastic wrap, and let it chill and rest in the refrigerator for 30 minutes before using.

Filling
Grab a small frying pan and melt 1 tbsp of vegan butter over medium heat. Sautee ¾ cup diced onions and ½ tsp minced garlic until just soft and fragrant. Remove from the heat and set to the side.

Bring ¾ lbs of peeled russet potatoes to a boil in a medium-sized pot with enough water to cover the potatoes fully. Cook potatoes until softened. Use a fork to test that you can easily pierce them. Drain the water and keep the potatoes in the pot.

Add in 1 cup vegan cheese, ¼ tsp salt, ¼ tsp black pepper, and 1 tbsp vegan butter to the potatoes. Using a potato masher, mash and combine the added ingredients. Mash all the lumps out.

Pour in 2 tbsp soy milk and continue to mash until smooth. I like to switch to a wooden spoon at this point. If you can’t get the potatoes smooth enough with a masher, try using a hand mixer or electric beater.

Once smooth, add the onion and garlic mixture. Mix until fully combined.

Assembling
Grab a large baking sheet and line it with parchment paper. Dust your work surface with a light layer of gluten-free flour, or use your silicone baking mat. Take the chilled dough out of the fridge and place it on the floured surface. Cut and separate into 2 equal halves.

Roll out the first portion of dough to a thickness of about ⅛ inches to ⅙ inches. Using a round cookie cutter (about 3 to 4 inches in diameter), cut circles from the rolled dough. Set any leftover dough scraps aside to re-roll later.

Place the filling and a small bowl of water near your work area. Using a small spoon or teaspoon, drop approximately 1 teaspoon of filling into the center of each dough circle.

Go slowly and work on one pierogi at a time. Dampen your fingers with water and lightly place water on the edge of the dough circle. Fold each circle in half over the filling and use your fingers to pinch the sides closed. The damp edges act like glue, closing the dumpling. You can use a fork to press halfway down into the edges to reinforce the closure. If any filling seeps out, you’ve added too much filling. Repeat this by filling and sealing each pierogi and getting ready to cook.

Cooking
Fill an extra-large pot with water and bring it to a vigorous boil. Once the water is fully boiling, carefully add about 4-5 pierogi to the pot. Do not overcrowd the pot, keeping the pierogi separated to avoid sticking. After 30 to 60 seconds, the dumplings will begin to float. Once they float, set a timer for 5 minutes and let them continue cooking in the boiling water.

After 5 minutes, use a slotted spoon to lift the pierogi out of the water. Place them on a parchment-lined baking sheet to drain. If water remains on them, gently dab with a dry paper towel. Repeat the boiling steps until all pierogi have been cooked.

Melt 2 tablespoons of vegan butter in a large frying pan over low to medium heat. Add a few pierogi to the frying pan, spacing them so they don’t touch. Cook each side until they’re golden and slightly crisp.

Repeat with the remaining pierogi, adding more vegan butter as needed. Serve with your favorite toppings, and enjoy!


Made half the recipe since I have had many failures with facebook recipes. Made 12 good size ones. They all held together beautifully. They look like homemade Perogies. Tomorrow my celiac grandson will give the final verdict.
I was very disappointed with this dough. I used King Arthur GF flour. It was grainy and gritty like most of the things I have tried to make. If anyone can help me with this dough I would greatly appreciate it.
Hi Marsha, That grainy, gritty texture is usually tied to the flour blend and how it absorbs liquid. This recipe was tested with Bob’s Red Mill Gluten-Free 1 to 1 Baking Flour, which hydrates differently than King Arthur, so using King Arthur can make the dough feel drier and rougher even when you follow the measurements. Try adding a little more liquid, a tablespoon at a time, until the dough feels soft and pliable, and let it rest for 20 to 30 minutes before rolling so the flour fully hydrates. That extra moisture and rest time should help the dough smooth out and be much easier to work with.
What is the best flour to use?
Hi Ticia, for these gluten free pierogis we used Bob’s Red Mill Gluten-Free 1 to 1 Baking Flour.