Chickpea Pizza Crust
Published


A high-protein chickpea pizza crust made with just 4 ingredients, baked right in a hot cast-iron pan for the perfect crispy bite. This pizza crust turns golden and crispy, and it comes together much faster than a traditional yeast-based crust. With a few simple pantry staples and about 10 minutes of prep, you can whip this up and top it with all your favorite pizza toppings.

OK, so I didn’t want to make the regular gluten-free pizza crust this time, so I turned to chickpea flour instead. Chickpea flour is one of my favorite gluten-free ingredients for flatbreads and pizzas, especially when you want a sturdy crust with a nice crunch. The crust is very similar to my socca flatbread, but I tweaked it to create a thicker crust that can actually hold up to pizza toppings. It’s designed to be as simple and low-mess as possible for an easy pizza night. Chickpea flour, salt, warm water, olive oil, and an optional pinch of Italian seasoning are mixed together and baked right in a hot cast-iron pan so the crust sets evenly and browns beautifully. Once the crust is set, it’s topped with sauce, cheese, meats, veggies, or whatever you love, then baked again. In about 30 minutes, you have a fully baked pizza!
What I Learned While Testing
- Use a fully preheated cast-iron pan. Cast iron holds heat exceptionally well, which helps the batter start cooking the moment it hits the pan. This creates crisp, golden edges and prevents sticking. Using a cold pan will almost always result in a pale, soft crust.
- Keep toppings light and balanced. This crust can hold toppings, but heavy sauces or moisture-rich vegetables, or even fresh mozzarella, can weigh it down and make the center gummy. Pre-cook and pat dry vegetables like peppers, zucchini, spinach, mushrooms, or fresh tomatoes. A thin layer of sauce and well-drained toppings work best.
- Let the batter rest for a few minutes. Chickpea flour needs a short rest to fully hydrate. This improves texture and helps the crust bake up evenly instead of being gritty or dense.
- Expect a thinner, crispier crust. This is not a fluffy, yeasted pizza dough. Think more along the lines of a crisp, flatbread with a firm bite that’s perfect for slicing and topping.
Chickpea Pizza Cust

Equipment
- 1 10" cast-iron skillet
Ingredients
- 2 tbsp olive oil, divided
- 1¼ cups chickpea flour
- ½ tsp salt
- ½ tsp Italian seasoning, optional
- 1 cup water, warm
- pizza toppings of choice
Instructions
- Preheat the oven to 425°F (220°C). Place a 10” cast iron pan into the oven to preheat as well.
- In a medium bowl, whisk together the chickpea flour, salt, and Italian seasoning.
- Slowly whisk in 1 cup of warm water until fully combined. Set aside to thicken slightly.
- Brush 1 tbsp of the olive oil over the bottom and sides of the hot, preheated cast-iron pan.
- Whisk the remaining 1 tbsp olive oil into the crust batter.
- Pour the batter into the pan. Spread into an even layer with a spatula.
- Bake for 15-17 minutes, until the edges are golden brown.
- Top with pizza toppings and bake for an additional 15 minutes.
Notes
- If you don’t have a cast-iron skillet: Use an oven safe stainless steal pan or rimmed baking sheet. I suggest lining the hot pan with parchment paper and olive oil for easy removal.
Nutrition
Nutrition information is automatically calculated, so should only be used as an approximation.
How to Make Chickpea Pizza Crust Step by Step

Gather the Ingredients: Gather all the ingredients together. Preheat the oven to 425°F and place a 10-inch cast-iron pan in the oven to heat.

Mix the dry ingredients: In a medium bowl, whisk together 1¼ cups chickpea flour, ½ tsp salt, and ½ tsp Italian seasoning, if using.
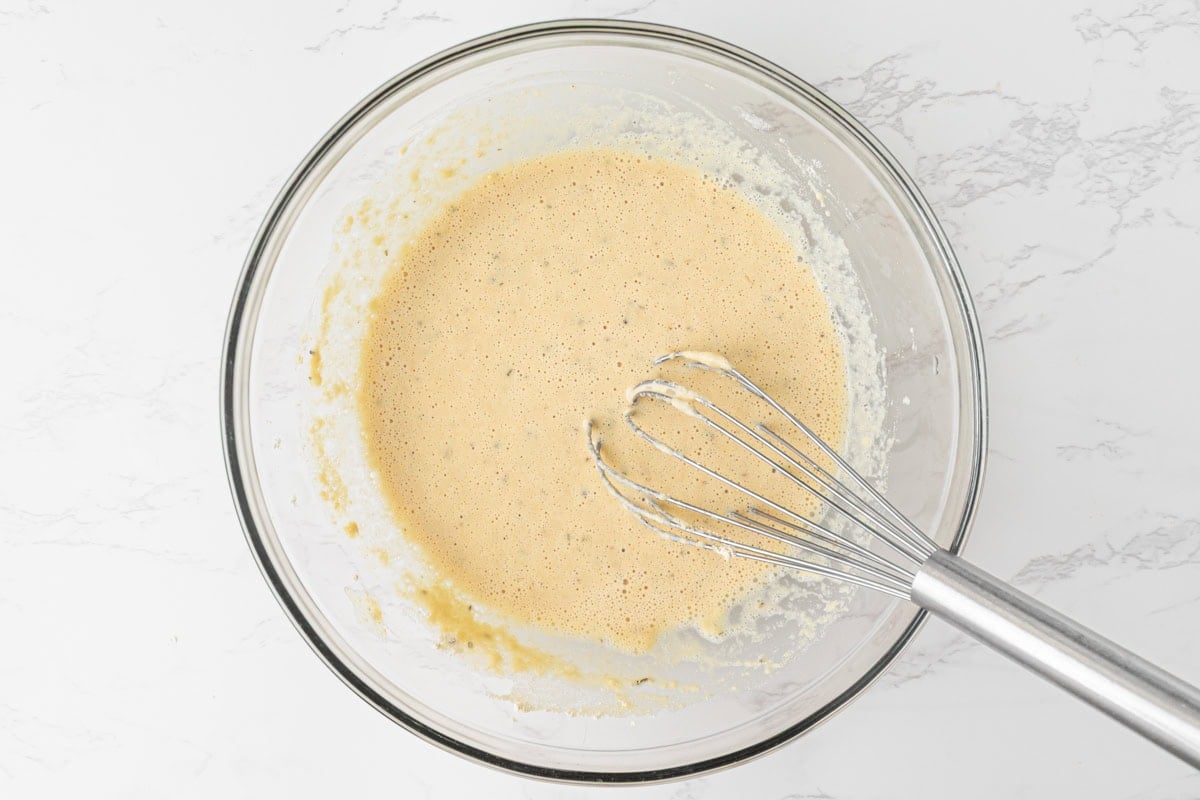
Add the warm water: Slowly whisk in 1 cup warm water until a smooth batter forms. Let the batter rest for a few minutes to thicken slightly.

Brush the skillet with oil: Carefully remove the hot pan from the oven and brush 1 tbsp olive oil over the bottom and sides of the skillet.

Add the olive oil: Whisk the remaining 1 tbsp olive oil into the chickpea batter until smooth.

Fill the cast-iron skillet: Pour the batter into the hot skillet and use a spatula to spread it into an even layer.

Bake the crust: Bake for 15-17 minutes, until the edges are golden brown and the center is set.
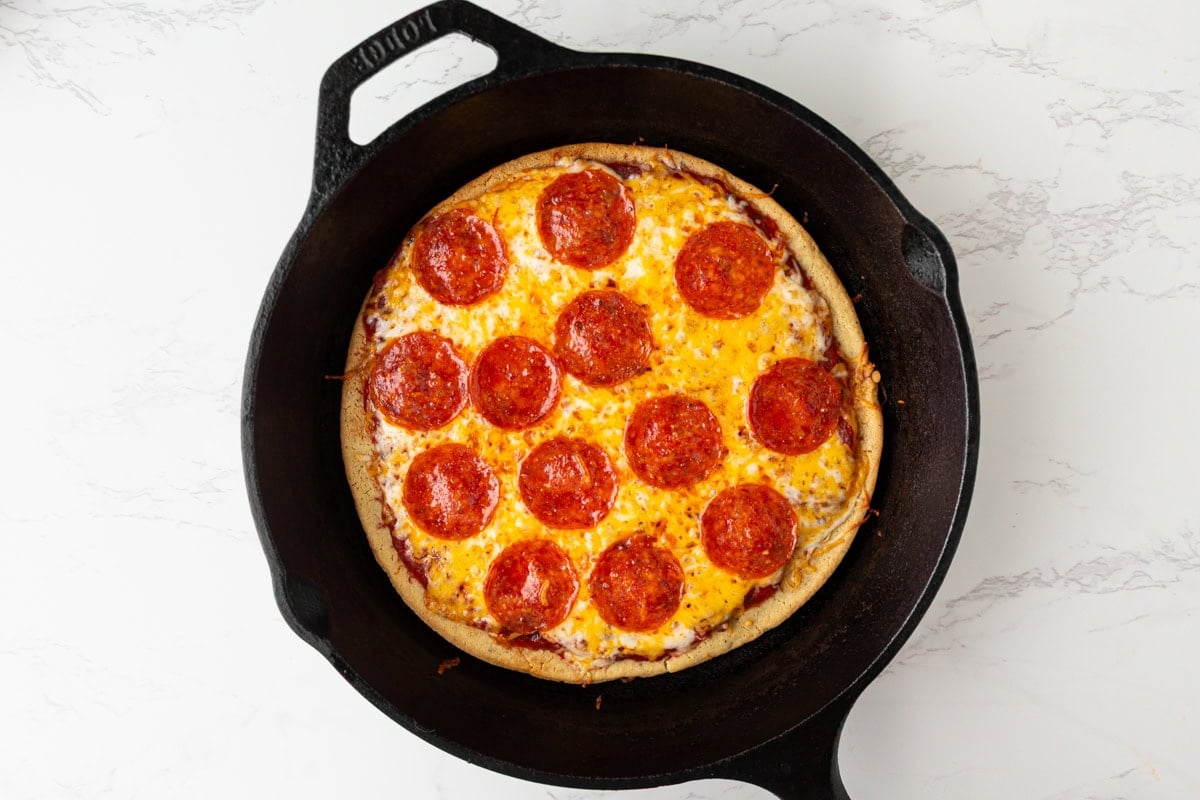
Top and bake: Top the crust with your desired pizza toppings and return it to the oven to bake for an additional 15 minutes, until fully cooked.

Serve and enjoy: Carefully remove the pizza from the cast-iron skillet, slice, and serve. Enjoy!

What Else to Add
- Swap the red sauce for a dairy-free alfredo and top with sautéed mushrooms, spinach, and roasted garlic for a creamy white pizza.
- Add cooked sausage, pepperoni, gluten-free meatballs, or shredded chicken for extra protein.
- Keep it veggie-forward with roasted zucchini, bell peppers, and onions.
- Finish with fresh basil or arugula added after baking for brightness.
- Drizzle with chili oil, hot honey, or balsamic glaze for extra flavor.
Serving Suggestions
I love serving this chickpea pizza crust fresh out of the oven, topped with marinara, especially on casual pizza nights at home. It pairs perfectly with a cozy bowl of gluten-free potato soup or a simple salad to round out the meal without much extra effort. When I’m hosting, I like to slice it into smaller pieces and serve it as an appetizer alongside gluten-free pigs in a blanket or gluten-free chicken wings, and it always disappears fast. This is one of those recipes that works just as well for an easy weeknight dinner as it does for game day, family gatherings, or laid-back weekends with friends.
Storage Instructions
Store leftover chickpea pizza slices in an airtight container in the refrigerator for up to 3 days. For best texture, reheat in a skillet over medium heat or in a 400°F oven until warmed through and crisped again. Avoid the microwave, as it tends to soften the crust. If you want to make the crust ahead, bake it fully without toppings, let it cool completely, then wrap it tightly and refrigerate for up to 2 days or freeze for up to 1 month.


This Chickpea crust was amazing. I followed it exactly as instructed. We are on an alkaline diet so the toppings included fresh garlic, mushrooms, onion, chards from our garden, and olives. I let that cook on the stove in a cast iron skillet with avocado oil while the crust cooked on the cast iron in the oven. Finding a crust we like has been very difficult. This one will be used again.