Pão de Queijo (Brazilian Cheese Bread)
Published


Pão de Queijo, or Brazilian cheese bread, is irresistibly soft and pillowy—a delightful treat my kids can’t get enough of! These naturally gluten-free, cheesy puffs are the perfect quick snack, boasting a golden, crisp crust and an airy, light interior that melts in your mouth.

These chewy cheese puffs are made with tapioca flour, which is made from the pulp of cassava root. The starch makes these Brazilian snacks chewy and light. When I found out these were made from cassava and were naturally gluten-free, I knew I had to try them. These Brazilian snacks are like cheesy dough balls but lighter than most bread balls with a golden cheese crust and airy center.
They’re just as easy to make as my Pandebono (Columbian cheese bread) recipe. Both aren’t your typical bread recipe—really more of a batter than a dough. All the ingredients are blended together and placed in a mini muffin tin with only a few minutes of prep time, and the whole recipe takes only 25 minutes.
Pão de Queijo (Brazilian Cheese Bread)

Equipment
- 1 mini muffin tin
Ingredients
- 1 ½ cups tapioca flour
- 2/3 cup milk
- ¼ cup vegetable oil
- ¼ cup sharp cheddar cheese, shredded, packed
- ¼ cup parmesan cheese, freshly grated, packed
- 1 large egg
- ½ teaspoon salt
Instructions
- Preheat oven to 400°F (204°C).
- Spray a mini muffin tin with non-stick cooking spray. Set aside.
- Add all ingredients to a blender then blend just a few seconds (10 to 15 seconds only) until all ingredients are combined. Give the mixture a stir in case any dry ingredients are stuck at the bottom of the blender.
- Pour the batter into the mini muffin tin—each cavity should be about ¾ full to give the cheese bread room to grow while baking. This recipe will make 24 Brazilian cheese breads.
- Bake for 15 minutes then turn the oven off, open the oven door just a crack, and let the cheese bread cool to room temperature slowly. Let the cheese breads sit in the open oven for about 10 minutes before removing from oven. Letting them cool slowly will help prevent the cheese breads from getting crater holes (sinkholes) in the middle.
- Serve warm or cold.
- Store leftovers in a sealed food-safe container at room temperature for up to 3 days. Let them cool completely before storing in a sealed food-safe container.
Notes
- I use vegetable oil because it’s neutral in flavor. You can substitute butter or olive oil. Just be aware the taste will be altered.
- Be careful not to overmix the batter; the ingredients need to be blended until they’re mixed, and that’s it!
- This recipe doesn’t include any leavening agents like baking powder or yeast. Instead, the bread rises thanks to the steam and air pockets formed during baking. To achieve the best rise, ensure your oven is fully preheated and very hot before you begin baking.
- Grate and shred the cheese yourself rather than purchasing pre-shredded cheese. The pre-shredded cheese has a coating on it that prevents it from melting smoothly.
- Check all of your ingredients to ensure they are gluten-free. Don’t forget to read the cross-contamination warnings on packages as well.
- As with any baking recipe, it’s crucial to weigh the flour rather than relying on a measuring cup dipped directly into the flour bag. For this recipe, measure exactly 175 grams of tapioca flour. Scooping flour straight from the bag can cause it to become packed, leading to an excess amount being added and potentially altering the recipe’s texture.
- It’s important to let the cheese bread cool slowly in the oven while the oven door is cracked open. A sudden change of temperature—from the hot oven to the cool countertop—can cause the cheese bread to get sinkholes in the middle. They’re still delicious but not as pretty.
Nutrition
Nutrition information is automatically calculated, so should only be used as an approximation.
How to make Pão de Queijo (Brazilian Cheese Bread) – Step by Step Photos
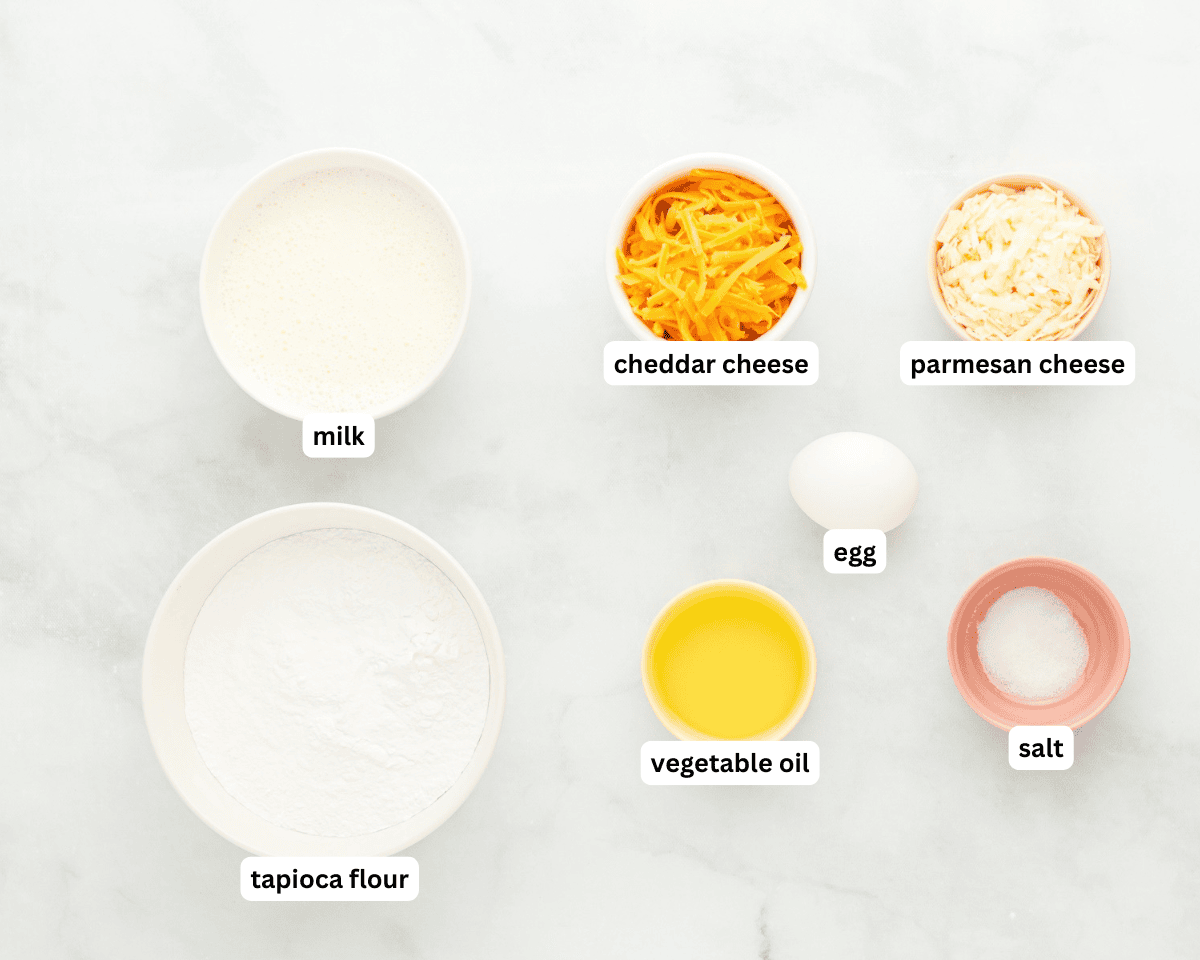
Gather all your ingredients together.

Preheat the oven to 400°F and spray a muffin tin with cooking spray. Grab a blender and add 1 ½ cups tapioca flour, ⅔ cup milk, ¼ vegetable oil, ¼ cup shredded sharp cheddar cheese (packed), ¼ cup freshly grated parmesan cheese (packed), 1 large egg, and ½ tsp salt.

Blend slightly until all the ingredients are combined—about 10-15 seconds only. Make sure no dry ingredients are stuck to the bottom using a spatula.

Pour the batter into the greased muffin tin, filling each muffin tin cavity to about ¾ of the way full.

Put the muffin tin in the preheated oven and bake for 15 minutes. Leaving the cheese bread in the oven, turn it off and open the oven door, just a crack. You want to let the puffs cool to room temperature slowly.

After about 10 minutes, take the muffin tin out of the oven. Serve Pão de Queijo warm or cold, and enjoy!

Serving Suggestions
In Brazil, Pão de Queijo is usually enjoyed warm, straight from the oven, when the crust is crisp, and the inside is soft and gooey. It’s usually found paired with hot chocolate or coffee as a snack or breakfast. My family really enjoys these as a quick snack when we’re running out the door or as a side for tomato soup or gluten-free chili.
Storage Instructions
Store leftovers in an airtight container on the counter for 2 days or in the refrigerator for 1 week.
To revive leftovers, reheat them in an oven or air fryer at 300°F (150°C) for a 5-7 minutes. This restores their crispness and soft texture.


Super yummy and easy to make! I think next time I’m going to add a bit more salt/garlic salt for some extra flavor though.
Question: I’m planning on making these for an event, could I keep them in a crockpot on warm to keep them soft?
Hi Audrey, That should be fine. We recommend using a clean, damp towel on the bottom of the slow cooker. Put the bread on top then cover the top of the slow cooker with a second clean, damp towel.
I was surprised that these weren’t soft and like a popover, but after rereading, I see I made them right. They are so cute and I am pleased that they turned out right. I used 2 kinds of soft cheese (dairy free) since I guess I ate all my parmesan! I think I will make them again with the parmesan, since I’m sure it will be a little more flavorful. This is an easy recipe to follow and is a fun way to get my bread requirements into the day.